Reports Tab
This tab contains various standard reports designed to help manage your business.
In this section, we provide you with detailed instructions on how to run each report listed.
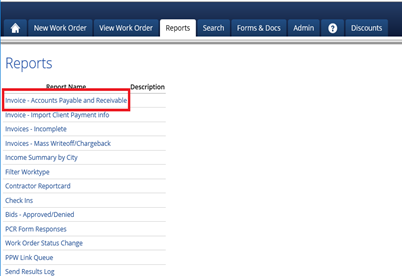
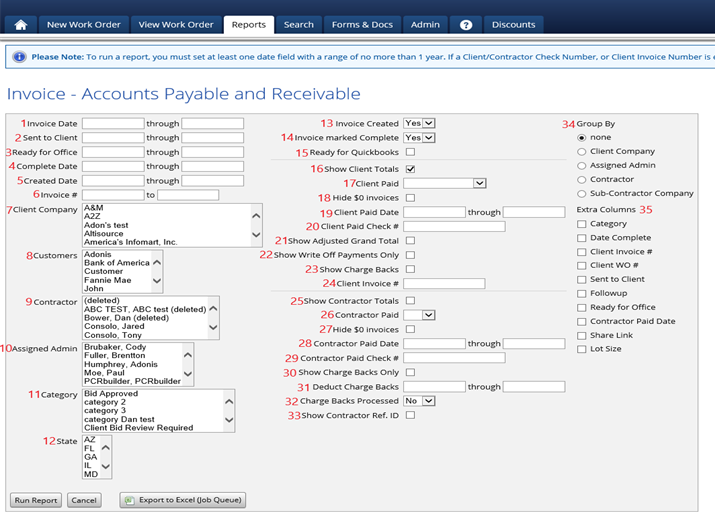
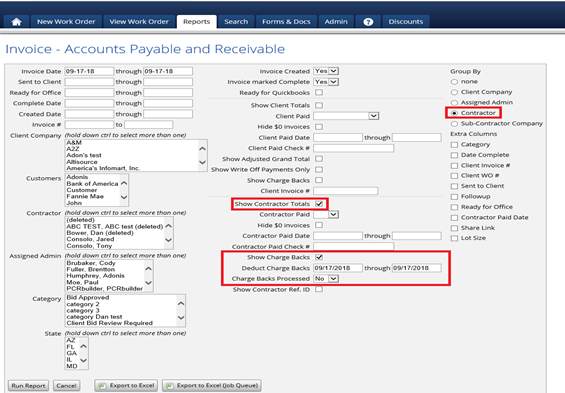
Invoice - Accounts Payable and Receivable
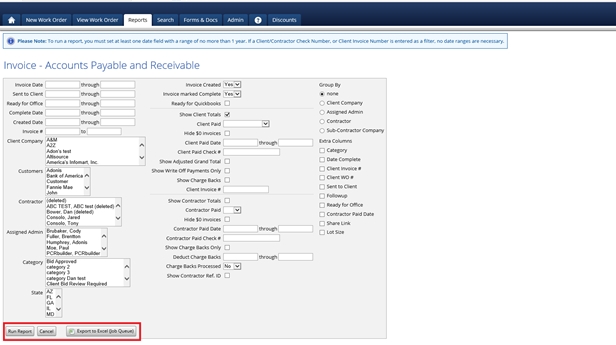
The Accounts Payable and Receivable report is one of the most often accessed reports in PPW.
It is convenient to run this report by date ranges of the following items:
1. Invoice Date
2. Sent to Client
3. Ready for Office
4. Complete Date
5. Create Date
6. Invoice Number
Move the cursor to one of the text boxes next to the area to be accessed and left click on the text box a calendar will appear. Search for the appropriate date, left click on the date, and it will be transferred to the search box. To search a specific range of dates, enter the beginning and ending date.
The data shown in the report can also be filtered by:
7. Client Companies
8. Customers (the Client Companies Customers)
9. Contractors
10. Assigned Admin (who was the processor of the WO)
11. Category (if used)
12. State
If the report is run without selecting a specific Client Company, etc. The default is for all of the available options under Client Companies, Customers, etc. to be included in the report. The Admin can highlight one or more of the options in each box by pressing CTRL and selecting the clients to be included in the report.
Other options on this report include:
13. Invoice Created: This option defaults to ‘Yes’ and if this option is set to ‘Yes’ then the report that is ran will only show orders where an Invoice was created. If it is set to ‘No’ then it will only show orders that do not have an invoice. If it is set to the blank option, then it will show all orders that match the other search criteria whether or not an invoice was created.
14. Invoice marked Complete: This option defaults to ‘Yes’. If this option is set to ‘Yes’ then the report that is ran will only show orders where the Invoice was marked as complete. If it is set to ‘No’, then it will only show orders that do not have the option Invoice Complete marked. If it is set to the blank option, then it will show all orders that match the other search criteria whether or not an Invoice Complete is checked.
15. Ready for QuickBooks: The default for this option is unchecked. If it is checked, then it will only show orders where the option ‘Ready for QuickBooks’ is checked, if it is unchecked then it will show orders where Ready for QuickBooks is not checked.
16. Show Client Totals: This option is checked by default, and if checked, when running the report, the resulting report will show the client totals on the report, if not checked then the resulting report will not display the client totals. The columns that this option effect are: Client Total, Client Discount %, Client Discount Total, Client Paid Date, Write Off Amount and Sent to Client
17. Client Paid: This option defaults to blank which will show all orders no matter if the client’s invoice has a payment on it or not. The following options are available in this drop down:
○ Yes: This option will only show orders where the client has paid you the full amount that you have invoiced them.
○ No: This will show orders where the client has either not paid at all for the order or if they have only paid an amount of the total invoiced amount.
○ Full and Partially: This will show orders where the client has either not paid at all for the order or if they have only paid an amount of the total invoiced amount ○ Partially Only: This will only show orders where a partial amount of the invoice has been paid.
18. Hide $0 invoices: If this option is checked, the report will not display any orders where the clients invoiced amount is $0.
19. Client Paid Date: If a date range is entered here the resulting report will only display orders that have a client payment entered with a payment date that is in between the 2 dates entered.
20. Client Paid Check #: If client checks or remittance numbers are entered when received they may be searched and pulled up with this report. When entering remittances, the check numbers are used.
21. Show Adjusted Grand Total: If you would like the Adjusted Grand Total to be displayed, check this box.
22. Show Write Off Payments Only: If this option is checked, and if the client underpays the invoice and Admin chooses to write it off on the invoice, then those write offs would be displayed.
23. Show Charge Backs: This option is used when running a chargeback report for the client, if this option is checked then it will show chargebacks.
24. Client Invoice #: If a client Invoice number is entered on the invoice, you can run a report for that specific client invoice number here.
25. Show Contractor Totals: This option is checked by default, and if checked, when running the report, the resulting report will show the contractors totals on the report, if not checked then the resulting report will not display the contractors totals. The columns that this option effects are: Contractor Discount%, Contractor Total, and Contractor Paid Amount.
26. Contractor Paid: This option defaults to blank which will show all orders no matter if the contractor’s invoice has a payment on it or not. The following options are available in this drop down:
○ Yes: This option will only show orders where the contractor has been paid the full amount that they have invoiced for.
○ No: This will show orders where the contractor has either not been paid at all for the order or if a partial payment has been made towards the total invoiced amount.
27. Hide $0 invoices: If this option is checked, the report will not display any orders where the contractors invoiced amount is $0.
28. Contractor Paid Date: If a date range is entered here the resulting report will only display orders that have a contractor payment entered with a payment date that is in between the 2 dates entered.
29. Contractor Paid Check #: If a check number has been entered when entering a contractor payment, then this field may be used to search for orders with this check number.
30. Show Charge Backs: Please see below for the proper procedure to enter a chargeback.
31. Deduct Charge Backs: Please see below for the proper procedure to enter a chargeback.
32. Chargebacks Processed: Please see below for the proper procedure to enter a chargeback.
33. Show Contractor Ref. ID: If a contractor Reference ID is entered on the invoice and this option is checked, the Reference ID will be displayed.
34. Group By Options: When running a report, if you want the results to be grouped differently than the default option, then you can group the resulting report by the following options:
○ Client Company: If running a report for multiple client companies at once, you can check this option and the results of the report will be grouped by client company.
○ Assigned Admin: If running a report that includes multiple Assigned Admins at once, you can check this option and the results of the report will be grouped by the Assigned Admin.
○ Contractor: If running a report that includes multiple Contractors at once, you can check this option and the results of the report will be grouped by the Contractor.
○ Sub-Contractor Company: If you use Sub-Contractor Companies to further assign orders, then when running a report that includes multiple Sub-Contractor Companies at once, you can check this option and the results of the report will be grouped by the Sub-Contractor Company.
35. Extra Columns: These are columns that can be displayed when running a report, these are not shown by default, but if you would like the information to be displayed, simply click the check box next to each option you would like displayed. These options include: Category, Date Complete, Client Invoice #, Client WO #, Sent to Client, Follow up, Ready for Office, Contractor Paid Date, Share Link, and Lot Size.
Report Buttons
Run Report: This button will allow you to run the report and will then display the orders that match the criteria that you entered above.
Cancel: This will set all of the options back to their default setting.
Export to Excel (Job Queue): This will create an excel version of the spreadsheet, however, it will be added you your job queue and you will need to go to the job Queue to download the spreadsheet.
The Following Buttons will only appear after clicking the ‘Run Report’ Button:
Export To Excel: After clicking the ‘Run Report’ button, this button will appear and it will allow you to download the report you ran into an excel spreadsheet.
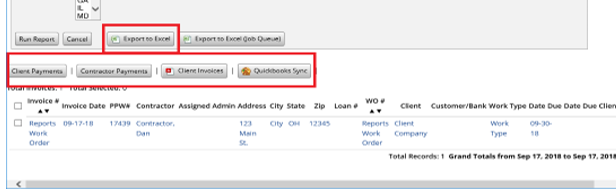
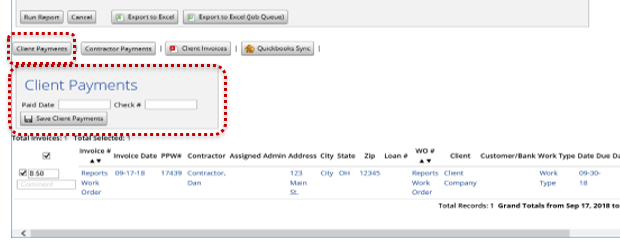
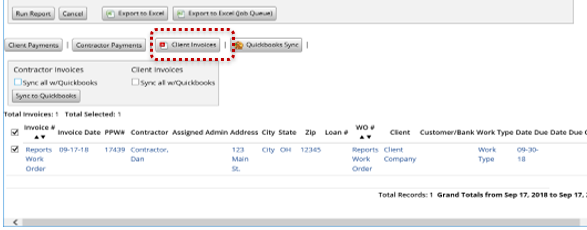
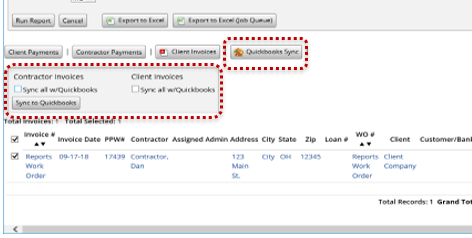
Client Payments: This button will allow you to enter Client Payments in mass. To use this, click the button, enter a paid date and a check number (if applicable) and then click on the check boxes next to the orders that you want to mark as paid. After the checkbox is clicked, the remaining balance of the invoice will appear, and, if needed, you can change the amount in this text box.
Once you have checked all of the work orders and verified the payment amount, click ‘Save Client Payments’ and those payments will be entered.
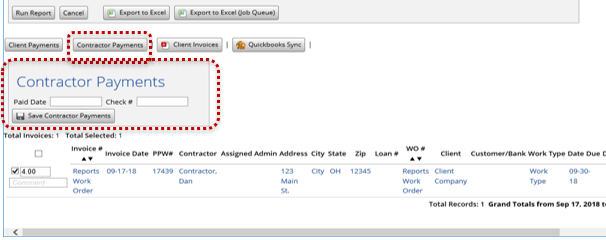
Contractor Payments: This button will allow you to enter Contractor payments in in mass. To use this, click the button, enter a paid date and a check number (if applicable) and then click on the check boxes next to the orders that you want to mark as paid. After the checkbox is clicked, the remaining balance of the invoice will appear, and, if needed, you can change the amount in this text box.
Once you have checked all of the work orders and verified the payment amount, click ‘Save Contractor Payments’ and those payments will be entered.
Client Invoices: This button allows you to download PDF versions of the clients invoice for all of the work orders displayed.
QuickBooks Sync: This will allow you to sync these invoices to QuickBooks. The following options will allow you to: Sync all Contractor invoices w/QuickBooks or Sync all Client invoices w/QuickBooks, or you can choose which orders to sync to QuickBooks using the check boxes next to each order.
How To Process Chargebacks
Chargeback reports must be run separately from the Accounts Payable and Receivable report. Chargebacks are designed to work after you have already paid the contractor. If you have not paid the contractor use the Invoice Adjustment feature.
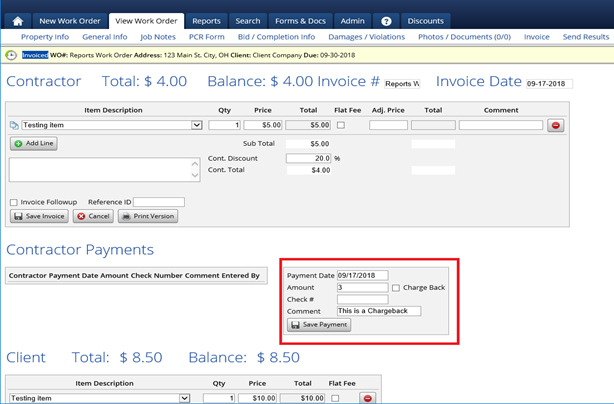
When in the invoice of the order, here is what to enter:
Payment Date: This is a reference date. Enter the pay date you will be deducting the money.
Amount: Enter a positive amount for the chargeback.
Chargeback: Check this box.
Check: Normally left blank.
Comments: Describe the reason for the chargeback.
Save Payment: Click this to save the chargeback. The screen will now show this:
When you wish to Run a chargeback report, please follow these directions:
Check Group By Contractor.
Check Show Contractor Totals.
Check Show Chargebacks Only.
Enter the date(s) you want to run for chargebacks. This date reflects when you entered the chargeback not the pay date.
If you want to run a report on chargebacks that have not been deducted, Select “No” in the Chargebacks Processed drop down. If you want to review previous Chargebacks Select “Yes”.
Click the 'Run Report' button.
Select Contractor Payment to process the Chargeback. Enter a “Pay Date” and select the Charge Backs you want to process. 'Save' Payment.
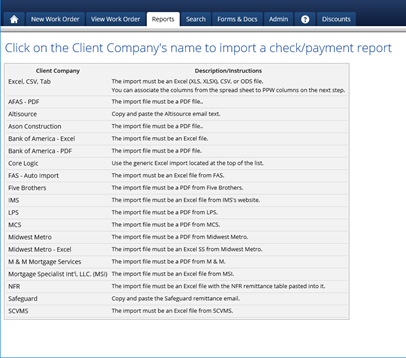
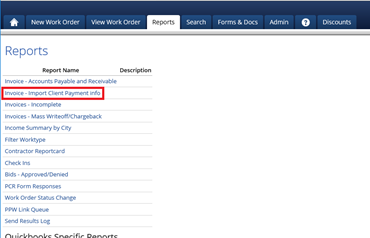
Invoice - Import Client Payment Info
This report is normally run before generating the Invoice-Accounts Payable and Receivable report. Left clicking on the report displays a list of clients, which PPW is set up to auto- import.
The way Admin auto-imports depends on the Client’s preferences. To import Altisource and Safeguard payments, copy and paste the remittance email into the Check Data dialog box, which will display after left clicking on the client. Select the Client Company by scrolling and highlighting the appropriate client, and then left click on Process or Cancel.
Other clients may have you import an Excel or PDF file. If those are the requirements, the user will be asked to Select File in place of the Check Data dialog box.
In order to process payments from clients who are not listed but transmit the information electronically:
1. Open an Excel Spreadsheet
2. Label column A “Work Order Number” for work order
3. Label Column B “Payment Amount”.
4. Enter the appropriate information from the client in this file and then Save the file.
To import:
1. Select Excel, CSV, Tab from the client list.
2. Choose the file.
3. Enter the Check # and Check Date, Client Company.
4. Then click Process. This will import the data into the system, and it will not have to be completed manually. If needed, here is a link to a video that walks you through this process: https://vimeo.com/133355531
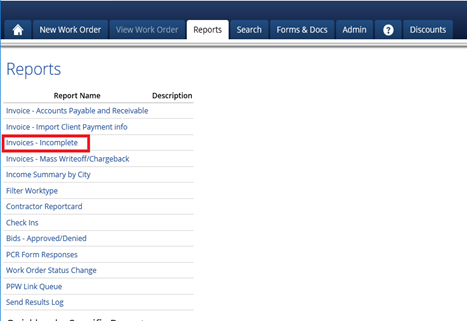
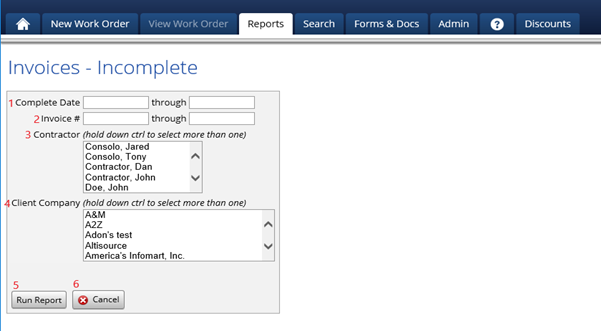
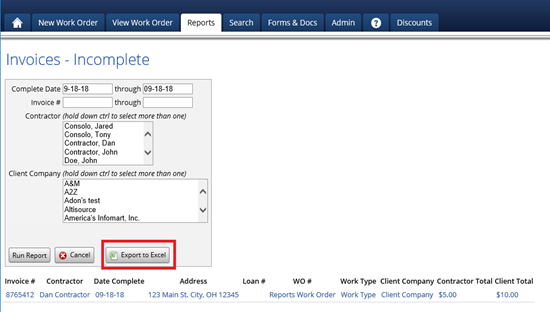
Invoices - Incomplete
This report provides a list of invoices which may have been overlooked and not marked Complete.
When running this report, there are a few different options that will allow you to filter the results. You can use the following fields to run the report:
Complete Date
Invoice Number
By Contractor
By Client Company
After clicking the ’Run Report’ Button, the resulting report will show orders where the invoice has not yet been marked as complete.
The 'Cancel' Button will clear out any data that you have entered and also un-select any contractors/clients that you have selected.
The ‘Export to Excel’ Button appears once the report is generated and will export the results of the report to a MS Excel spreadsheet.
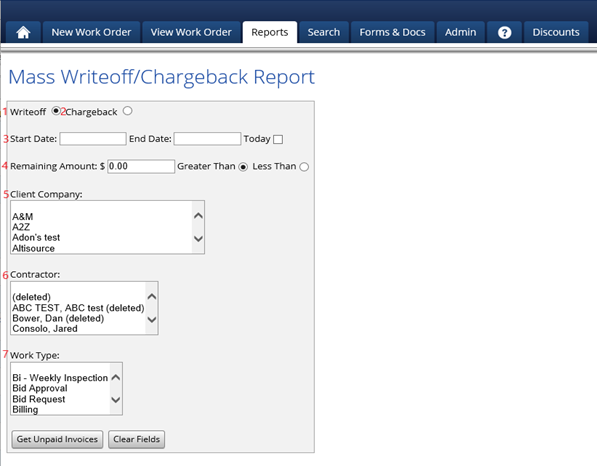
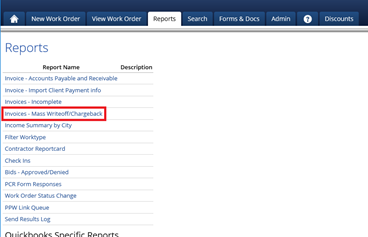
Invoices - Mass Write-off/Chargeback
The Mass Write-off/Chargeback report will allow for multiple write-offs or chargebacks to be entered into the system for the client invoices in mass.
When running this report, the first thing that you will need to do is to choose whether you are going to be entering:
Write-off or
Chargeback
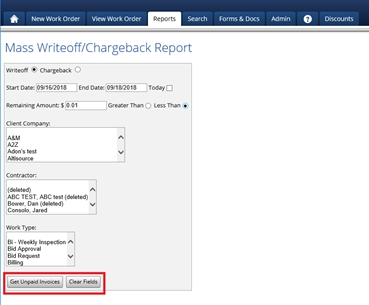
Next, a date range will need to be entered into the Start Date and End Date field, this date range is referring to the invoice date of the work order.
The Remaining Amount $ and Greater than or less than buttons are used together to determine how much of the invoice you want to Write-off or Chargeback. For example, if you wanted to write-off any invoices that had $0.01 left, you would put ‘0.01’ into the ‘Remaining Amount’ text box and then choose ‘Less Than.’ Now, when you run the report, it will only show orders that have a client invoice of $0.01 or less.
Client Company
Contractor
Work Type
After all of the filters have been set, click the ‘Get Unpaid Invoices’ button and the orders with invoices that match your filters will be displayed.
Alternatively, if you wish to clear the filters/dates you entered, simply click the ‘Clear Fields’ button and the report will be reset.
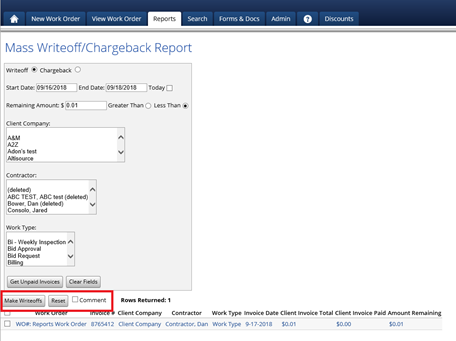
Write-Off
If Write-off was selected, you will see another button that says, ‘Make Write-offs’ and ‘Reset.’ The ‘Reset’ button will allow you to Reset the filters and clear any results on the screen. The ‘Comment’ checkbox will allow you to enter a comment to be entered when entering the write-offs. Note that the comment must be entered before the ‘Make Write-offs’ button is clicked.
Once everything is set as required, you will select which work orders you want to write-off by clicking the checkbox next to each order or clicking the checkbox at the very top which will select all of the orders. After the orders are selected, you will click the ‘Make Write-offs’ button and the ‘Amount Remaining’ listed in the far-right hand column will now be written off.
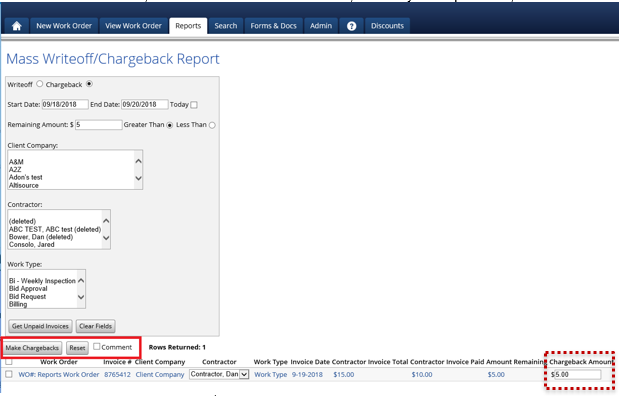
Chargeback
If you wish to run the Chargeback report you will do the same as above, however, the chargeback report is for contractor chargebacks and not client chargebacks.
In the next screenshot, the contractor invoiced for $15, and they were paid $10, but we are issuing a chargeback for $5.
We have the report ran, and you can see that we still have an option to enter a comment and in the far-right hand column we can enter how much we are charging back, the system will enter a default amount of the Amount Remaining, so you do not have to enter the amount for each order.
Once everything looks good, we will click the ‘Make Chargebacks’ button and a chargeback of $5.00 will be entered on this work order.
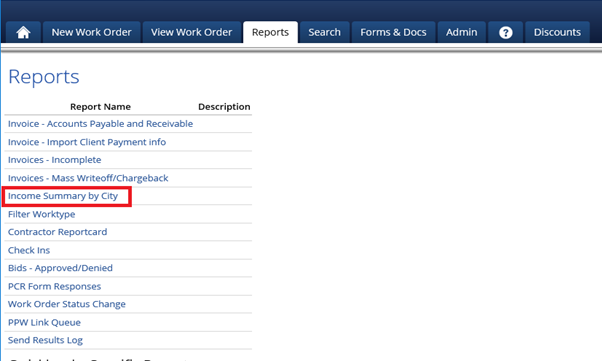
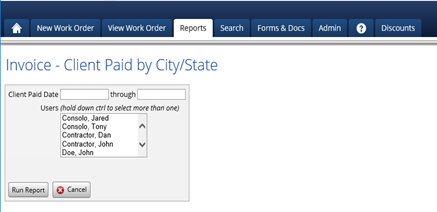
Income Summary by City
To run this report, enter your Client Paid Date or range, select Contractors and the report will list all of the amounts paid to contractors and list them by city and state.
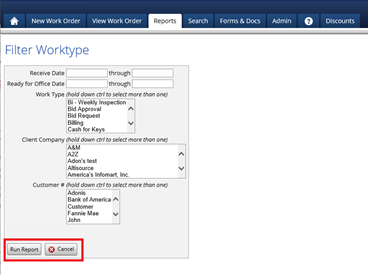
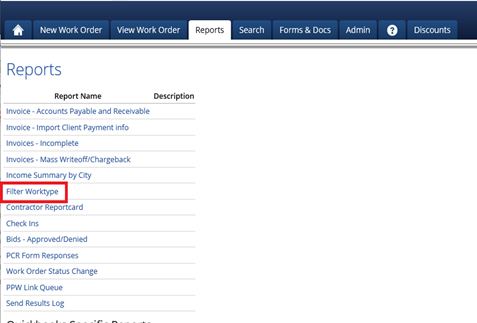
Filter Worktype
The Filter Worktype report is a management tool to help the Admin understand the concentration and intricacies impacting their business.
This report can be run by:
Received Date
Ready for Office Date
Work Type
Client Company
Customer
When running this report, there are a 2 different date options that can be used, the Receive Date of the order (the Receive Date can be found on the General Info page of the work order), and the date the order was marked Ready for Office.
The results can be further filtered down based on the Work Type of the order, the Client Company and the Customer.
Also, if you would like to run this report with multiple work types, client companies, or contractors at one time, you can hold the ‘CTRL’ button down and select multiple options.
Clicking the ‘Run Report’ button will run the report, and the ‘Cancel’ button will clear any date ranges or any other filter options that you have selected.
Once the report has been generated, you can export this report to MS Excel by clicking the ‘Export to Excel’ link at the top of the page.
The report information displayed includes:
Receive Date
Ready for Office
Complete Date
Address
Loan number
Work Order number
Client Company
Customer
Work Type
Contractor
Client Paid Amount
If you want to view the work order, you can click on blue link on any of the fields and it will take you straight to the General Info page of the order.
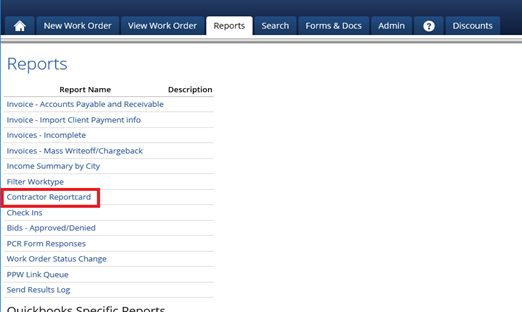
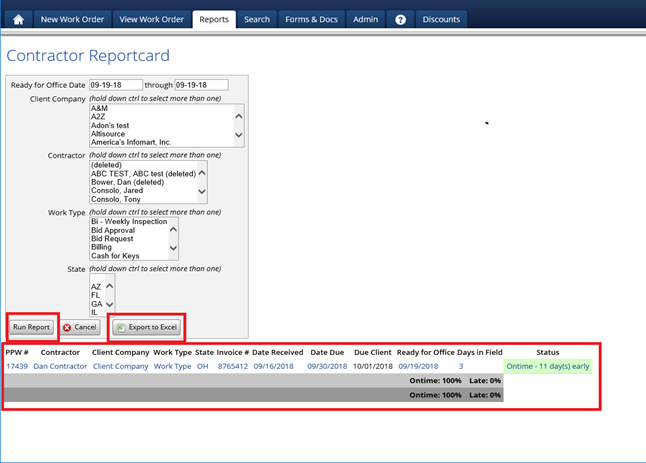
Contractor Reportcard
To run this report, select:
Ready for Office Date or date range
Client Company
Contractor
Work Type or leave it blank for an overall report
State
Click the 'Run Report' button.
When ‘Run Report’ is selected, it will display selected contractors and their On-Time submissions versus their Late submissions. The number of days late or early will also be incorporated into the report.
Once the report generates, you will be able to export to MS Excel by clicking the 'Export to Excel' button.
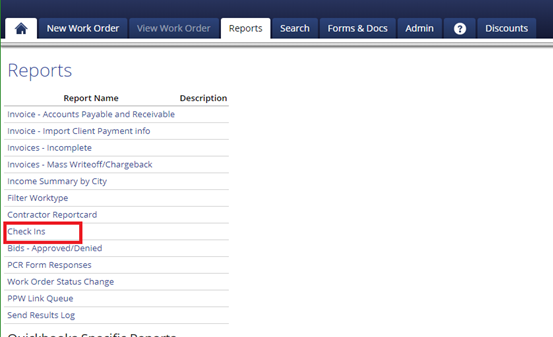
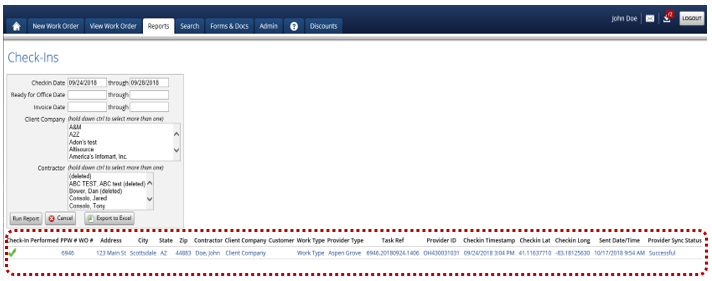
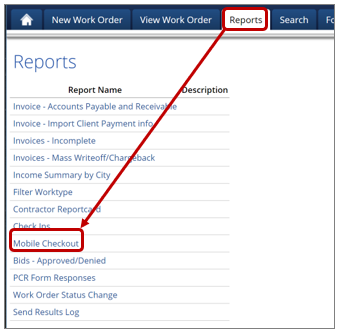
Check-Ins
This report will allow you to run reports based on the contractor's check ins and will show you information about each one.
This report can be run using the following criteria:
Check-in Date
Ready for Office Date
Invoiced Date
By Client Company
By Contractor
After you click the ‘Run Report’ button, you will see the following columns:
● Check-In Performed
● PPW number
● WO Number
● Address, City, State and Zip Code
● Contractor
● Client Company
● Customer
● Work Type
● Provider Type (which is the type of check-in that as performed)
● Task Reference Number (if applicable)
● Provider ID (generally the ABC number of the user who performed the check-in)
● Date and Time the check in was performed
● Latitude and Longitude the user was at when they checked in
● Date the check-in was sent to the client
● Status of the check-in
If there is an error with sending the check-in, it will show here and on the general info page of a work order.
Lastly, this report can be exported to MS Excel if needed by clicking the 'Export to Excel' button.
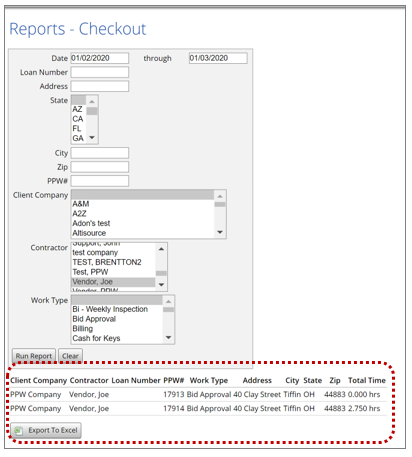
Check Out
You have the ability to run a report to more effectively review the Checkout data, if enabled in your system.
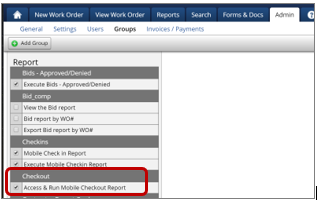
Group Permissions
In order to utilize this report, the following permission must be enabled:
Access & Run Check-in/Check-out Report – this will allow the group to run the new report.
Building The Report
The user would utilize the following criteria to run the report:
Date Range – both a starting and ending date are required. Limited to a 30-day period.
Loan Number – be able to enter a specific loan number and get all total time for each work order.
Address, City, State, Zip – Would need a box to enter each.
PPW # – be able to enter a specific order number and get all data for that order only.
Client Company – choose a specific client company, from a dropdown list of all client companies, to display all work order total time.
Contractor – choose a specific contractor, from a dropdown list of all contractors, to display all work order total time data for orders they completed.
Work Type – choose a specific work type, from a dropdown of all available work types, to display total time for each work order of that type.
PLEASE NOTE: All variations of this report will be limited to a 30-day date range.
Report Contents
Once the appropriate criteria have been selected and the “Run Report” button clicked, it will display on the screen AND have a button to allow for Export to MS Excel.
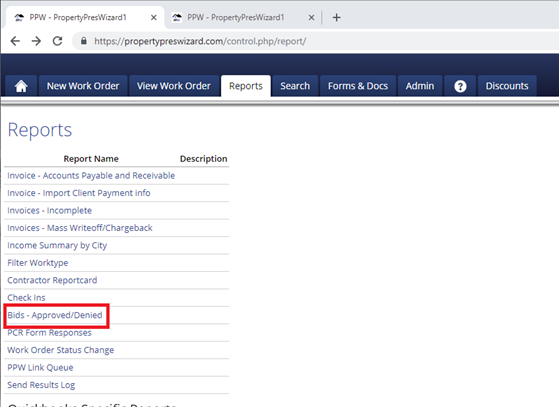
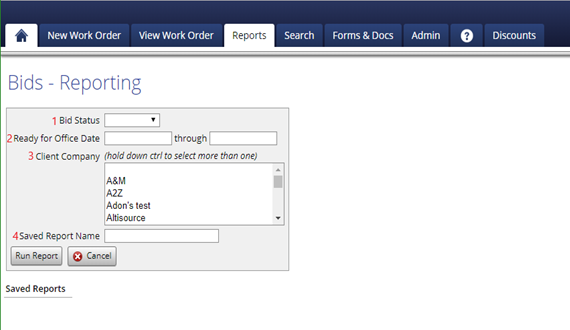
Bids - Approved/Denied
This report will allow you to run a report based on the whether or not the bids on a certain work order have been approved or denied.
When running this report:
Select a Bid Status.
Enter a Ready for Office Date date range The date range cannot exceed 30 days.
You can also narrow down your search results by selecting a Client Company.
You can save this report so that you can easily run it later. To save the report, simply type the name you would like to save it as in the Save Report Name.
Click ‘Run Report’ and the next time you come back to this page, you can simply click on the report name to re-run it.
When running this report, you can use the Bid Status to search for all bids by leaving the field blank, bids that have no status by selecting 'No Status' or you can see all Approved or Denied bids by selecting 'Approved' or 'Denied'' respectively.
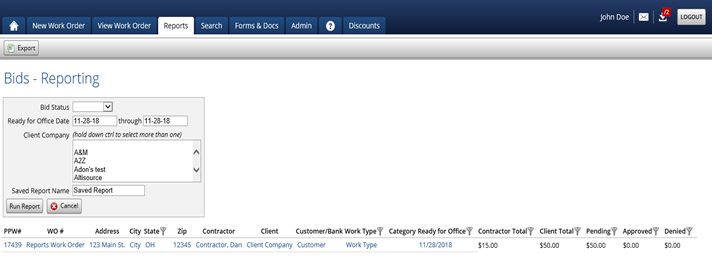
After clicking the ‘Run Report’ button you will then see the following:
● PPW number
● WO Number
● Address, City State & Zip Code
● Contractor
● Client Company
● Customer
● Work Type
● Category
● Ready for Office Date
● Contractor Bids Total
● Client Bids Total
● Total dollar amounts of all bids that have not been Approved or Denied
● Approved bids amount for Contractor
● Approved bids amount from Client
● Denied bids total for Contractor
● Denied bids total from Client
You can also column-sort the results by the following options:
● State
● Work Type
● Ready for Office Date
● Contractor or Client total
● Pending, Approved, or Denied
Lastly, you can export this report to MS Excel by clicking the 'Export' button on the top of the page.
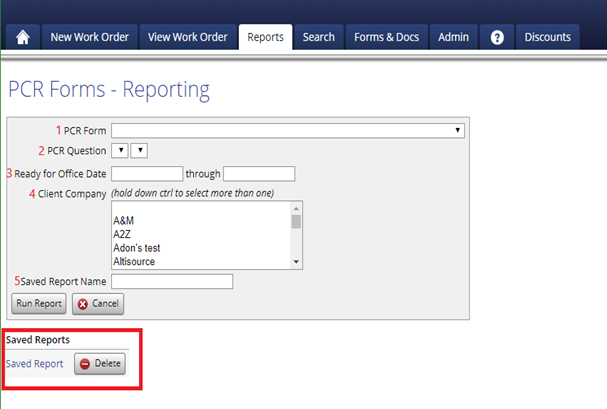
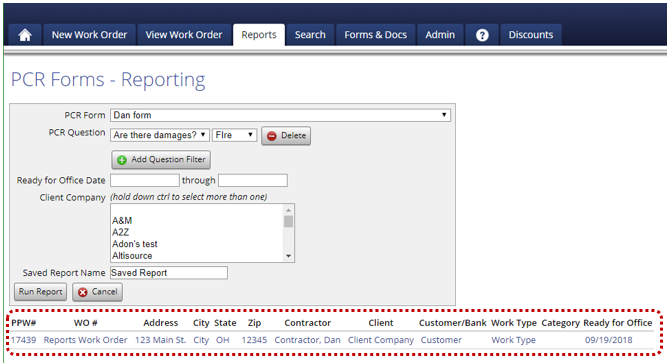
PCR Form Responses
This report will allow you to run a report based on an answer to a specific question on a certain PCR form.
When running this report, you will need to:
Select from the PCR Form drop down list.
Select 1 or more questions by choosing a question in the PCR Question field.
You can also run this report based on the Ready for Office Date of an order, but this is optional.
You also can filter the results down by choosing a Client Company.
If you wish to save this report, type in a name of the report in the Saved Report Name field.
If you have previously saved a report and wish to run it again you can click on the name of the saved report and that report will automatically run.
After you have run the report you will be able to see the work orders that meet the criteria. The information that is shown is the following:
● PPW Number
● WO Number
● Address, City, State and Zip
● Contractor
● Client
● Customer
● Work Type
● Category (if applicable) Ready for Office Date
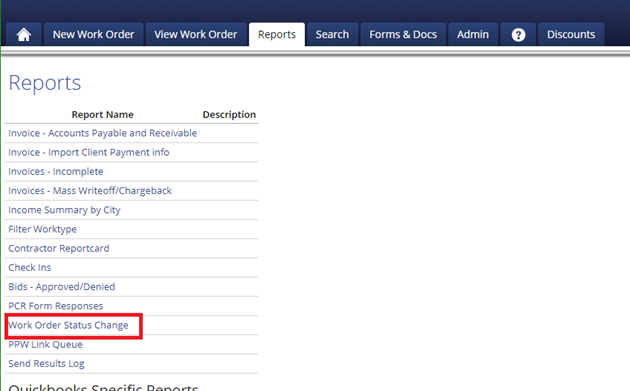
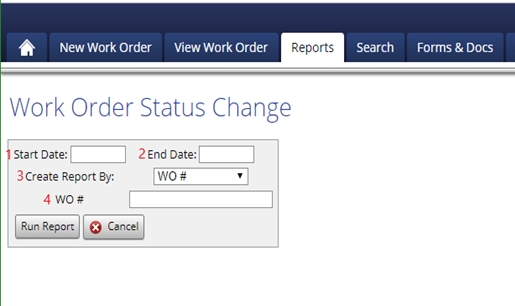
Work Order Status Change
This report will allow to see the status change history of work orders. You will be able to see what time/date an order was moved from one status to another and which user caused the order to change statuses.
When running this report, you will enter/select the following:
1. Start Date
2. End Date - must not exceed a 30-day period
3. Create Report By:
WO Number
PW Number
Client
Customer
Contractor
Work Type
Category
4. Choose an option from a drop down or type in a Work order or PPW number.
After clicking the ‘Run Report’ button, you will see:
· Work Order #
· Status
· Changed By
· Date of Change
So, in the screenshot below, the order was in the 'Unread' status, but Dan Support changed it on September 17th, 2018 at 10:51 am to the status of Ready for Office. Next, you can see the order was moved to the Invoiced status by Dan Support on September 17th, 2018 at 10:53am.
Once the report has run, you can export it to CSV or Excel but clicking on the respective button.
Send Results Log
This report will show you the results of when you use the Send Results feature of PPW.
You will choose the date that you want to run the report based on the date the results were sent and then clicking on the 'Get Report' button.
The resulting report will show you the Work Order Number, the Status of the order, who queued the order, the date it was queued and when it was synced.
Last updated