Invoice
The invoice tab of PPW is where contractors can enter their invoice and you can invoice your clients.
The items that show in both the contractor’s and client invoices are pulled from the Bid/Comp & Invoice items section of the Admin tab.
Contractor Invoice
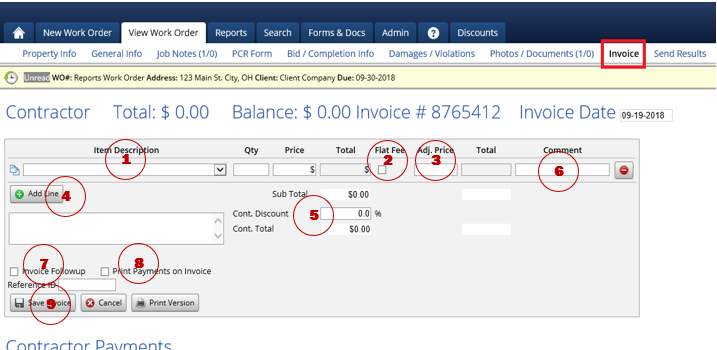
To select an item for the contractor invoice, simply click on the dropdown menu and select the appropriate item and enter a quantity. The price will automatically fill in.
The Flat Fee option will enter the item as a flat fee, meaning that it will ignore any discounts present.
The Adj. price will allow you enter an adjusted price which will override the Total. The comment field will allow you to enter any comments if needed.
If you need to add multiple invoice items to the invoice simply click the ‘Add Line’ button.
a. If you need to enter a custom or one-time use invoice item, simply click the dropdown menu and select ‘*Other’. After doing this you will be able to type in an invoice name and you will also need to enter a Qty. and price.
Once your items have been entered you will see a preview of the Subtotal along with the total after any discounts are applied.
There is also a location for comments/notes as well.
You can mark the Invoice as follow up, meaning that a correction is needed by the contractor.
Also, there is an option to print the payments when printing the contractor version of the invoice.
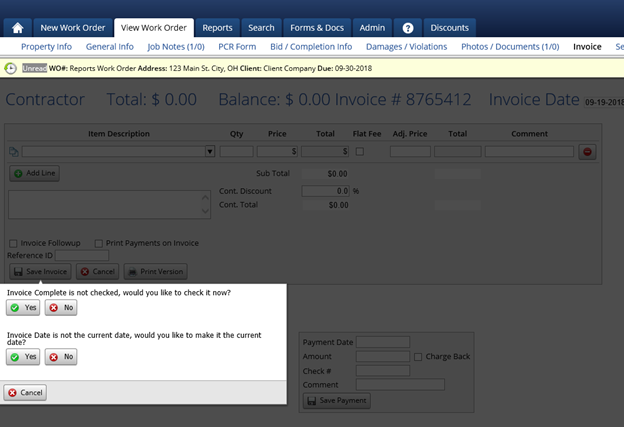
To Save the Invoice Click the ‘Save Invoice’ button and when you Save the contractor’s invoice you may be asked the following questions:
Invoice Complete is not checked, would you like to check it now?
If you say YES, the order will move to the invoiced status If you say NO, the order will stay in the current status
Invoice Date is not the current date, would you like to make it the current date?
If you say YES, the invoice date will change to today's date. If you say NO the invoice date will not change.
Contractor Payments
To enter a contractor payment all you will need to do is enter a Payment Date and an Amount.
Also, if applicable, you can enter a Check # and a comment.
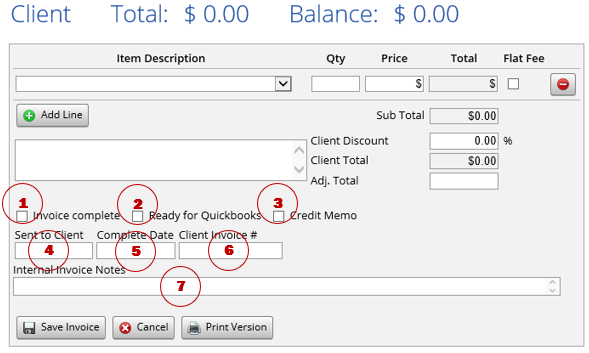
Client Invoice
You will want to follow the same steps as you did for the Contractors invoice with the following additional options:
Invoice Complete - This allows for marking the invoice of the order complete & moving it to the invoice status. You will also be prompted to mark this when you click ‘Save’.
Ready for QuickBooks - This will allow you to mark the order as Ready For QuickBooks. (for more info see the QuickBooks portion of the manual)
Credit Memo - This will allow you enter a credit memo on this order.
Sent to Client - This is the date that you sent the order to the client.
Complete Date - This is the date the order was marked as complete.
Client Invoice # - This is the client Invoice #.
Internal Invoice Notes - This is a place for any internal notes about the invoice.
Last updated