Thank you for referencing the Mobile App Manual. Should you not find your answer here, please reach out to our Support Team.
Loading...
Loading...
Loading...
Loading...
Loading...
Loading...
Loading...
Loading...
Loading...
Loading...
Loading...
Loading...
Loading...
Loading...
Loading...
Loading...
Loading...
Loading...
Loading...
A brief explanation of how to install the PPW mobile app.
The mobile app for Android is installed using the Google Play Store.
Searching for PPW or PPW Mobile returns the PPW app. Alternatively, on your mobile device, navigate to www.propertypreswizard.com, tap 'System Login' in the top right toolbar. Under 'PPW Mobile App', tap the Google Play Store icon. This takes you directly to the PPW app in the Google Play Store. Install the PPW app.
The mobile app for iOS is installed using the Apple App Store.
Searching for PPW or PPW Mobile returns the PPW app. Alternatively, on your mobile device, navigate to www.propertypreswizard.com tap 'System Login' in the top right toolbar. Under 'PPW Mobile App', tap the Apple App Store icon. This takes you directly to the PPW app in the Apple App Store. Install the PPW app.
The PPW mobile app supports the Android and iOS mobile platforms. Effort is made to support the most used version for each platform, along with the latest releases.
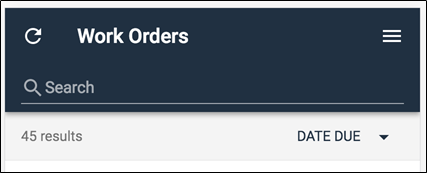
The mobile app Home screen lists all orders in your queue.
Using options at the top of the Home screen, you can perform these actions:
● Tap Refresh to connect to the PPW servers and get all work orders, job notes, and PCR forms.
● Tap the screen name, Work Orders, to scroll to the top of the screen.
● Tap the Settings icon to change some app settings, switch users, or log out.
● Tap Profile to see your user information.
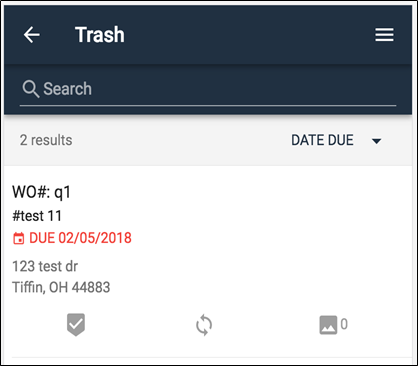
● Tap Trash to see a screen with all work orders that have been deleted or removed from your queue.
● Use the Filter field to find orders containing specific text. You can filter by address, city, check-in type, work type, and more.
● Use the Sort option to change the order of records displayed. This option is set to Date Due by default. Tap the button to change the sort field. Tap the button again and choose the same field to sort by ascending or descending order.
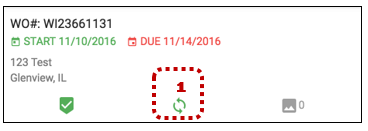
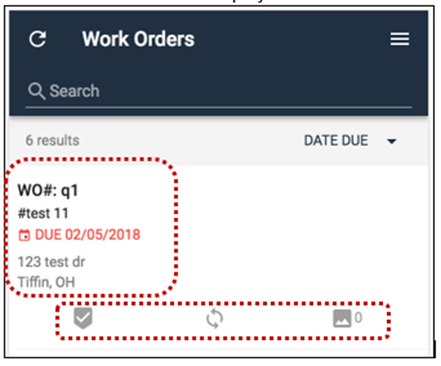
Work orders listed on the Home screen include this information:
● Due date
● Start date
● Work order number or PPW number
● Address
● Work type
● Mobile check in
● Sync status
● Photo counts
Some information is not displayed if it is not available or does not pertain to the work order.
NOTE: If a work order start date is greater than the current date, the order cannot be worked on. You cannot check in, take photos, complete forms, or sync data.
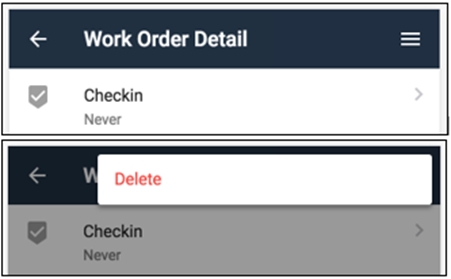
An explanation of how Trash works.
Work orders can be placed into the trash in these ways:
By tapping the menu icon in the upper right on the Work Order Detail screen and then tapping on the Delete option.
Work orders can also be automatically placed into the trash when they are removed from your queue on the server. Orders marked Ready for Office, Invoiced, Complete, Canceled, or Unassigned are removed from your queue. Based on the mobile app settings for the work order cleanup, work orders that are auto removed from your queue are either removed from the app or placed on the Trash screen.
After a work order has been sent to the trash, you have these options on the Trash screen:
To restore a work order, tap and hold the order until a menu is displayed allowing you to bring it back. Also, if you open the work order from the trash, you can use the same button used to manually trash the order to restore it.
To restore a work order from the trash, tap and hold on the order.
To restore all work orders in the trash, tap the menu icon in the upper right and tap on 'Restore All'.
To permanently delete all work orders from the trash, tap the menu icon in the upper right and then tap on 'Empty Trash'. This removes the orders and associated information from the mobile app.
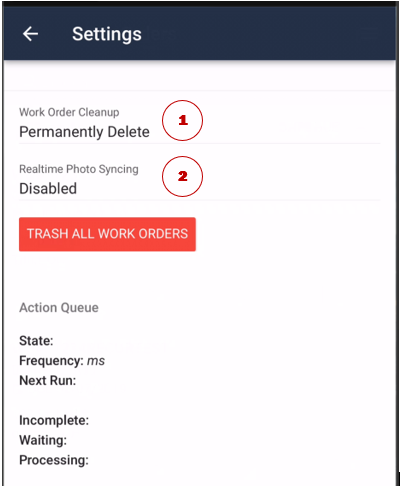
The following settings are on a per-user basis. If the app has multiple logins, each one has its own settings.
This setting determines what happens to work orders that have been removed from your queue. Cleanup options are Send to Trash and Permanently Delete.
● Send to Trash moves the orders to the Trash screen. The orders stay in the trash until you manually empty the trash.
● Permanently Delete deletes the orders from the app and the device.
Note: If any data or photos have not been synced, the order is always moved to the Trash screen. This prevents data from being accidentally deleted.
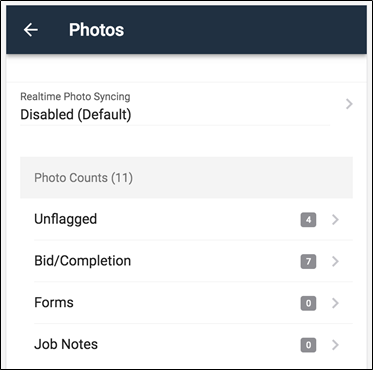
The real-time photo syncing setting has three options: Disabled, WiFi Only, and Always.
● Disabled is the default option.
● WiFi Only auto syncs photos only if the device is on wifi.
● Always auto syncs photos if there is a cellular or wifi connection.
Note: Syncing photos over a cellular connection uses your device's data plan, and charges from your carrier may apply. Choose the option that makes the most sense based on your data plan and connection.
Real-time photo syncing sends only the photos. Photos flagged for Bid/Comp, PCR Forms, or Job Notes are synced but are not flagged until the full order is synced. Photos are uncategorized for Bid/Comp items until the full sync is done. Job Notes photos do not appear until the job notes have been synced.
Real-time sync does not automatically try to re-sync photos. If real-time sync is enabled, but a data connection is not available, photos must be manually synced.
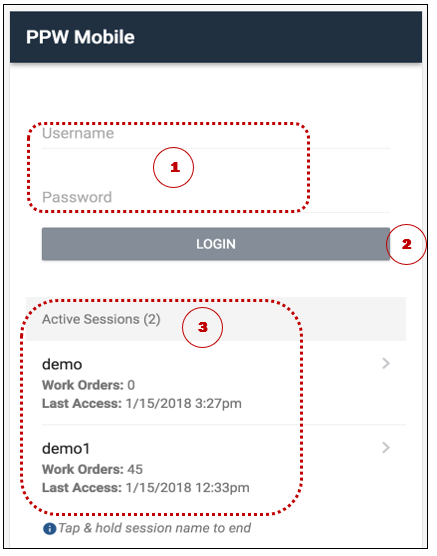
To login to the app...
Enter your PPW Username and Password into the login fields.
Tap the ‘Login’ button. Sessions for logged in users are cached.
To log in again, tap your user name in the Active Sessions list.
You can log in to active sessions for 24 hours without requiring a connection to the PPW servers. This allows the app to work offline for 24 hours. After 24 hours without connecting to the PPW servers, the account can log in as long as the device is online, and internet is available.
You can delete active sessions by tapping and holding the Username in the Active Sessions list. Tap ‘Yes’ when prompted to confirm.
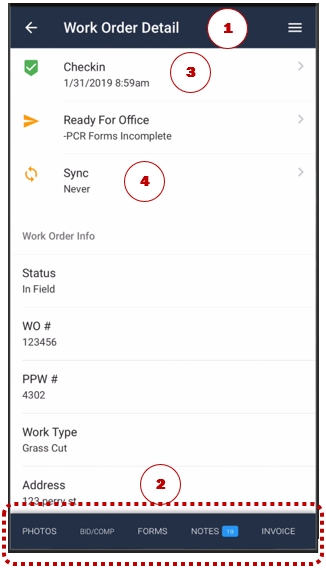
Tapping a work order row on the Home screen loads the Work Order Detail screen for the selected order.
Using options at the bottom of the Work Order Detail screen, you can perform these actions:
Tap the screen name, Work Order Detail, to scroll to the top of the screen.
Tap Photos, Bid/Completion, Forms, Notes or Invoice to load one of those screens. Note: Not all options may be shown based on system setup and permission level.
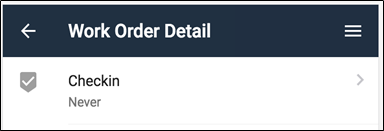
Tap Check In, to complete the check in and view the last check in date and time..
Tap Sync, to synchronize data and photos for completed work.
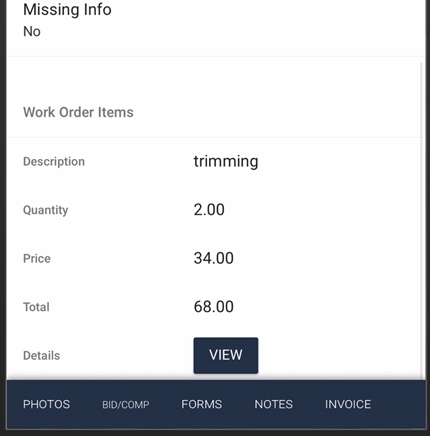
Information about work to be completed on the order is displayed at the bottom of the Work Order Detail screen. You can tap any of the items listed to see additional instructions, if applicable.
A review of the Bid/Completion screen functionality.
The Bid/Completion screen is used to add new bids or completions for a work order.
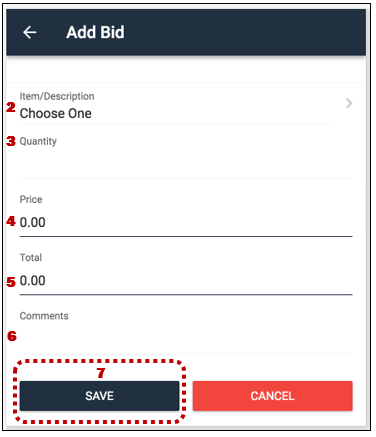
Follow the steps below to enter new bids on a work order.
On the Bid/Comp screen, tap ‘Add Bid’. The Add Bid screen is displayed.
Select an Item/Description from the drop-down menu. If the item cannot be located, select ‘Other’ at the bottom of the list. When Other is selected, a text box is displayed, so you can enter a description of the bid.
Enter a Quantity.
If a pre-set item is selected, the Price is automatically included. If another item is selected, you must manually enter the price.
The Total is calculated based on the quantity and price.
Enter any additional Comments for the bid item.
Click 'Save'.
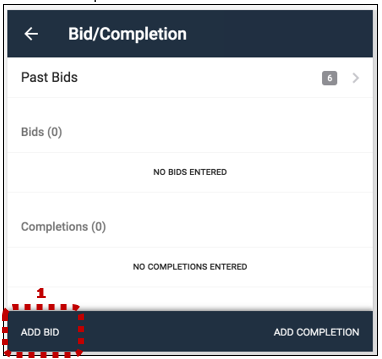
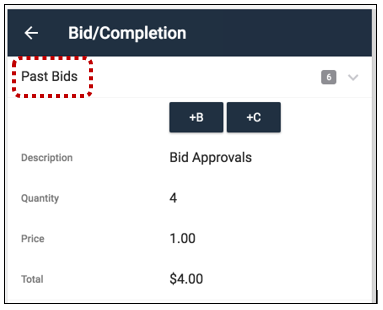
If there are past bids associated with the property, they can be copied, so you don’t have to manually enter them again. To display past bids, tap ‘Past Bids’.
Bids can be copied as new bids or new completions. To copy the past bid as a new bid, tap +B. To copy a past bid as a completion item, tap +C. New items can be modified as needed.
To take photos for a bid, tap the Camera button (1). The number of photos taken for the bid is displayed on the Gallery button (2). To view photos for the bid, tap the Gallery button.
Bids can also be modified by tapping anywhere on the bid info line. The Edit Bid screen is displayed. This form is the same as for adding a bid.
Tap and hold anywhere on the bid item information. A message will pop up asking you if you want to delete the bid. Click ‘OK’ to delete the bid.
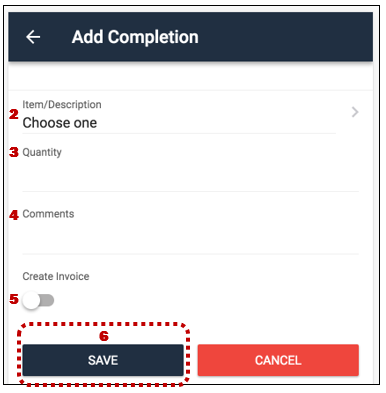
Follow the steps below to enter new completions on the work order.
On the Bid/Comp screen, tap ‘Add Completion’. The Add Completion screen is displayed.
Select a Item/Description from the drop-down menu. If the item cannot be located, select Other at the bottom of the list. When Other is selected, a text box is displayed, so you can enter a description of the completion.
Enter a Quantity.
Enter any additional Comments.
Optional: Select the ‘Create Invoice’ toggle to also add the item to the invoice screen. If PPW is setup to auto transfer Completion items to the Invoice this will not be shown. This will also not show if access has not been granted to the Invoice section.
Click ‘Save’.
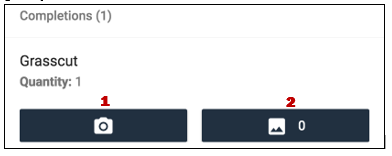
Completion items have three stages for photos: Before, During, and After. Select a stage when taking photos. The stage can be modified when in the camera as well. Read the Camera section for more information.
To take photos for a Completion, tap the ‘Camera’ button (1). The number of photos taken for the completion is displayed on the ‘Gallery’ button (2). To view the photos for completion, tap on the gallery button.
Completions can also be modified by tapping anywhere on the completion info line. The Edit Completion screen is displayed. This form is the same as for adding a completion.
Tap and hold anywhere on the completion item information. A message will pop up asking you if you want to delete the completion item. Click ‘OK’ to delete the completion item.
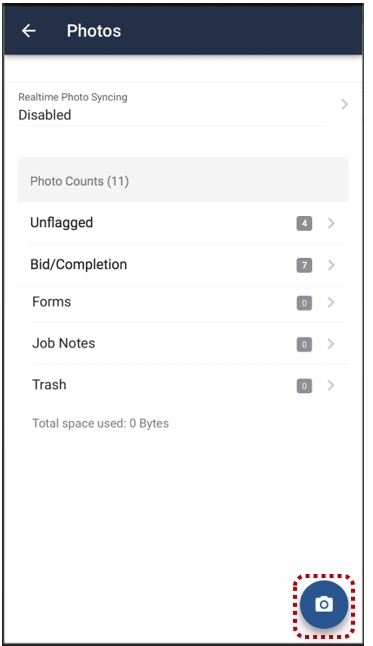
A Review of the Photos screen functionality.
The Photos screen under the work order shows all unflagged photos for the order. You can take unflagged photos by tapping 'Capture Photo' on this screen. Located in the lower right corner. ( Unflagged = A photo that is not associated with a Bid/Completion Item or PCR Form Response)
The count of photos taken for Unflagged, Bid/Completion, Forms, and Job Notes is shown. Tapping any of these headings takes you to the screen for that section.
A review of the Job Notes screen functionality.
The Job Notes screen shows job notes for the work order, from newest to oldest. Existing job notes cannot be modified. Tap the ‘Notes’ button on the Work Order Detail screen to display the Job Notes screen.
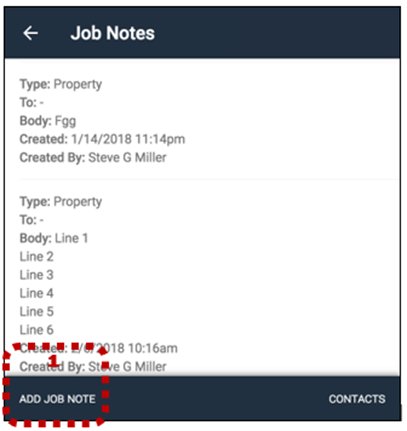
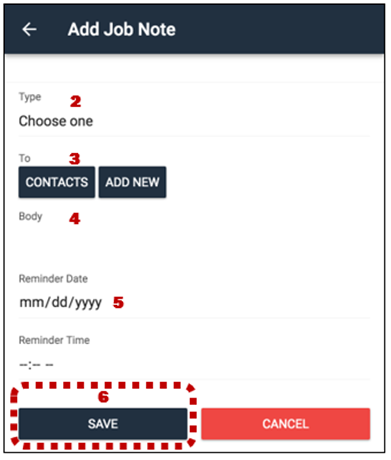
Follow the steps below to add new Job Notes.
1. On the Job Notes screen, tap Add Job Note. The Add Job Note screen is displayed.
2. Select the note Type.
a. The Property note type is associated with the property and is always displayed on all orders at the property.
b. The Work Order note type is associated with only the specific order being completed.
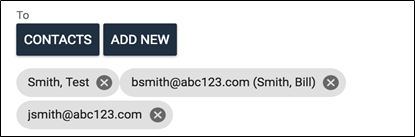
3. Optionally, you can specify a contact in the To field. Contacts selected in the To field are sent an alert when the note is synced. Pre-set contacts are alerted based on your PPW alert settings. Contacts added with an email address receive the note in their email inbox. (Pre-set contacts - Contacts that have been defined in the Job Notes section of the PPW web application.)
a. To choose preset contacts or contacts previously added in your contact list, tap Contacts.
b. To create a new entry, tap Add New. Enter an email address, first name, and last name into the form. To save the contact to your list, select Save to Contacts.
4. Specify the body text for the job note.
5. Optionally, to receive an email reminder of the job note, specify a reminder date and time.
6. Tap Save.
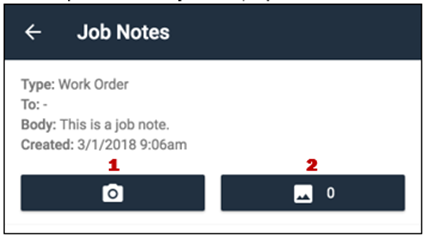
To take photos for the job note, tap the Camera button (1). The number of photos taken for the job note is displayed on the Gallery button (2). You can tap the button to open the gallery screen for the job note and tap photos in the gallery to see a larger version. Tap and hold to display the delete photo option.
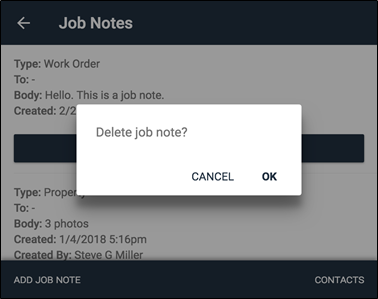
Tap and hold anywhere on the job note information. A message will pop up asking you if you want to delete the job note. Click ‘OK’ to delete the job note.
Job notes can be edited, and photos can be taken until the job note has been synced to the server. After the job note is synced, it cannot be modified, and photos cannot be taken. You can add another job note if additional information is needed.
Contacts from the server that are enabled to receive job notes are automatically sent to the app. These contacts cannot be modified or deleted.
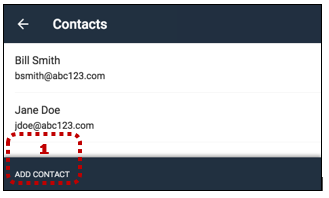
On the Job Notes screen, you can tap 'Contacts' to access the Contacts screen, which lists any contacts added by the end user. The contacts sent from the server are not displayed on this screen.
To add new contacts, follow the steps below.
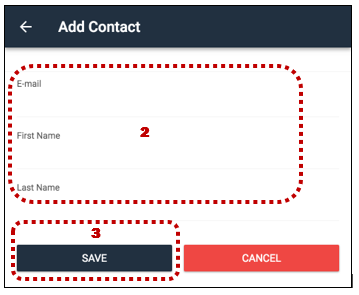
1. On the Contacts screen, tap Add Contact. The Add Contact screen is displayed.
2. Enter an email address, first name, and last name. You cannot enter multiple contacts with the same email address.
3. Tap Save, or, if you need to return to the previous screen without saving the contact information, tap Cancel.
To modify existing contacts, tap anywhere on a contact info row of the Contacts screen. To delete a contact, tap and hold on the contact. A message will pop up asking if you want to delete the contact. Click ‘OK’ to delete the contact.
You can tap the Delete icon next to contacts that should be removed from the To field.
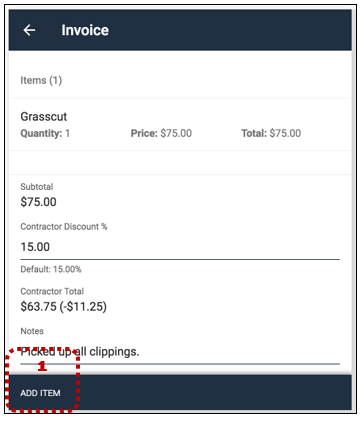
The invoice screen is where you create the invoice for the work order.
Based on how PPW is setup and the access your account has been given this screen may or may not have all options shown in this manual. The Invoice screen will show all items on the invoice, the discount, totals, and notes.
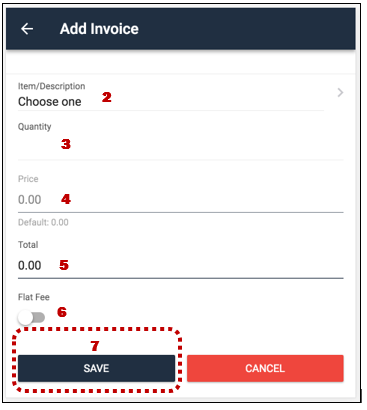
On the Invoice screen, tap ‘Add Item’. The Add Item screen is displayed.
Select an Item/Description from the drop-down menu. If the item cannot be located, select Other at the bottom of the list. When Other is selected, a text box is displayed, so you can manually type a description for the item.
Enter a Quantity.
If a preset item is selected, the Price is automatically included. If an item is manually entered, you must manually enter the price.
The Total is calculated based on the quantity and price.
The Flat Fee option may be available based on how PPW is setup. If Flat Fee is selected, the discount percentage will not be subtracted from the total.
Tap the ‘Save’ button.
Tap on an existing item on the Invoice screen to edit the item. Modify the information and tap the ‘Save’ button.
Tap and hold anywhere on the invoice item information. A message will pop up asking you if you want to delete the item. Click ‘OK’ to delete the item.
The discount for the invoice is shown below the items on the invoice. The discount may not be editable based on how PPW is setup. The discount is saved as it is entered. No save button is required to be tapped.
Comments can be added to an invoice using the Notes field. Comments are saved as they are typed. No save button is required to be tapped.
A review of camera functionality and troubleshooting.
The camera can be accessed from different areas of the app. The functionality is similar depending on what section you are using to take photos.
The camera options include:
The Shutter button is located to the right of the camera preview. Tap this button to take a photo.
The work order number for the current order is displayed at the top middle of the screen. Below the work order number is the completion stage: Before, During, or After. Tap the stage name to change the stage.
The last photo taken is displayed in a small circle to the left of the camera preview. Tap the small image to display a larger view.
Tap the large view to close the photo.
Tap the Close button (X) in the lower right corner to exit the camera and return to the app.
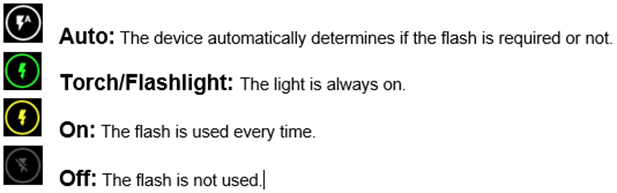
The flash setting is located in the upper left corner of the screen. Tap the icon to rotate through these flash options:
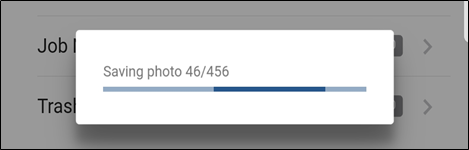
As photos are captured, they are saved to the local storage of the device. After the camera is closed, a process dialog box will appear to indicate the photos are being associated to the proper section of the work order. The number of photos captured in a single camera session will determine the amount of time it takes to process the photos.
Backing up photos from the app to a computer requires that you have your device’s charge/sync cable to connect the device to a computer.
NOTE: Some cables only charge and do not sync. Be sure you have the correct cable for your device.
The PPW photos are stored in this folder:
Android/data/com.propertypreswizard.app.propertypreswizard/photos/
There is a folder for each work order.Follow these steps to backup photos:
Connect your device to the computer.
Set the USB option to File Transfer.
Copy and paste or drag and drop files/folders from the PPW folder to your local computer.
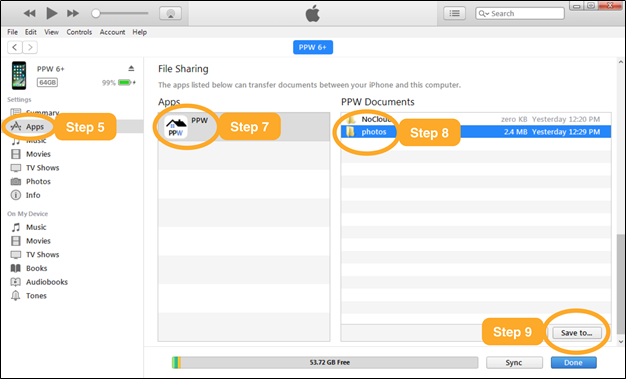
Backing up photos from the app to a computer requires that you have your device’s charge/sync cable to connect the device to a computer. Also, iTunes must be installed on the computer. NOTE: Some cables only charge and do not sync. Be sure you have the correct cable for your device.
Follow these steps to backup photos:
Open iTunes on your computer.
Connect your device to the computer.
Authorize access on the device and computer if required.
Click the device in iTunes.
5. Click the Apps option in the left menu.
6. Scroll down to the File Sharing area of the apps window.
7. Click the PPW app.
8. Click the photos folder in the PPW Documents window.
9. Click 'Save to'.
10. Find and select the location to which the photos will be saved.
A review of this area's features and functionality.
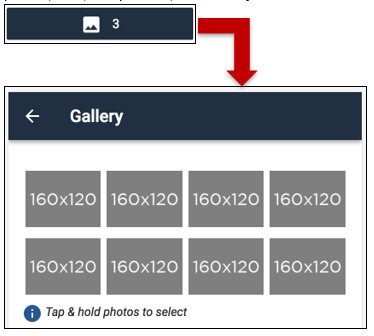
The photo gallery button will allow you to see all photos for the section you are in. Unflagged photos, bids, completions, forms and job notes can all have galleries.
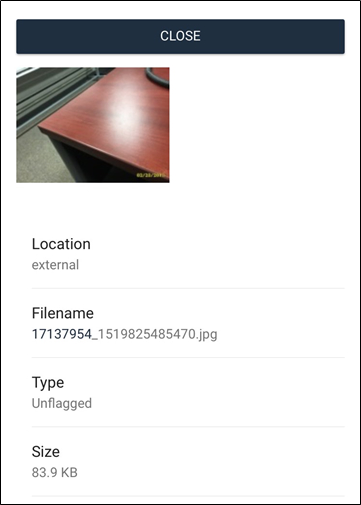
Tapping on a photo within the gallery will display a larger version of the photo and also some details about the photo.
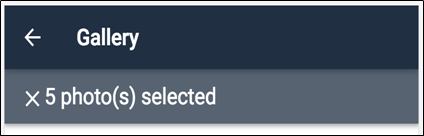
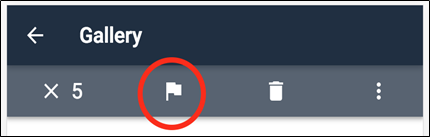
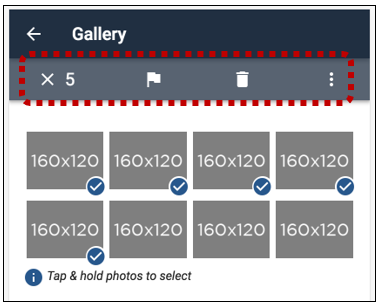
Tap and hold on photos to enable the multi select option. Once you have selected one photo a checkmark will appear in the lower right of the photo. You can tap on additional photos to select as many as needed.
A menu will appear below the screen heading. This will indicate the number of photos selected. To the right of the photo select count will be the reflag button, delete button, and a more options menu. The more options menu contains a Select All option. This will select all the photos in the current gallery.
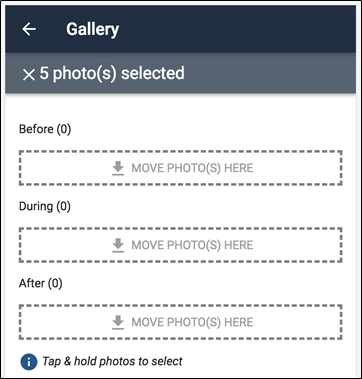
Only photos that have not been synced can be reflagged. Photos can be reflagged between different orders within the same PPW account but not between different PPW accounts.
The app will now indicate you have photos ready to reflag by changing the sub menu to indicate the number selected. The option to reflag photos is hidden.
Navigate to the screen to which you would like to flag photos. This can be Unflagged, Bid/Comp, Forms, or Notes. On the desired screen, tap the area labeled Move Photo(s) Here to flag the photos to that specific item.
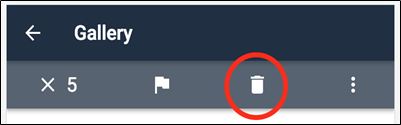
Only photos that have not been synced can be deleted.
With the photos selected, tap on the Delete icon. A confirmation message will appear, tap ‘OK’ to delete the photos. Deleted photos cannot be recovered.
The Forms screen is used to view the forms associated with a work order.
The name and some question information are displayed for each form. A progress bar indicates how much of the form has been completed. Tap anywhere on the question information to load the form and begin answering questions.
The default form view shows one question at a time. Use the ‘Previous’ and ‘Next’ buttons to navigate forward or back when answering questions. To show all questions, tap the ‘Menu’ icon (1) in the upper right corner to display an option for toggling between Single and All question views. When viewing all questions, you can scroll up and down the list. Use the view that functions best for your device or personal preference.
To display a list of active questions, tap the List button (3) at the bottom of the screen. Based on the answers to questions and how the form was set up, not all questions are always displayed. Questions highlighted in red are required but have not been answered completely. Questions in black are not required and have not been answered. Questions highlighted in green are answered correctly.
If photos can be taken for a question, the Camera button is dark blue. If photos are not permitted for the question, the camera is lightened and does not function when tapped. Camera button is on the left (1). The Gallery button is on the right (2).
The Gallery button indicates how many photos have been taken for the question. You can tap the button to open the Gallery screen and tap photos in the gallery to see a larger version. Tap and hold to display the delete photo option.
3. The minimum and maximum photo requirements for the question are displayed below the camera and gallery buttons. If a minimum requirement is not set, then photos are not required for the question. When the maximum number of photos have been taken, the camera automatically closes.
4. If a question is not answered properly or photo requirements have not been met, the question name will be highlighted in red. When a question is answered properly, the question text will be highlighted in green.
Verify that location services are enabled on your device. This can be done in the Settings app. Scroll down and find Location Services in the list.
Verify location services are in High Accuracy mode for best results.
Try to use Google Maps or another map application and verify that it functions properly. If other applications do not function, then the problem is with your device.
Open the Settings app.
Scroll down and tap the Privacy option.
Tap the Location Services option at the top of the page.
Verify that the Location Services are on. The toggle indicator at the top of the page should be green.
Scroll down and tap the PPW app.
Verify that the While Using the App setting is selected.
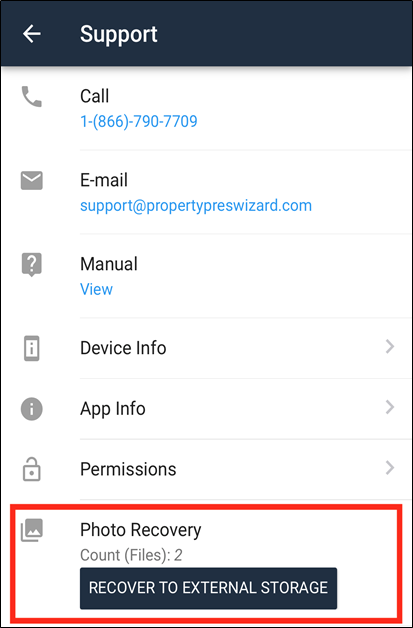
Version 2.2.x and newer of the mobile app has a feature that will try to recover photos that may have been orphaned from a work order because of an application or device issue. When you open the app, any photos not associated to an order will be processed and recovered. You will see a message stating the number of photos recovered at the bottom of the screen.
If photos were taken and the photos do not appear in the work order, it’s possible the photos are still in the camera’s cache folder. To recover the photos, navigate to the support screen. If there are photos to recover the Photo Recover section will show in the Support screen.
Tap the button labeled Recover to external storage. This will move the photos from the hidden directory the camera plugin uses to the location where photos can be backed up.
Android/data/com.propertypreswizard.app.propertypreswizard/photos/recovered/
The count of files to be recovered will be double the number of photos actually taken because it includes the thumbnail image. Once photos have been recovered, the next time you go back to the support screen the Photo Recovery section will not show because no photos are available to be recovered.
Added Invoice and Ready for Office. Changed page to screen.
Added Recover Photos Not Saved section
Added Auto Recover Photo section.
Added information to camera section showing saving photo dialog window with progress bar.
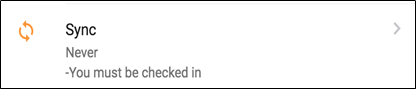
Use the Work Order Details screen to sync data and photos for completed work. Tap ‘Sync’ and acknowledge the confirmation to begin syncing data.
If the requirements to sync the order have not been met, they will be displayed below the sync icon.
The data entered into the work order is synced first. After this data has been synced, the photos are synced. If real-time photo sync is enabled in your app settings, some of the photos may already be synced. If the work order has been previously synced, only new data and photos are synced. When all data has been synced, the status on the Home screen is updated to green (1).
A review of Ready for Office functionality.
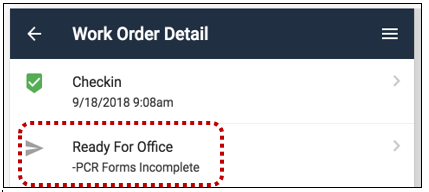
When a work order has been completed and all information has been entered the order should be marked Ready for Office. This is completed by tapping on the Ready for Office button on the Work Order Detail screen. If all requirements have not been met a list of the missing information will be displayed.
When an order has been set Ready for Office it can no longer be modified. Tapping on Ready for Office again will undo the action.
When an order has been synced and Ready for Office is set, it can no longer be modified.
If Ready for Office is set and there is an error returned from the server when syncing the order, Ready for Office will be unset, and the errors will be displayed.
Work orders can be set for a PPW, Aspen Grove, or ServiceLink check in.
The ‘Check In’ button functions differently depending on the required check in for the work order. If no specific check in is set, then a standard PPW check in is required.
The PPW check in is standard if no check in option is set for the work order. To check in, tap the ‘Check In’ button. You may see a GPS Acquiring Location status indicator. If you receive an error checking in, verify that you have location services enabled for your device. Refer to the Troubleshooting section for more information.
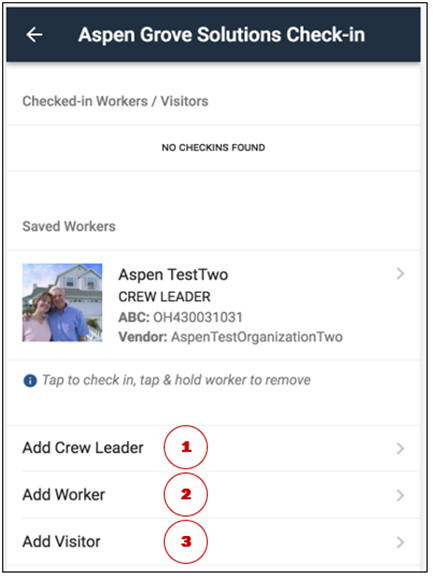
Checking in with an ABC# or as a visitor is supported for all orders with an AGS check in requirement; however, MCS does not allow the visitor check in.
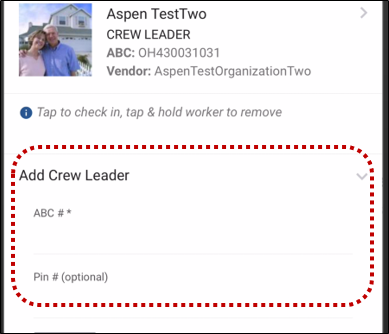
1. To check in with your ABC#, tap the ‘Add Crew Leader’ option. Specify your ABC# and then tap 'Search'. If the ABC# is found, information is displayed under the saved workers. If you are adding additional ABC#’s, you must enter the PIN #.
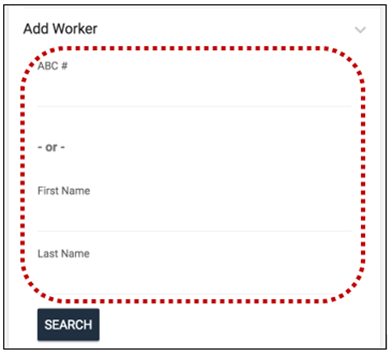
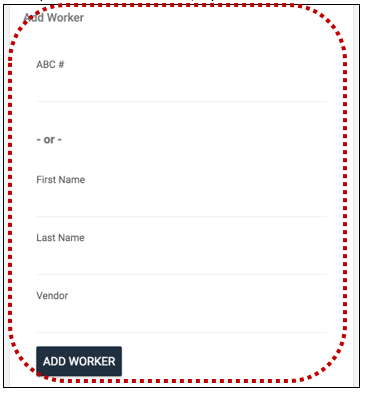
2. To add crew members that have ABC#s, tap the ‘Add Worker’ option. Specify the ABC# and then tap ‘Search’. Tap the search result if it is found. You can also search by first and last name.
Note: The search function looks for only workers in the same company as the crew leader. If the worker you search for is signed up under their own company or a different company, the worker cannot be found.
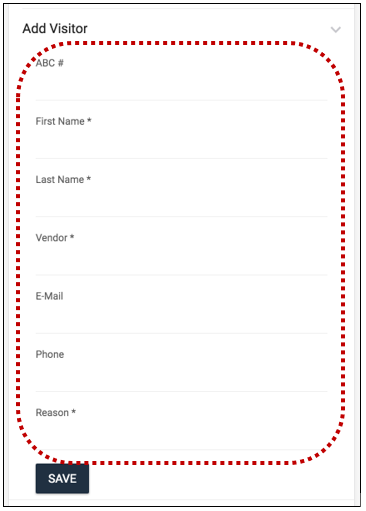
3. You can also check in visitors to the work order. A visitor is any worker who does not have an ABC#. Specify the first name, last name, vendor (company name), and reason for being at the property, and then tap ‘Add Visitor’.
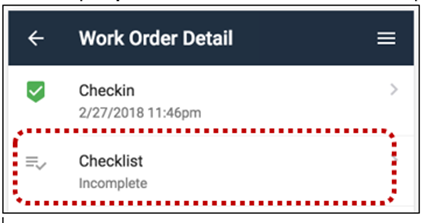
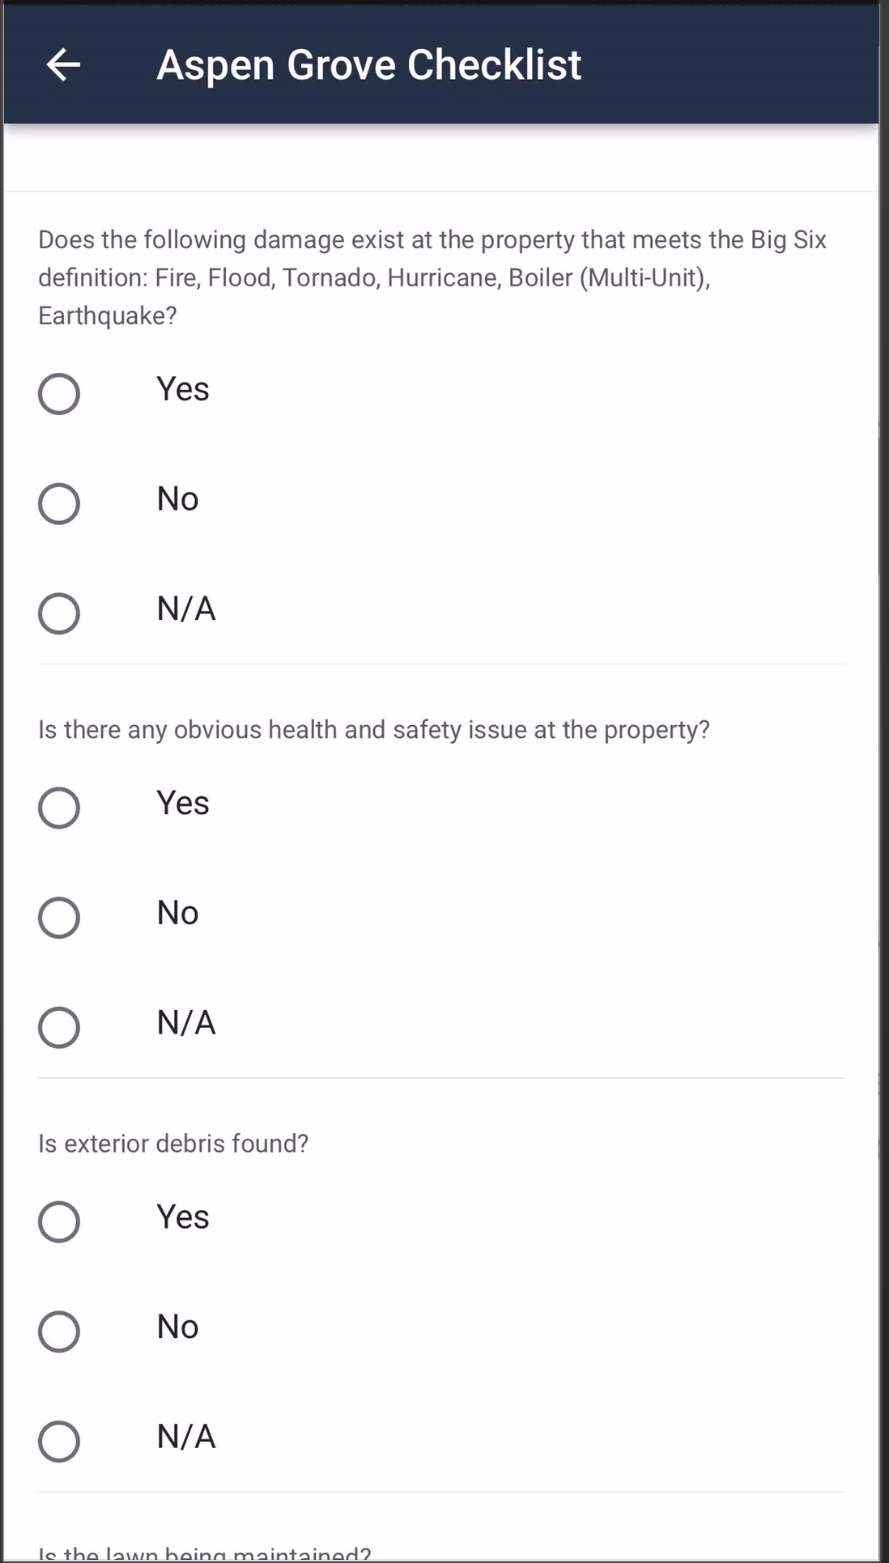
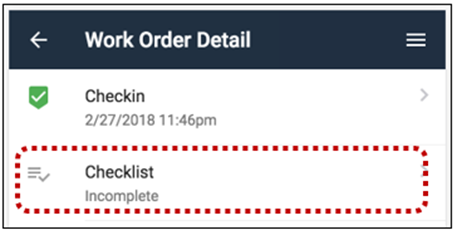
The Aspen Grove Checklist must also be filled in before the work order can be synced to the server. Tap Aspen Grove Checklist to answer the required questions.
ServiceLink work orders require a check in. Specify either the ServiceLink ID or ABC #. If you do not have either of those items then enter a first name, last name and vendor (company name). To finish the check in, tap ‘Add Worker’.
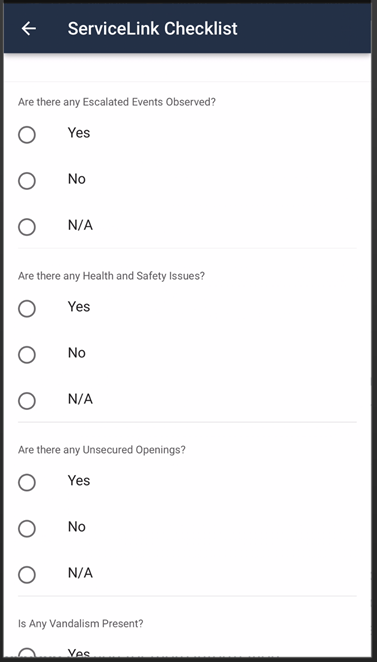
The ServiceLink Checklist must also be filled in before the work order can be synced to the server. To answer the required questions, tap ServiceLink Checklist’.
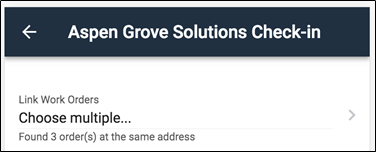
If you have multiple Altisource work orders located at the same property, you can check in to one of the properties and link it to the other orders. Follow the steps below to link multiple Altisource work orders under one check in. This does not affect photos, Bid/Completion items, Forms, or Job Notes. Complete orders as you normally would after the check in is complete.
Tap the Altisource work order.
Tap Check In. On the AGS Check In screen, you will see a message that Linked Work Orders have been found.
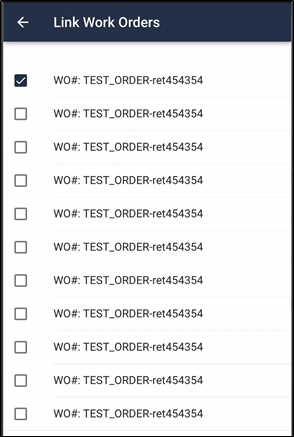
Tap ‘Link Work Orders’. A list of work orders for the same property is displayed.
Tap each order you would like to link to this check in.
Tap the close button in the upper left corner of the window. The work order numbers are displayed in the ‘Link Work Orders’ button.
Check in and answer the AGS questions as you normally would.
Complete each order as you normally would.
When finished, sync each order.
We are looking to provide a method to assist users in tracking the amount of time spent at a property for any given work order.
Please Note:
This is a PPW Check-in function and not associated with AGS or other check-in options.
This option will not show until the vendor has checked into the property.
User can sync the order without check out but cannot mark as Ready For Office (RFO) if set as required.
Feature can be set to:
o A specific Client Company
o A specific User
o A specific Work Type
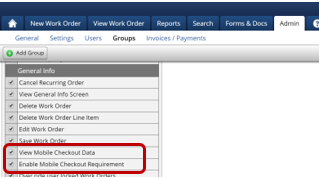
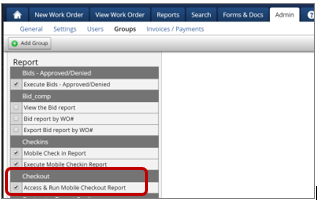
In order to utilize this feature, the following permissions must be enabled:
Enable Mobile Check Out Requirement – this makes the group required to complete the check out process before marking an order RFO. This must be enabled for your Contractor group in order for the functionality to be available to them.
View Mobile Check Out Data (all locations) - this will allow the group to see all check out information on the work order General Info screen as well as the Home Screen.
Access & Run Check-in/Check-out Report – this will allow the group to run the new report.
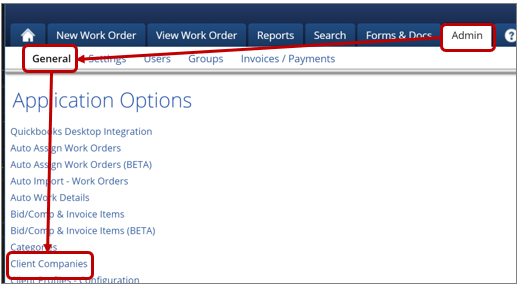
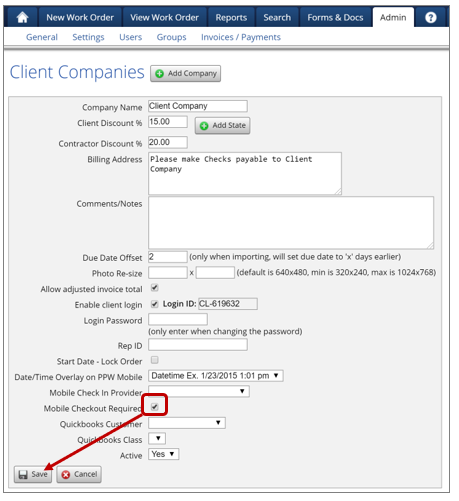
To set the Check Out procedure as required for a specific client company, Go To Admin->General->Client Companies and either click the “Add Company” button or select a specific Client Company already created.
To set for a specific Client Company, check the “Mobile Check Out Required” box and then click save:
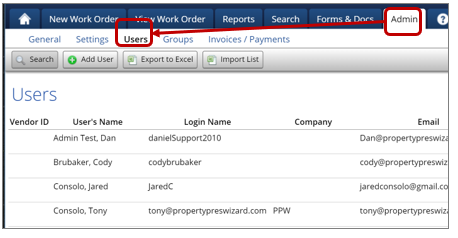
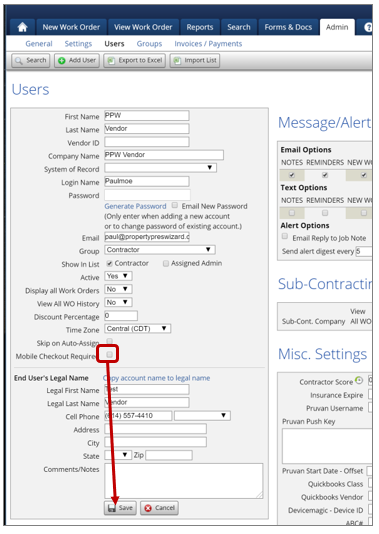
To set the Check Out procedure as required for a specific User, Go To Admin->Users and either click the “Add User” button or select a specific User already created.
To set for a specific User, check the “Mobile Check Out Required” box and then click save:
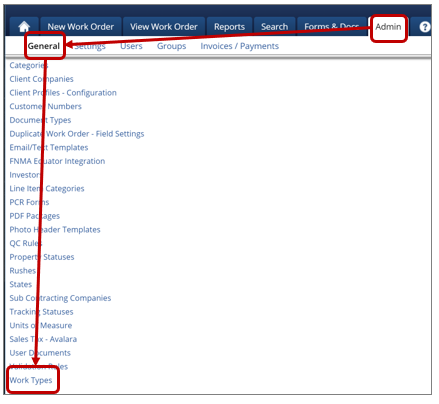
To set the Check Out procedure as required for a specific Work Type, Go To Admin->General->Work Types.
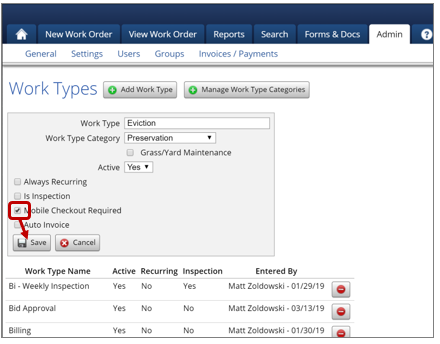
Choose either to click the “Add Work Type” button or select a specific Work Type already created. To set for a specific Work Type, check the “Mobile Check Out Required” box and then click save:
Once the mobile user checks into the property:
The ‘Checkout’ option will appear.
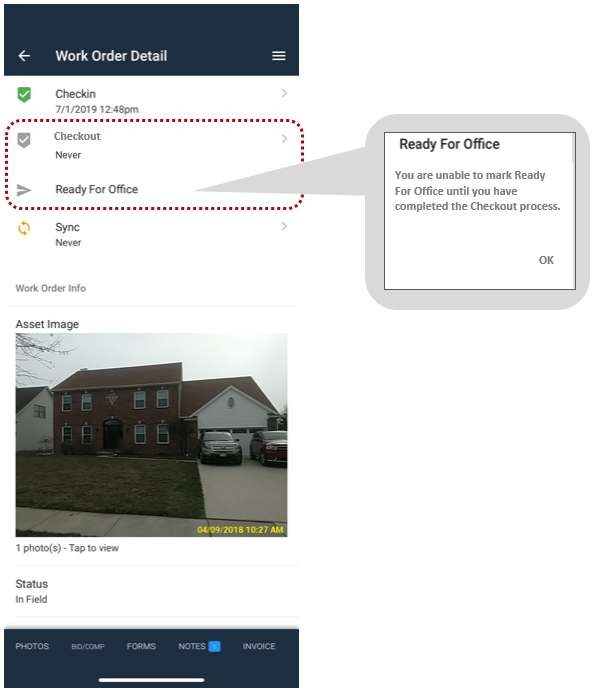
If the user has not checked out once they are ready to leave the property, the user will not be able to mark the order ‘Ready For Office’.
User will receive a warning message reminding them to check out first.
Both Check In AND Check Out data will real time sync versus waiting until the Sync function is used.
In order to track both the check in and check out data, We have added the following to the General Info screen of the work order:
Section will also calculate the time from the most recent check in until the time of check out.
All occurrences will be recorded.
Clicking on the information icon will provide you with more detail for each action.
Section will also display a Total Time Spent at property. This is a totaling of each occurrence of check in and check out.
Total Time Spent will be rounded to the nearest 0.125 (roughly 7.5 minutes).
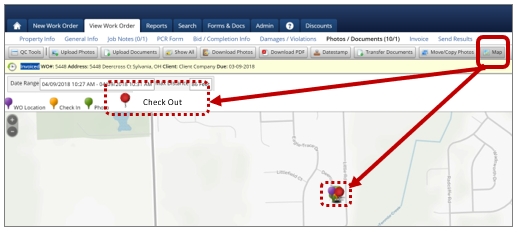
Just as we do for check-in, we also added a demarcation pin indicating where the Check Out was completed. This can be located on the Map on the Photos/Documents tab of each work order.
We have added a new column option to the Home Screen called ‘Total Time’. This will display the total time spent at the property on that work order. It will be the same number as what is displayed on the General Info screen.
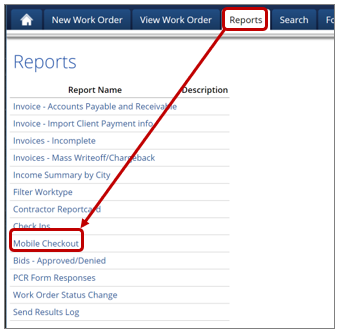
You also have the ability to run a report to more effectively review the Checkout data.
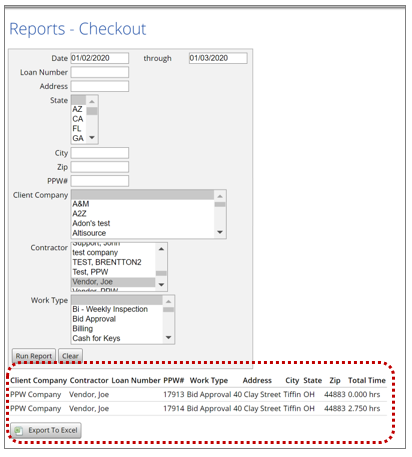
The user would utilize the following criteria to run the report:
Date Range – both a starting and ending date are required. Limited to a 30-day period.
Loan Number – be able to enter a specific loan number and get all total time for each work order.
Address, City, State, Zip – Would need a box to enter each.
PPW # – be able to enter a specific order number and get all data for that order only.
Client Company – choose a specific client company, from a dropdown list of all client companies, to display all work order total time.
Contractor – choose a specific contractor, from a dropdown list of all contractors, to display all work order total time data for orders they completed.
Work Type – choose a specific work type, from a dropdown of all available work types, to display total time for each work order of that type.
PLEASE NOTE: All variations of this report will be limited to a 30-day date range.
Once the appropriate criteria have been selected and the “Run Report” button clicked, it will display on the screen AND have a button to allow for Export to MS Excel.