Thank you for referencing the PPW User Manual. Contact our Support Team if you are unable to find your answer here.
Loading...
Loading...
Loading...
Loading...
Loading...
Loading...
Loading...
Loading...
Loading...
Loading...
Loading...
Loading...
Loading...
Loading...
Loading...
Loading...
Loading...
Loading...
Loading...
Loading...
Loading...
Loading...
Loading...
Loading...
Loading...
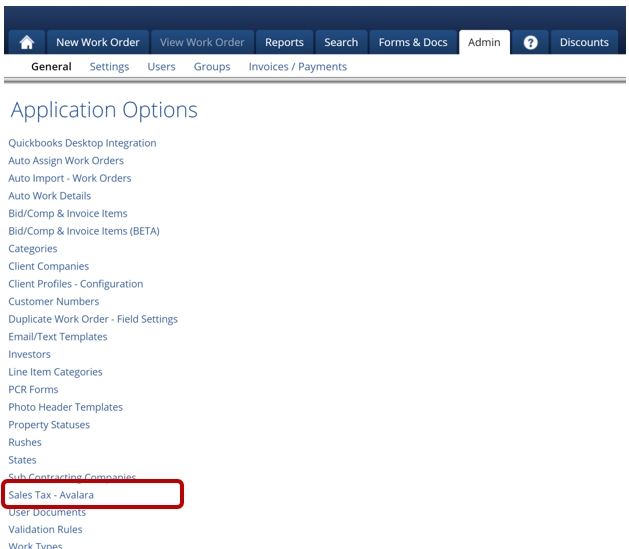
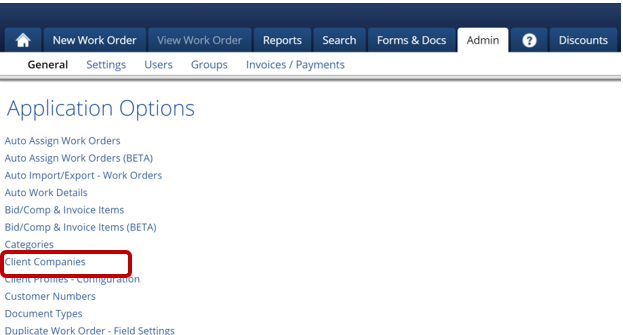
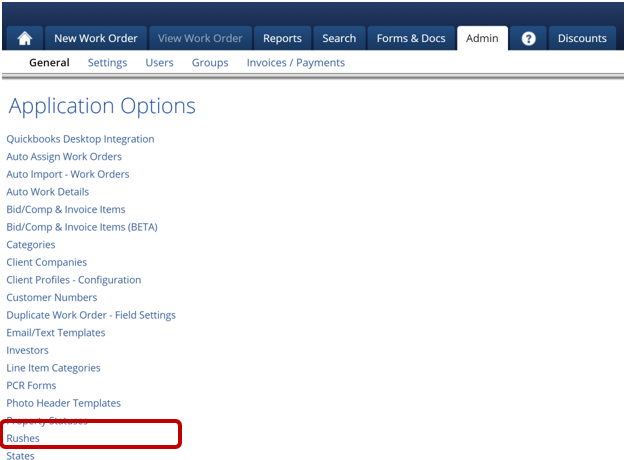
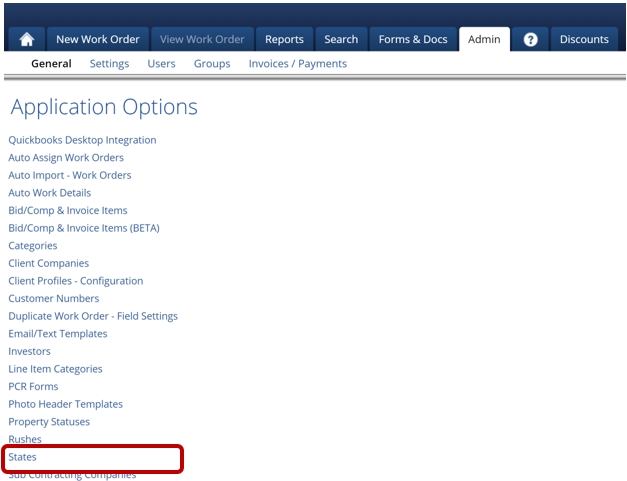
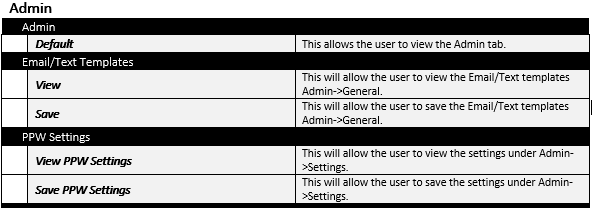
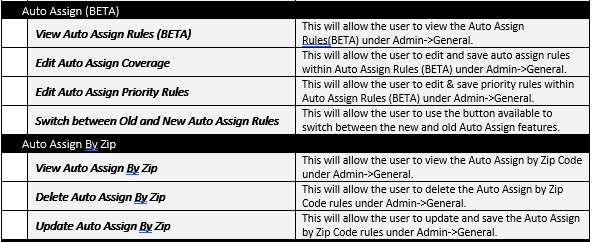
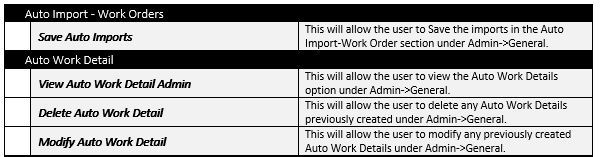
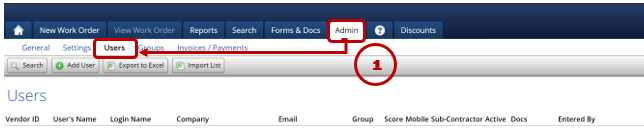
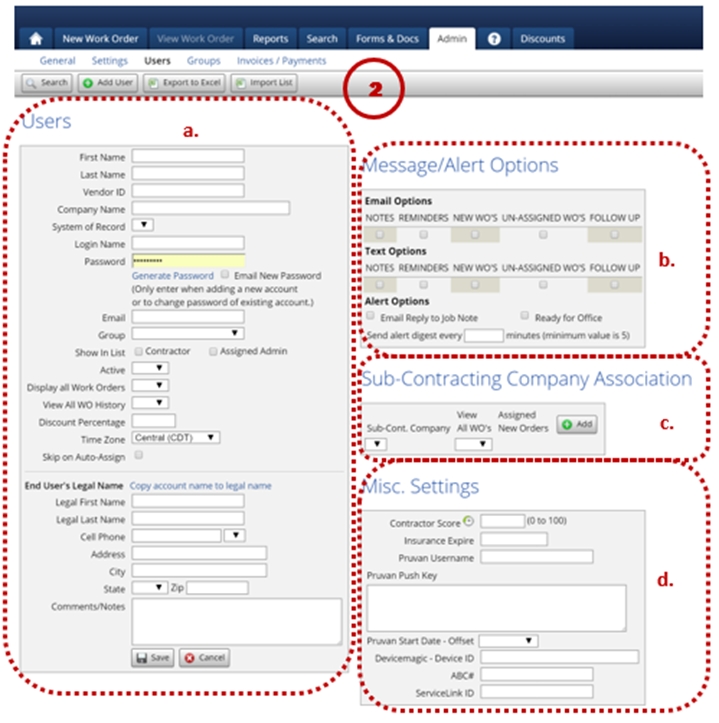
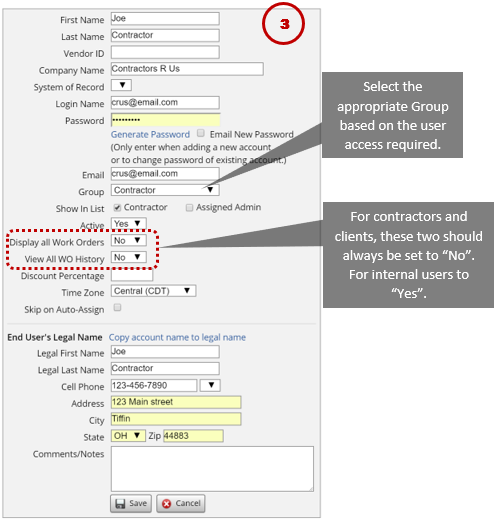
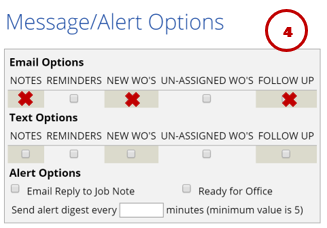
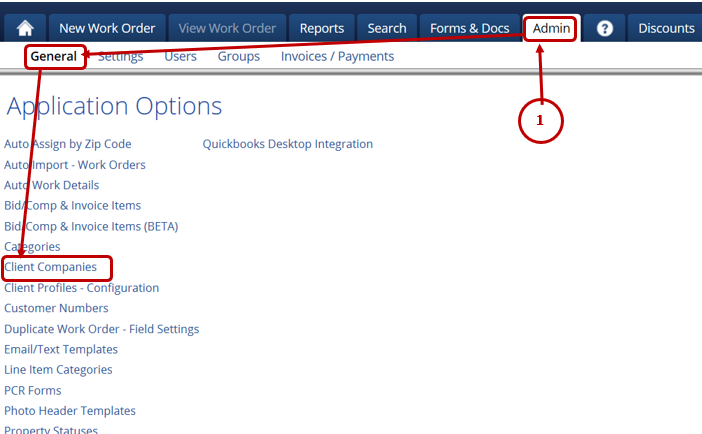
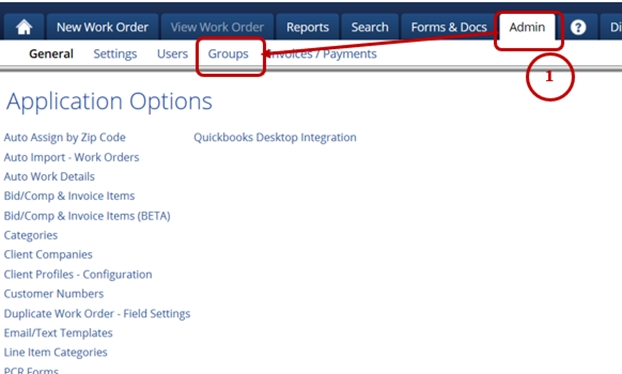
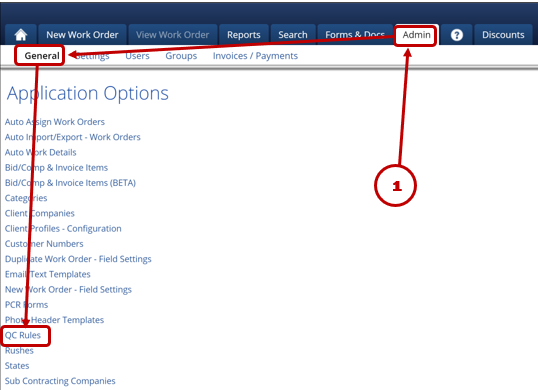
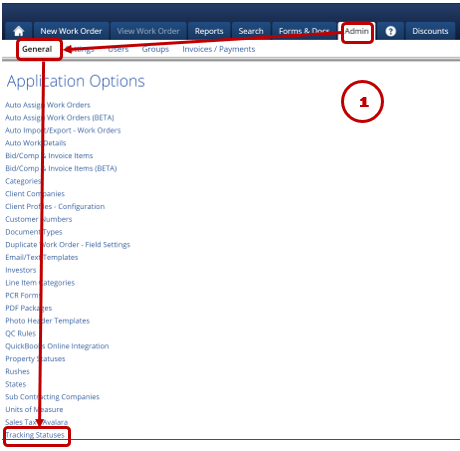
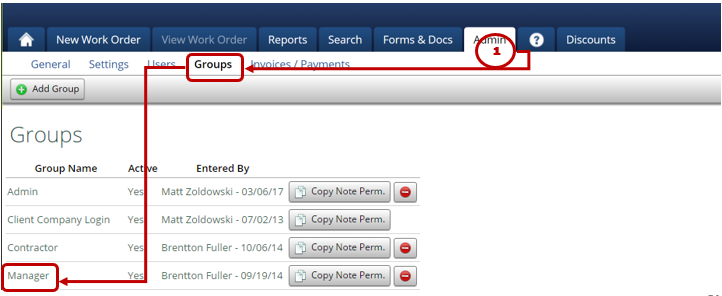
This tab contains many key elements of system and user administration. Consult the appropriate section for more details.
Loading...
Loading...
Loading...
Loading...
Loading...
Loading...
Loading...
Loading...
Loading...
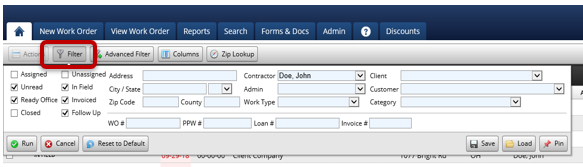
The Filter button will allow you to to filter the orders you want to display on your homepage.
The basic filters allow you to filter by:
Status
Address
City/State
Zip Code
County
Contractor
Admin
Work Type
Client
Customer
WO Number
PPW Number'Loan Number
Invoice Number
You can also save and load filters that you have selected. You can also select the pin option which will keep the filters on the home page. The reset to the default button will reset your filters back to their default settings.
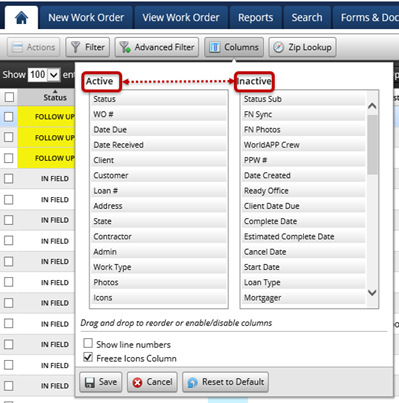
The columns button will allow you to select and display what columns you want on the Home screen.
By dragging one of the columns from the Inactive section to the Active section will place that column on the home screen in the order selected. For example, if you select the column ‘work order’ then ‘address’ and ‘zip code’ the orders will display in that order on the home page.
Status
WO#
Date Due
Date Received
Client
Customer
Loan#
Address
City
State
Zip
Contractor
Admin
Work Type
Photos
Icons
Status Sub
FN Sync
FN Photos
WorldAPP Crew
PPW #
Date Created
Ready for Office
Client Date Due
Complete Date
Estimated Complete Date
Cancel Date
Start Date
Loan Type
Mortgagor
County
Lot Size
Lock Code
Category
Invoice #
Invoice Date
Item Details
Client Invoice Payment
Client Invoice Total
Client paid
Cont. Invoice Payment
Cont Invoice Total
Cont Invoice Paid
Last Cut Date
Next Date
BC Provider
Mobile Check In
Import ID
Property Frozen
Conveyance Date
First Time Vacant
Routing Date
Deed Recorded Date
Property Lock Code
There are 3 columns that are permanently on the home page and those are:
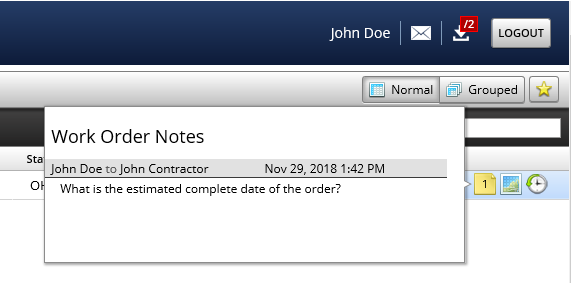
When you hover over the job notes icon, it will display the job notes and property notes for this order:
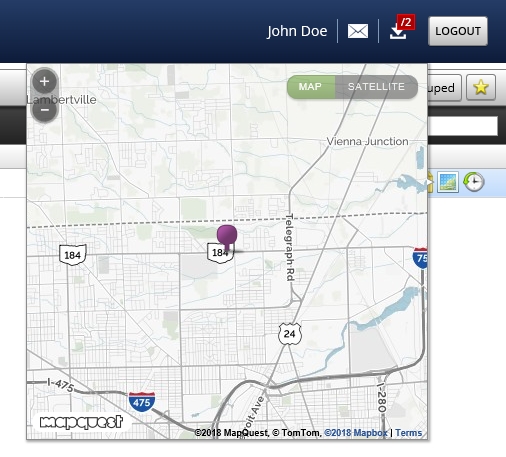
When you hover over the map icon, it will display the location of the address on an order:
When you hover over the clock icon, it will display the past orders for this address:
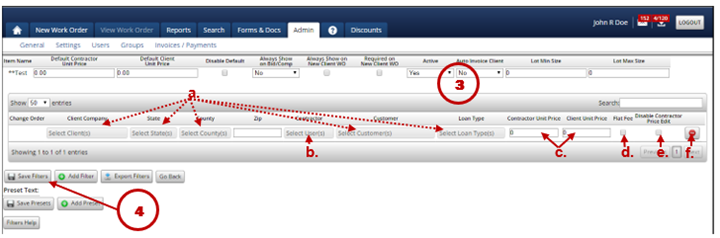
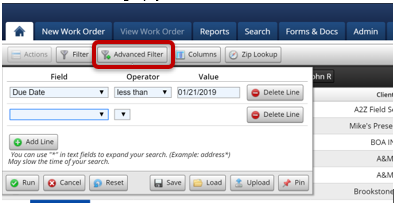
The Advanced Filter tab will allow you to set a more refined search for the orders on your homepage.
You will be able to add a line with several field options such as client totals, contractor totals, work order and address and much more. You will also be able to save the filters you have selected and load them later. The upload button can upload excel or csv files to bring up your work orders.
WO Status
WO#
PPW#
Client
Customer
Loan#
Report_id
Loan Type
Mortgagor
Work Type
Contractor
Admin
Category
Address
City
State
Zip
County
Create Date
Received Date
Accepted/Rejected Date
Photo Date Stamp
Due Date
Client Due Date
Complete Date
Ready for Office Date
Invoice Date
Client Invoice Total
Client Invoice Payment
Client Invoice Paid
Cont Invoice Total
Cont Invoice Payment
Cont Invoice Paid
Recurring - Next Date Property Frozen
When adding a field to your advanced filter that is a Date Field, you have the following options:
1. Operator – select from:
a. Previous
b. Next
c. Current
d. Before
e. After
f. On
g. Between
2. Value – a free type numeric field
3. A variable field, where applicable, to select:
a. Days
b. Weeks
c. Months
d. Years
When saving a Basic or Advanced filter, it will also save only the columns you wished to display as well as how you had the records sorted.
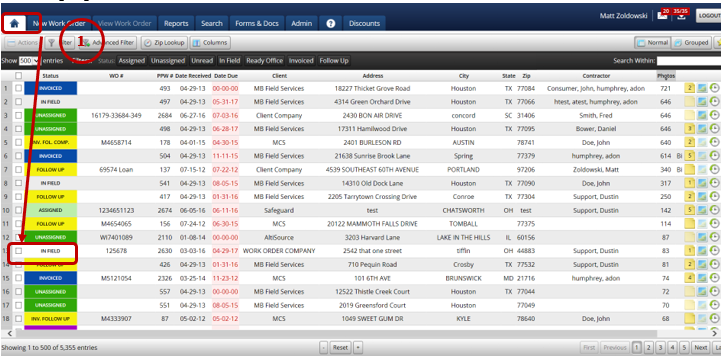
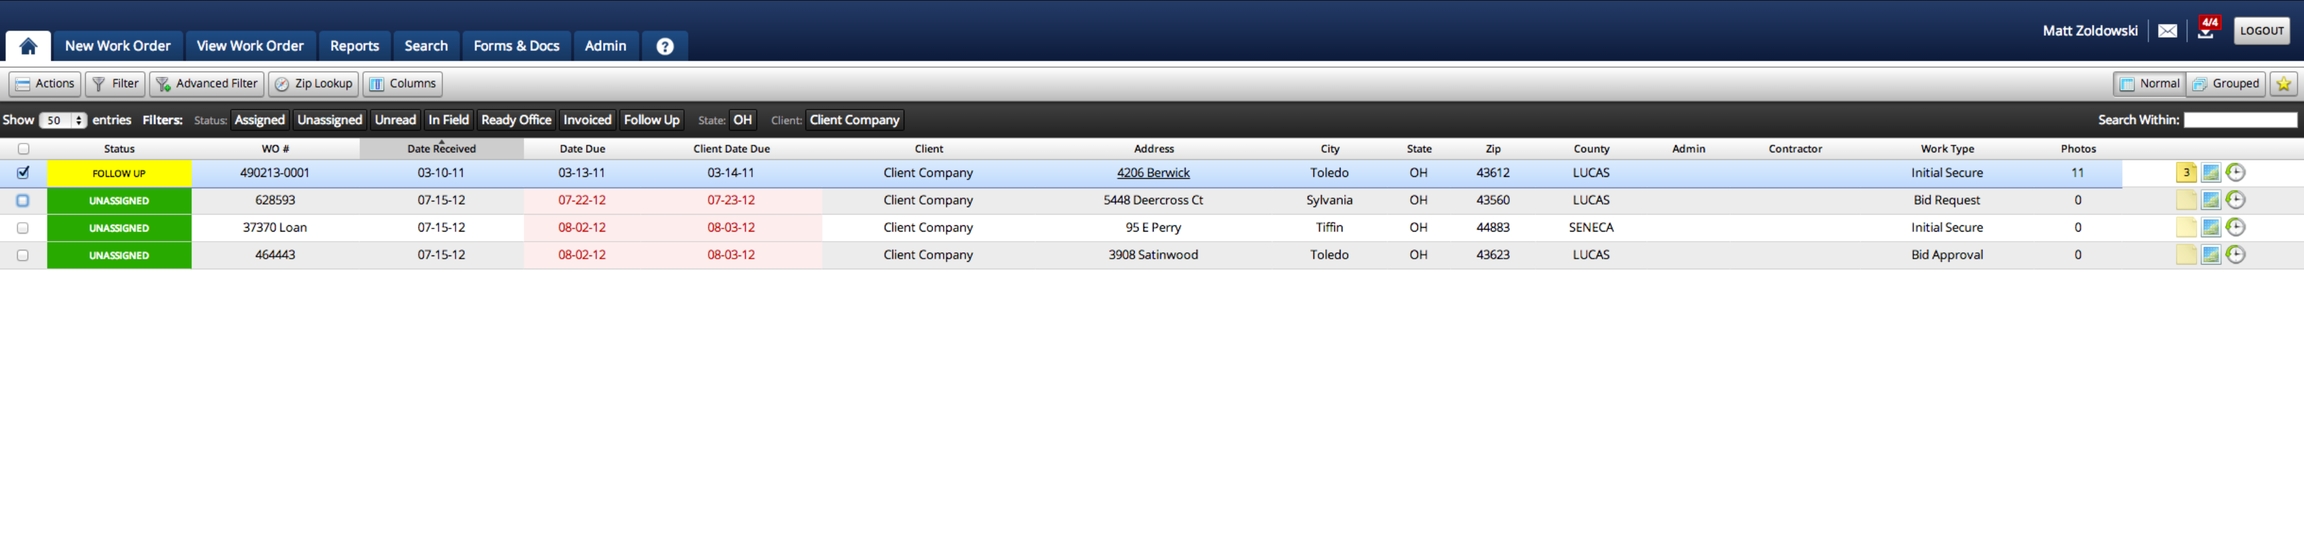
The Home page of PPW is the first page you will see when logging into PPW.
Here you will be able to see the work orders and information about those work orders. You will also be able to set exactly which orders display on the home screen along with what information about them does display. You will be able to manage those orders in mass. You can always return to the Home page by clicking on the "House" tab.
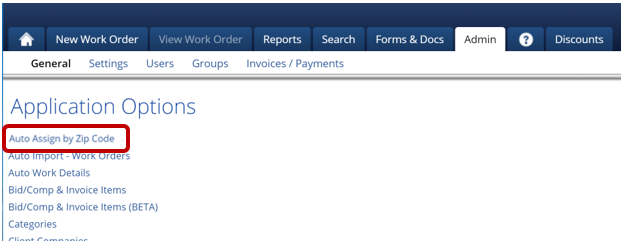
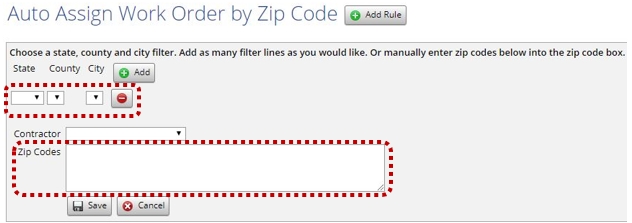
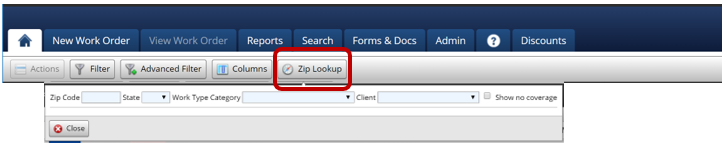
The zip code lookup button works with the auto-assign by zip code feature.
This button will allow you to perform a search by zip code to see which contractors have coverage over the area. The state filter will show all zip codes for that state. Select a Work Type Category to narrow your results.
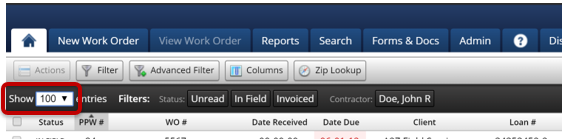
The show entries option will allow you to set how many orders Display on the home screen at once:
The options you may choose are:
25
50
100
250
500
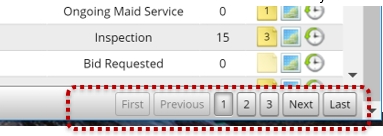
For example, you have PPW set to show 50 entries at one time, but you have a total of 55 orders that match your filters, then you may need to navigate to another page to see all the orders you are looking for. If this is the case, there are multiple ways to do this. In the bottom right-hand corner of the window you will see a few different options:
First: If you are not on the first page, you will be able to click this button and it will take you to the first page of orders.
Previous: Upon clicking this button you will be taken back one page.
Page Number: Clicking a page number will take you straight to the page you clicked.
Next: This will take you to the next page of orders.
Last: This will take you to the very last page.
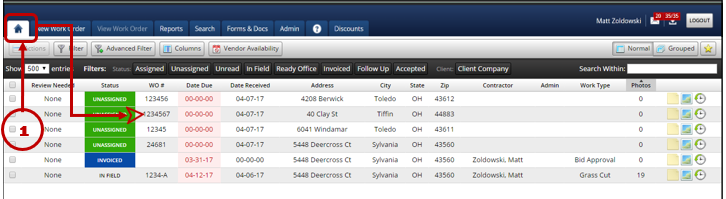
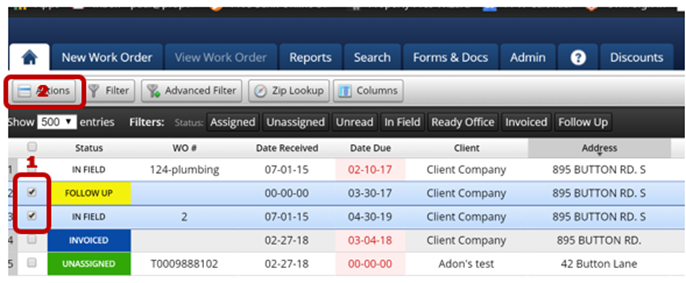
The actions button will allow you to modify, delete, cancel and export work orders.
There are four types of actions you can perform on the home page:
● Status change
● Modify order
● Import/export
● Miscellaneous.
● The actions button will be gray and unavailable until a work order is selected. You can select a work order on the home screen by checking the box left of it. This will give you the option to modify the order using the actions button.
The status change options allow you to modify the status of a work order. You will be able to mark the order complete, assign and unassign contractors, send it to field, mark orders ready for office or acknowledge the order:
a. Acknowledge - This will change the order from an unread status to let others know you are aware of the order
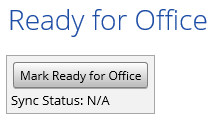
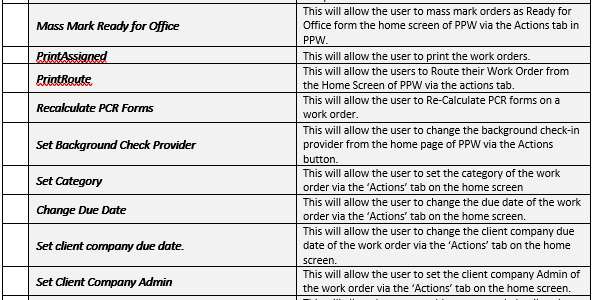
b. Mark Ready for Office - This will allow you to mark orders ready for office one by one or in mass.
c. Mark Complete - With this action you will be able to close orders by marking them complete.
d. Assign Contractor - With this action you can select multiple orders and assign contractors to those orders.
e. Send to Field - This will allow you to send work orders to field when you’re ready for the contractor to perform the work as well as send the order to the mobile app. This action will not apply if the setting to (Automatically send new Work Orders to the assigned Contractor. If not checked then new Work Orders will only show in the contractor’s queue if Ready for Field is marked) is enabled.
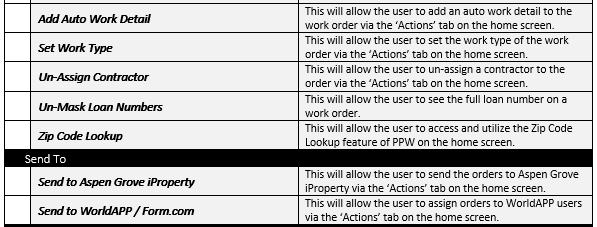
f. Un-Assign Contractor - This will allow you to un-assign or reassign any contractor that is assigned to a work order.
The modify order actions will allow you to make changes and edit the work order from the home page:
a. Assign Admin - This action will allow you to assign an admin to oversee your work order.
b. Set Work Type- This action allows you to set your work types. For example, you will set a work order as a grass cut or winterization depending on the type of work the contractor will be performing.
c. Set Client Company - This action will allow you to select or change the client company to the work order.
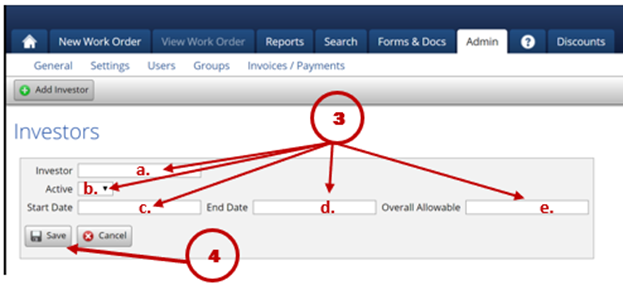
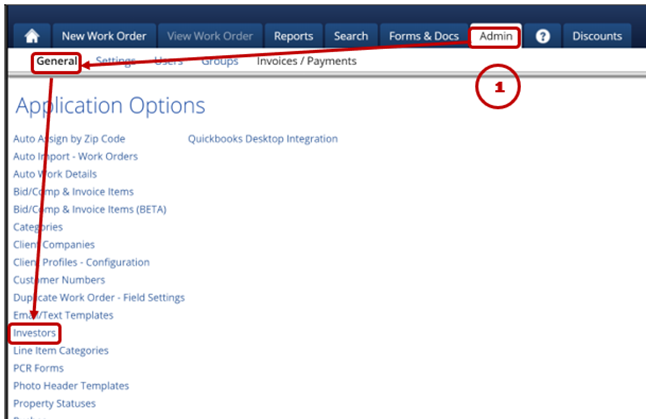
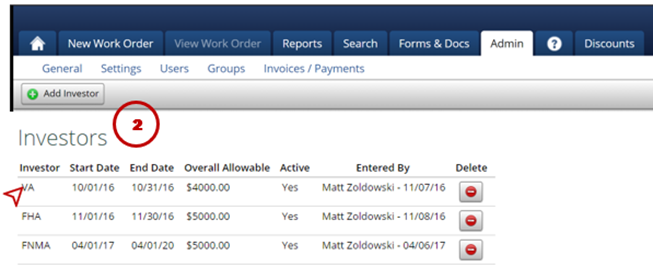
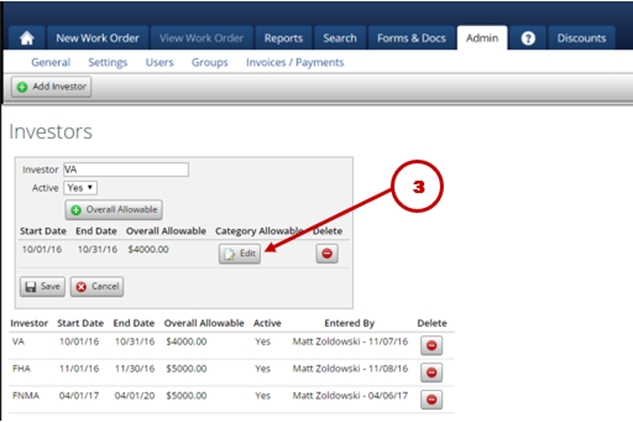
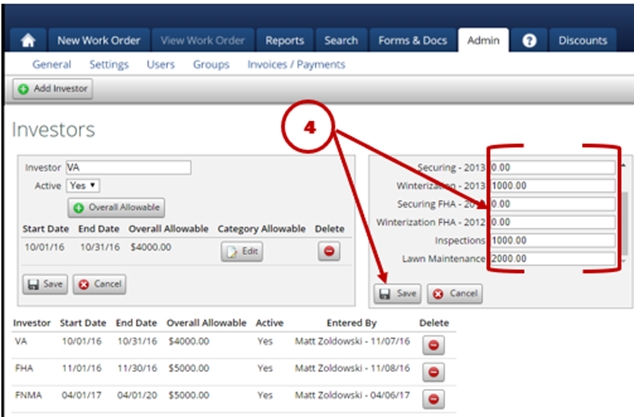
d. Set Investor - This is a PPW premium package feature that will allow you to select or change the investor for your work order property.
e. Change Due Date - This will allow you to change the due date of your work orders.
f. Set Start Date - This action allows you to change and set a date you want your work orders to be started.
g. Set Client Due Date - This allows you to set and change the client due date. This can be used if there is an error or change in the client due date.
h. Update Recurring Work order - This setting is used for any work orders you have set to recur in PPW. It allows you to make updates to recurring orders such as changing how often they recur and the cutoff date.
i. Set Estimated Complete Date - This allow you to set an Estimated complete date for when you expect the order to be completed.
j. Add Job Note - This allows you to create both property notes and job notes from the home page.
k. Add Work Detail - This allows you to add a work detail to the work order item details in the general info section of your work orders.
l. Set Category- This allow you to move or set your work orders to categories you have created.
m. Set Background Check Provider - This allow you to set or change the background check provider for your work orders. All work orders require you to check in when using the mobile app. If the Background Check Provider is set to blank it will require a PPW check-in that will allow you to just press the check in button. The Aspen Grove solutions option will require the contractor to have an active and valid ABC number as well as the completion of the Aspen Grove checklist. The Servicelink requirement will require the contractor to have If your client requires a valid and active ABC number as well as the completion of the Servicelink checklist. Please note that some clients require a specific check-in. PPW will not be responsible for any fees are penalties as a results of the background check provider being changed.
n. Re-Calculate PCR’s - This feature will allow you to recalculate your PCR forms. For example, if you have created a new PCR form that is filtered to enter work orders that have already been created or imported this will add the PCR form.
o. Cancel Work order - This will allow you to cancel work orders in PPW. This will change the status of the work order and will only show the order if the closed filter is selected.
p. Delete work orders - This will allow you to delete work orders from the home page. To delete multiple orders, you must first have the group permission enabled. Please note that if you delete the order there will be no way for you to recover the order on your end. If you contact PPW support, we will be able to restore the order for you.
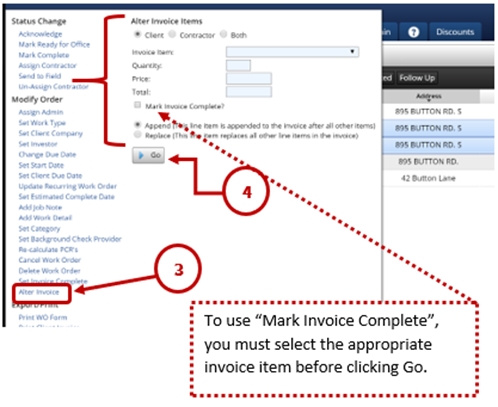
q. Set Invoice Complete- This will allow you to mark the invoice for work orders complete.
r. Alter Invoice- This is a PPW Premium package feature that allows you to alter invoice of work orders from the Home Screen.
a. Print WO form - This feature will allow you to view a PDF print out of your work orders
b. Print Client Invoice - This will to view a PDF print out of the client invoice you can send to your clients
c. Export to Excel - With this feature you will be able to print an excel spreadsheet of the orders you select on the home page. The columns will be determined by the columns you currently have selected on your home page.
d. Download Photos - This will allow you download photos from your work orders.
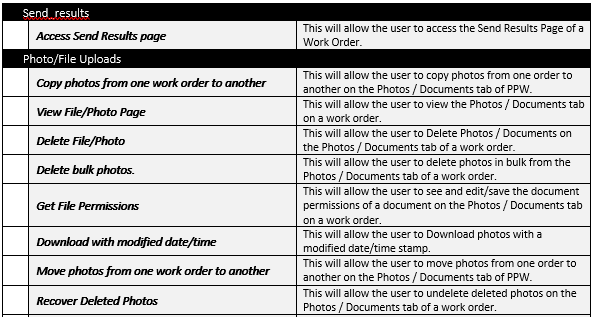
e. Send Results - Used to send results back to client via import/export.
f. Send Results by Email - Used to email a PDF package of results to the client for one or multiple orders.
a. Route - This feature will create a route for your work orders when working on multiple properties is required. Check the boxes for the work orders you wish to create a route for, once this is done you will click this option from the actions menu. You will then get a popup displaying a start and end address as well as all the addresses for the work orders you selected. Now click and drag the work order addresses to the order you desire using the 3 dots to the left of the work order address. Once the addresses are in the desired order you can click the create route button at the bottom of the popup window and it will pull the directions for the route. Once this is complete you can also use the print button to print the directions. Simply close out of the popup window to leave the route.
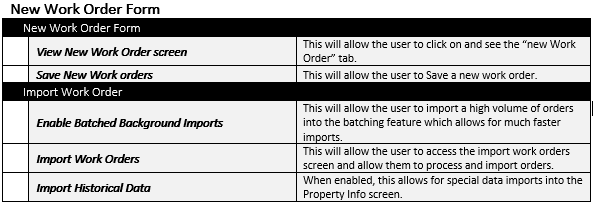
New work orders are created in the “New Work Order” tab.
Clicking on the “New Work Order” tab will show the new work order data entry form. You can also hover over the tab to access the work order import sections.
There are three ways to import new Work Orders into PPW:
Manually
Import Work Orders by accessing the Client’s website
Import Queue which utilizes the Auto Import feature
With the cursor placed over the New Work Order tab PPW will open a box highlighting the three option for entering new work orders. Clicking on New Work Order will open the screen for manually inputting a Work Order. The display is comprised of text boxes, some with pull down menus and some with a Push Pin Icon.
The Push Pin Icon will rotate and turn green if the information in the box is “Pinned.” If the WO is saved with information in a text box and a “Pinned” Push Pin Icon, the information will be saved and will auto-populate when the New Work Order tab is accessed.
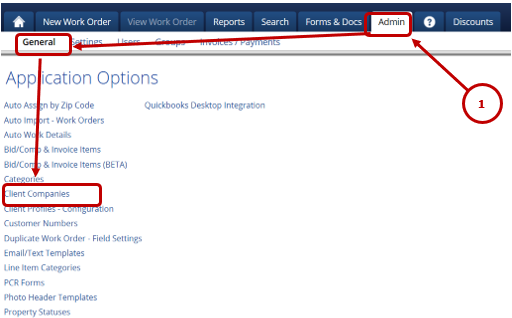
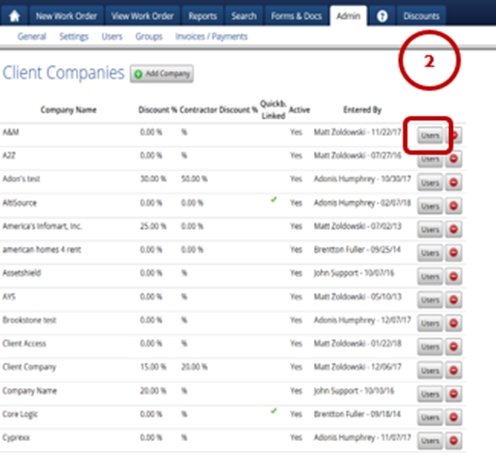
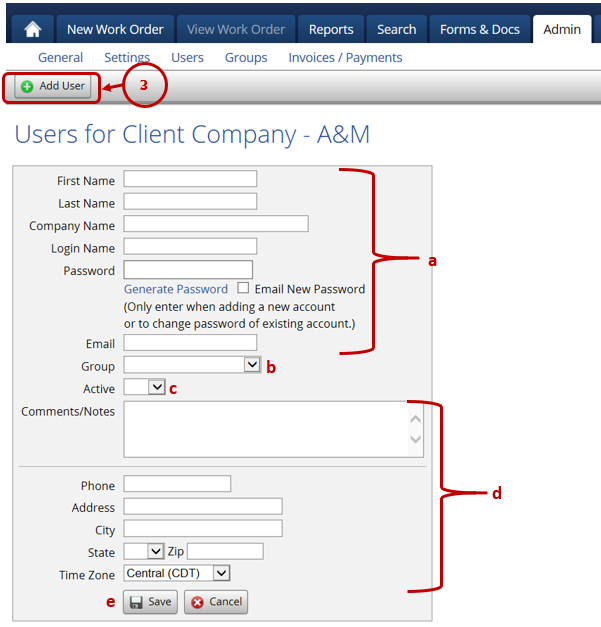
a. The Admin can set up a no-charge access account for a client. This type of activity is discussed in the Admin section and normally applies to clients who have consistent low volume work to be performed.
The Manual entry of WOs also allows for the creation of recurring WOs. In order to create a recurring WO, left click on recurring in the left-hand portion of the WO and several options will appear. There will be options to enter the number of days, weeks or months for the WO to recur, an option for the number of times per month, and an ending date. Clicking on the End Date creates a calendar display for selection of the ending date.
Comments again can be “Pinned” and will recur.
Importing work orders is the preferred method for creating new orders in PPW.
Work orders are imported using two different methods:
File based imports - These general use PDF files but other file types such as MS Excel and Word are also used.
Username & Password authentication - These imports require the client companies user credentials to pull work orders in directly from their website or online software application.
Left-click on 'Import Queue' and any orders that are ready for importing will be listed:
Imports that are ready will be listed. The first time importing from a client will require the setting of Work Types. The Client’s identification of the work type will be displayed next to the selection box, choose from the dropdown menu to identify & assign a Work Type Label. After the first time it is assigned, the system will auto assign the Work Type. If the Admin wants to change the designation, simply change it the next time it is imported.
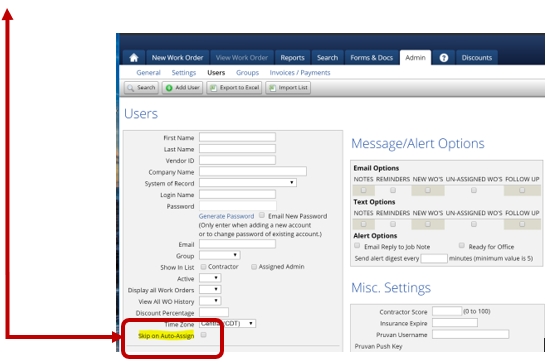
Contractors and Admins may also be assigned on import. If auto-assign is used the system will make a recommendation but it can be overridden. If assigning previous contractors is active PPW will use this option to assign contractors before the zip code assignments. Select Import and the WOs will be added to the job queue. If Admin or Contractors are not assigned when importing, the WO Status will be Unassigned.
1. To begin auto importing work orders into the system so they show up on the home screen, you will want to click on the Process button.
2. Once on the processing screen, you can then associate to the clients work type in parentheses. If there is not client work type in parentheses, then the system cannot automatically associate that work type the next time it comes into the system. If there is a work type from the client, then the system will automatically populate the last work type you designated in the drop down menu.
3. To teach the system what that work type is and to get the work order to populate on the home screen, you will first want to click on the 'Select All' button.
This will select all the work orders on the screen by checking in the check box on the left hand side of the work order number. Any box that is checked in will be SKIPPED from importing onto the home screen. You will want to un-check the box of the work order that you designated the work type for.
4. After you have unchecked the box, up at the top of the screen next to the un-assign orders button is a button that says 'Import Orders'. Click the button. That will import any work order that does not have a check box checked in. It will also teach the system what work types are so that the next time you go to that clients auto import, if there were a work order with that specific work type in parentheses, the system will automatically have the work type you designated in the drop down menu.
5. When you click on 'Import Orders', that will tell you how many work orders imported that will show up on the home screen, how many orders were skipped and will still be in the queue, and how many errors, if any, occurred.
Once the system has learned which PPW Work Types correspond to client work types, the system will match them automatically.
The Search Within text box will allow you to Search the orders that are displaying on the home screen for any criteria.
For example, if you wanted to see only the orders on ‘Alexis Rd’ all you would have to do is type in ‘Alexis’ in the Search Within text box and orders for ‘Alexis Rd’ would show.
This feature allows you to group work orders in clusters/groups to see a quick summary total.
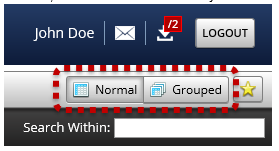
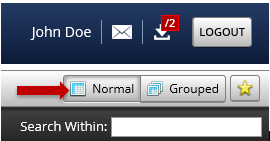
In PPW, there are two (2) different ways to view the Home Screen, Normal and Grouped. the Normal view is the default view of PPW.
To switch to Grouped, click on the ‘Grouped’ button which is beneath the log out button.
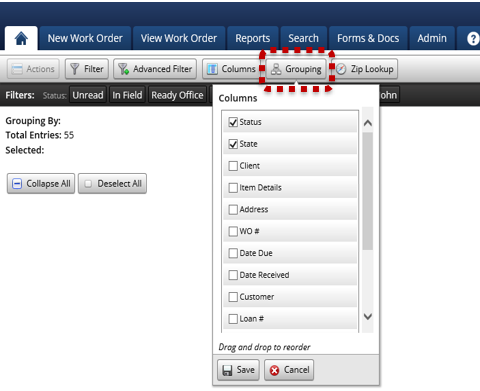
If you have never used the Grouped view before, you will need to do a little set up, after clicking on ‘Grouped’ this is the page you will see:
To start using this view, you will want to click on the button labeled ‘Grouping’ and select how you want the orders to be grouped:
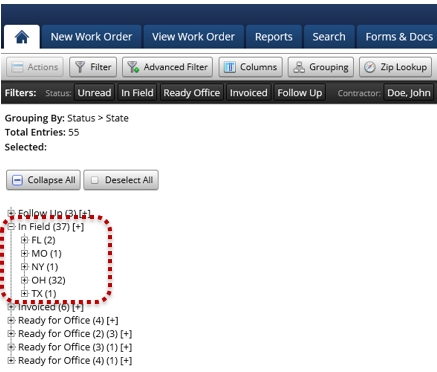
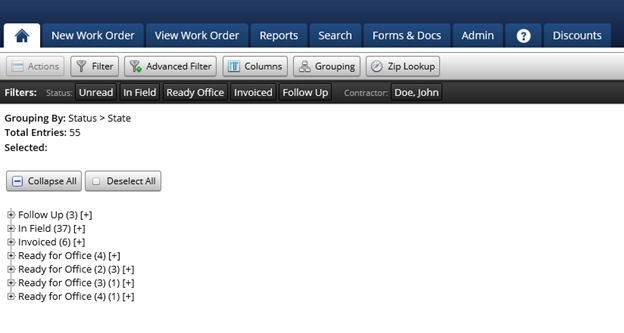
After you click 'Save", the page will refresh and will display as follows:
If you were to click the "+" button next to one of the statuses displayed, you will then see the list of States where those work orders are located:
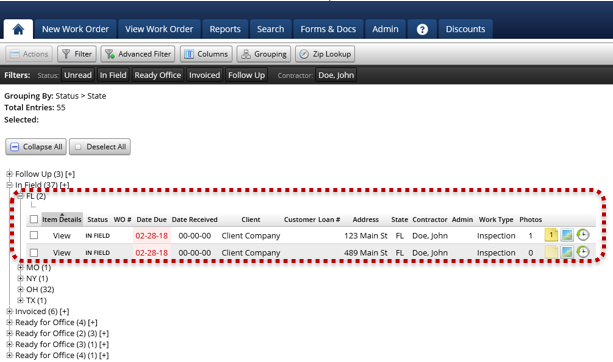
If you click the "+" button next to one of the States listed, we then see the work orders themselves:
To go back to Normal view, simply click the 'Normal' button:
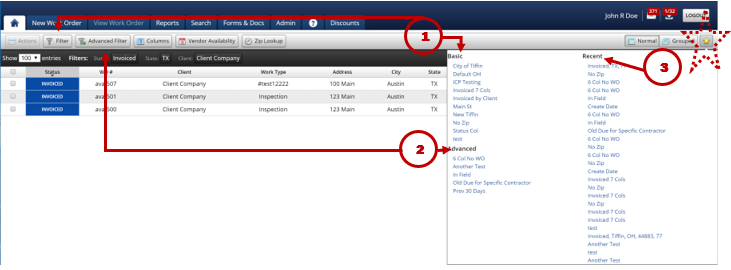
This button allows for access to all of your saved filters.
Clicking the 'Star' button will see the following:
1. ‘Basic’ Section – a list of any SAVED searches using the standard Filter.
2. ‘Advanced’ Section – a list of any SAVED searches using the Advanced Filter.
3. ‘Recent’ Section – a list of previous searches that were NOT saved.
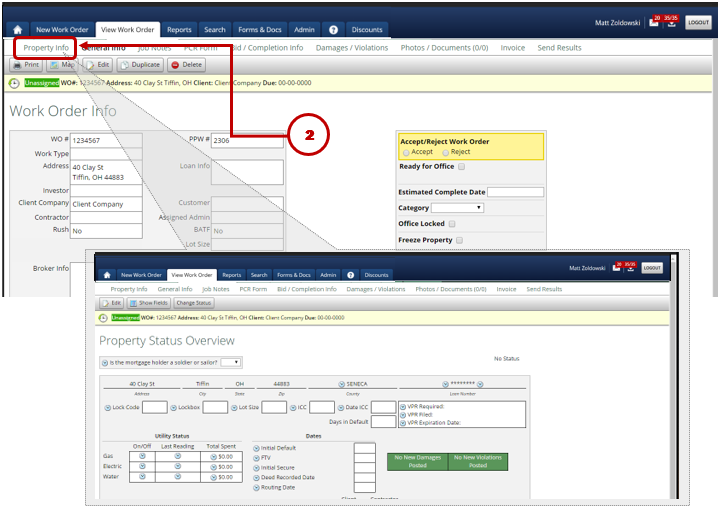
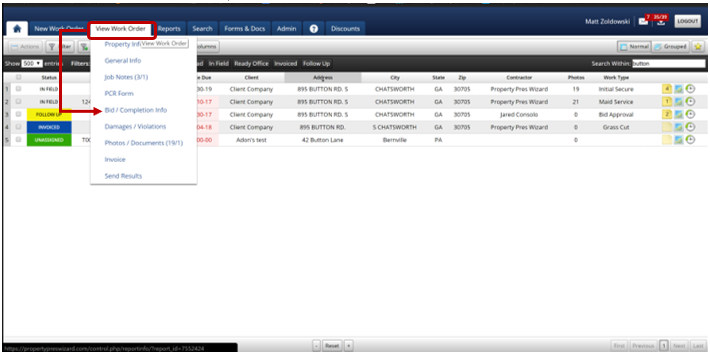
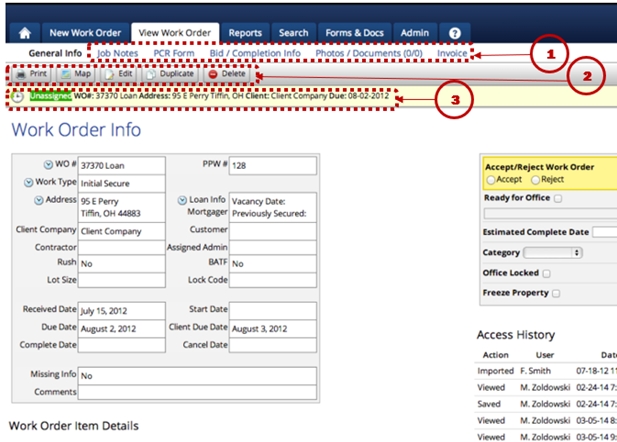
This tab will allow you to drill down into various parts of a specific work order.
To access a WO, simply click on the appropriate data line on the Home Page.
1. The WO will be automatically displayed under the View Work Order tab. Directly below will be a header with five (5) tabs used to enter various types of information into the WO:
Job Notes
PCR Form
Bid/Completion Info.
Photo/Documents (0/0)
Invoice
2. There are also five (5) self-explanatory Action Buttons: Print, Map, Edit, Duplicate, Delete. 3. Below the action buttons the current Status, ID Number, Address, and Due Date of the WOs.
It is useful to understand the information presented in the Work Order Info display and work backwards into the control Action Buttons and 5 Function Tabs.
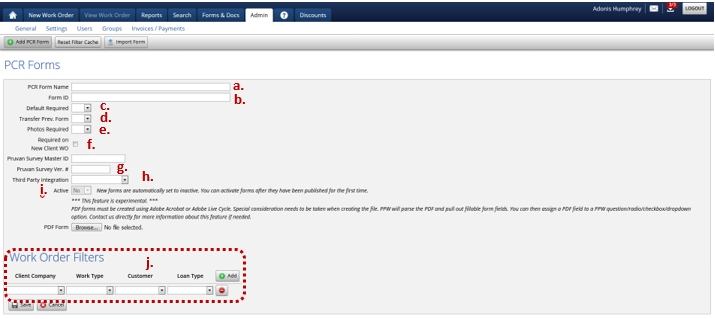
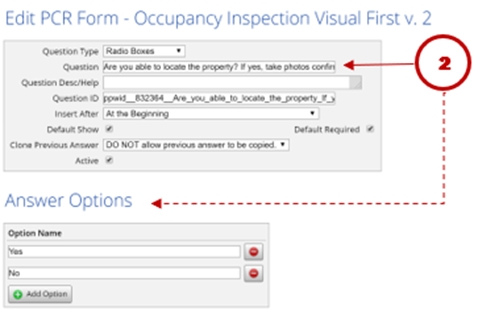
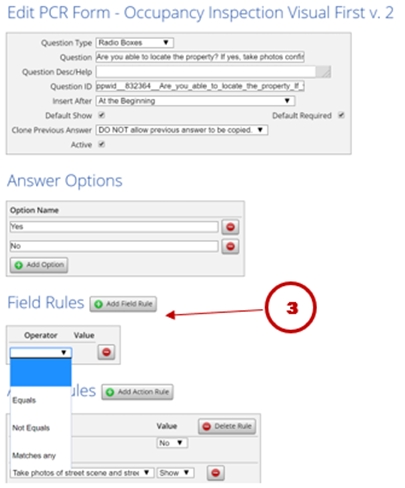
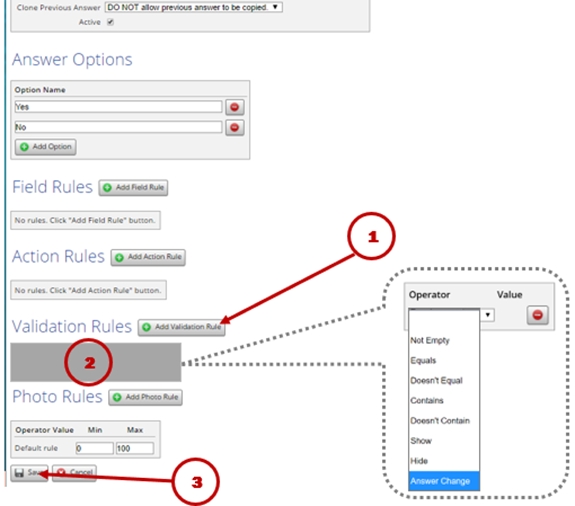
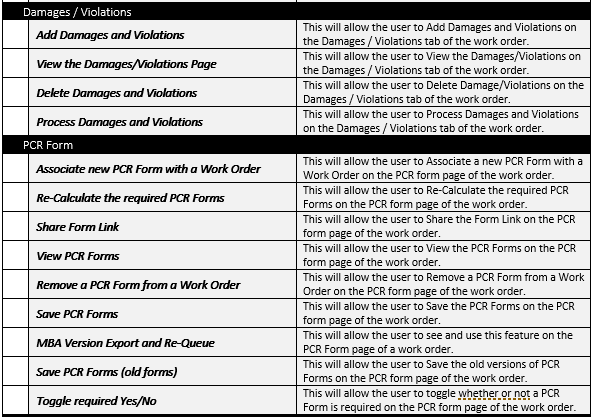
The Property Condition Report (PCR) is basically a questionnaire which can be created in the system.
There are several standard PCR forms available from which to choose. Questions can also be added to the standard PCR forms. Adding to or creating a PCR form provides the Admin the ability to make rules such as: which WOs they apply to, or which clients, etc. If the Admin makes this a required form, the contractor will not be able to submit their work until they have filled out the required PCR Form.
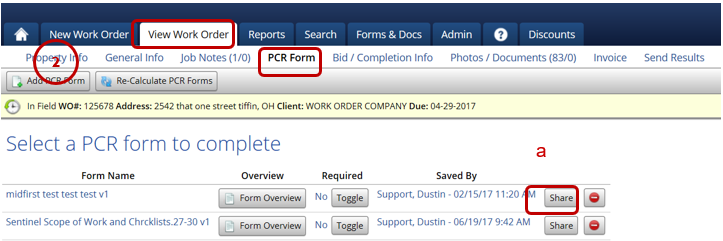
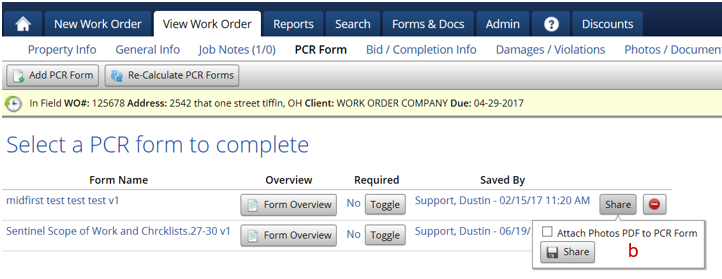
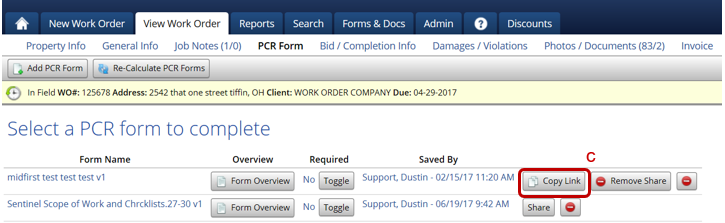
To access the form simply left click on the appropriate form, if the contractor has a smartphone or tablet, they can fill out the form at the property. If the contractor is going to be in an area without known internet access at the work site, they can print a PDF version and take it with them.
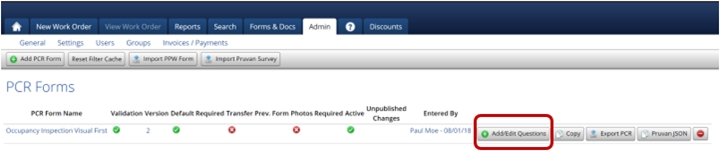
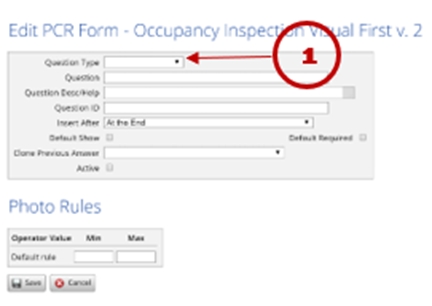
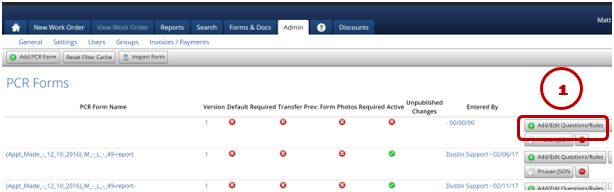
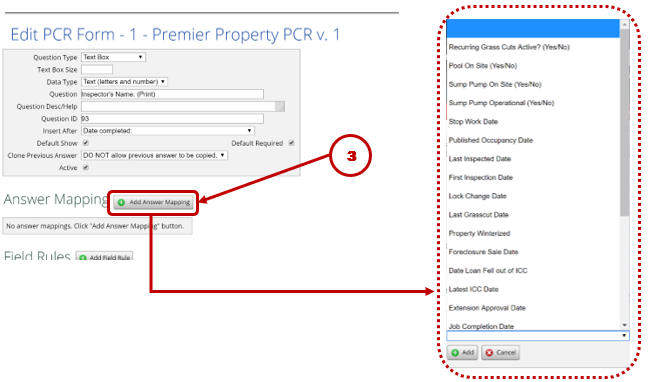
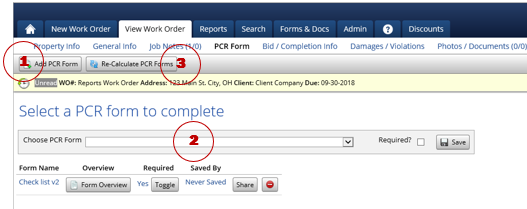
Click the ‘Add PCR Form’ button which will bring up a drop-down menu that will display all of the PCR forms in your system.
To add a PCR form, simply select the form from the list, choose whether or not to make the form required and then click the ‘Save’ button, this PCR form will now be added to this work order.
The ‘Re-Calculate PCR Forms’ button will allow you to recalculate your PCR forms. What this means is that if you have created a new PCR form and have added filters to that PCR form in the Admin section, you would then click the ‘Re-Calculate PCR Forms’ button and the PCR form will automatically be added to this order.
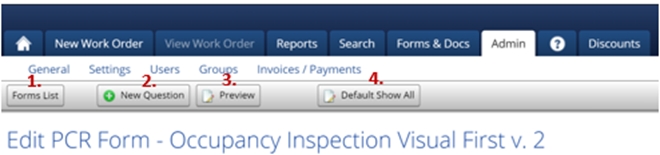
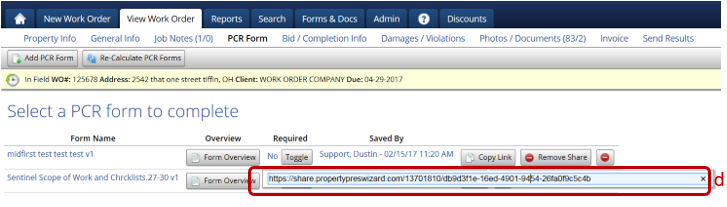
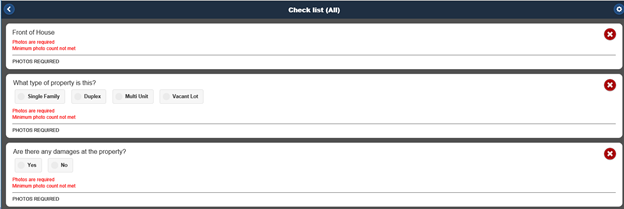
To fill out the Form from the web simply click on the 'Form Name' and a new tab will open allowing you to fill out the form. To answer the question, simply select or type in the answer and the form will automatically save that answer, there is no save button to press as the system saves the form as you answer questions.
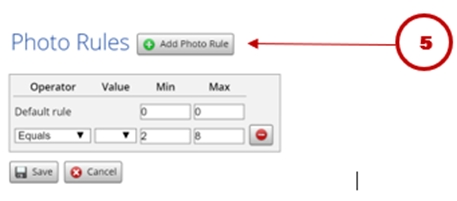
If the photo requirement has not been met, you will see an error message below the question.
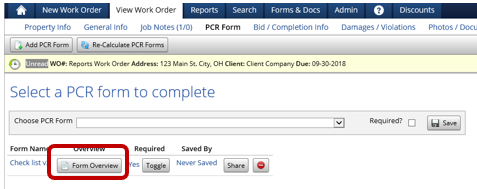
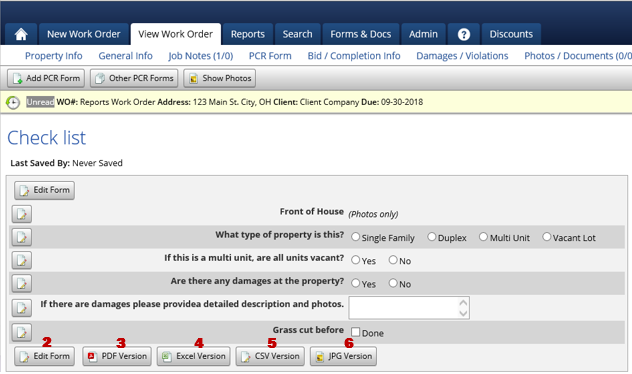
After the form is filled out you can close the window where you answered the questions and then to review the form, you can click on the ‘Form Overview’ and this will allow you to do a few things.
From the Form Overview page, you will be able to:
Review the answers to the form.
Edit the Form, which will take you to where you can answer the questions.
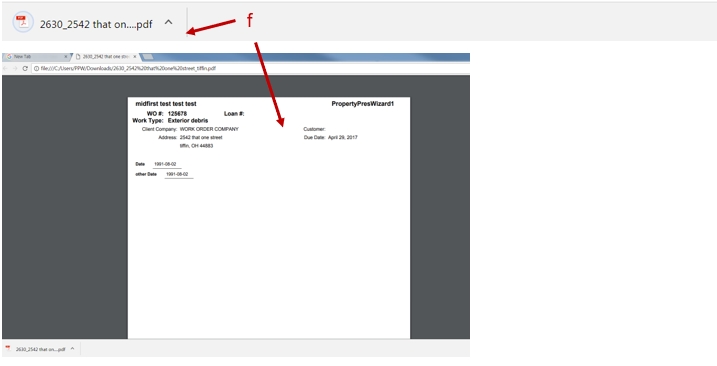
Print a PDF version of the form.
Print an Excel version of the form.
Print a CSV version of the form.
Print a JPG version of the form.
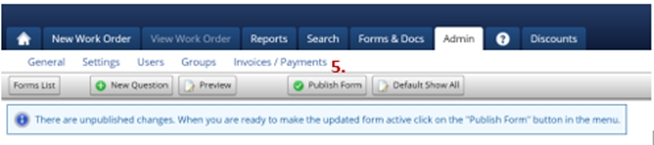
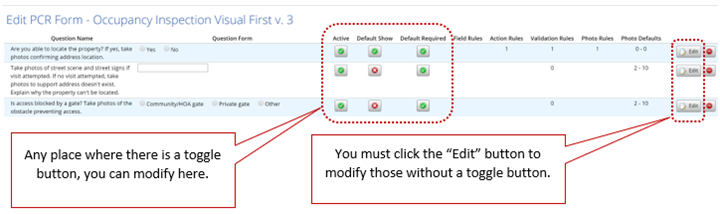
Going back to the main portion of the PCR Form page you will also be able to toggle whether or not this form is required, if the form is required, the order will not be able to be made Ready for Office until all of the questions are answered. You will also be able to see the last user that saved the PCR form along with the date and time it was saved.
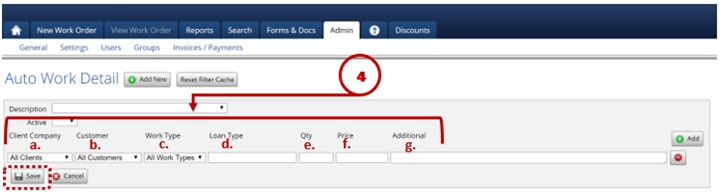
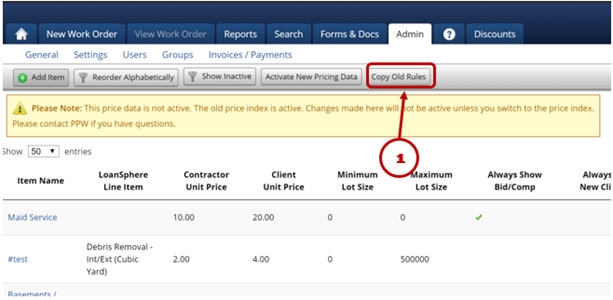
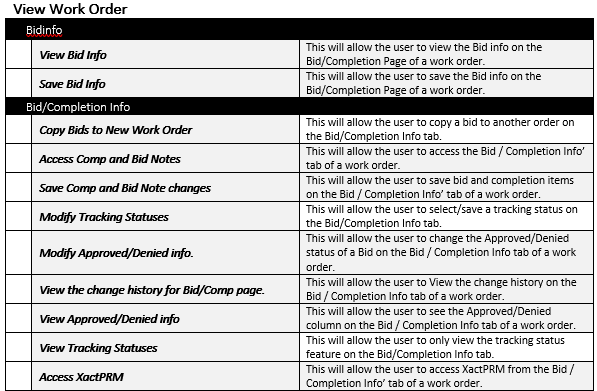
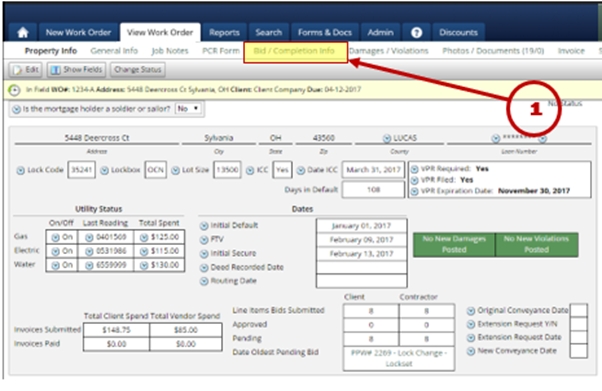
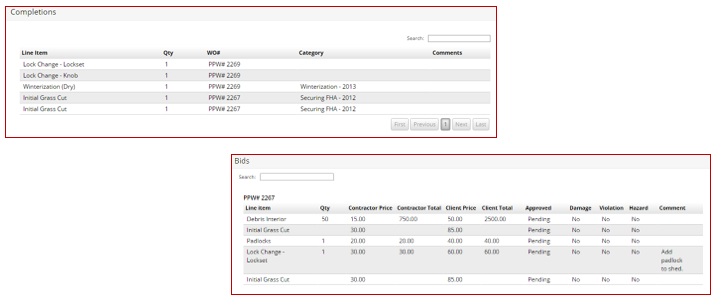
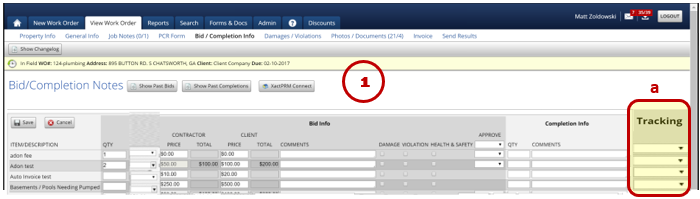
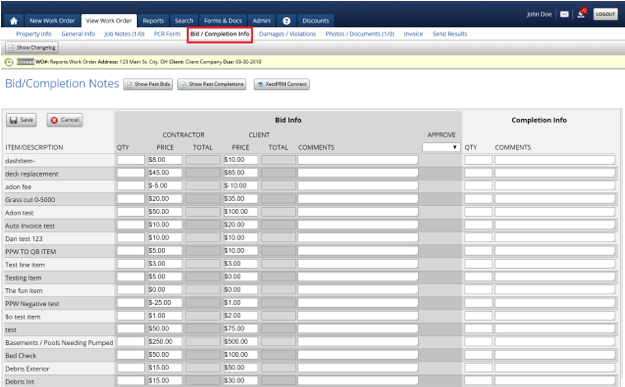
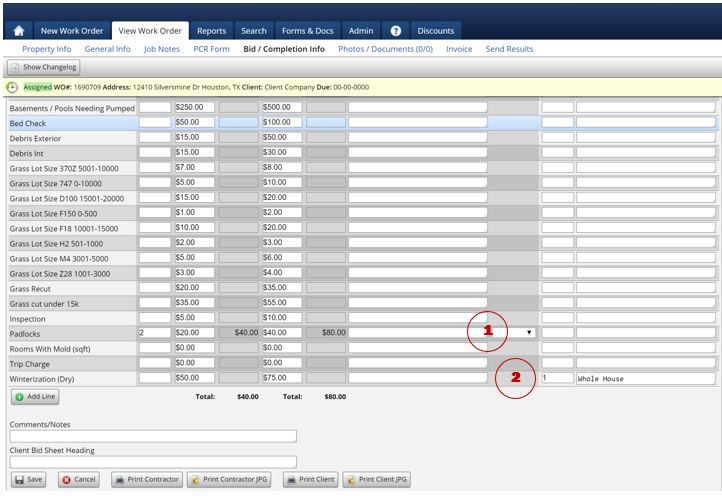
The Bid / Completion Info tab of PPW is where Bid items and completion items can be entered.
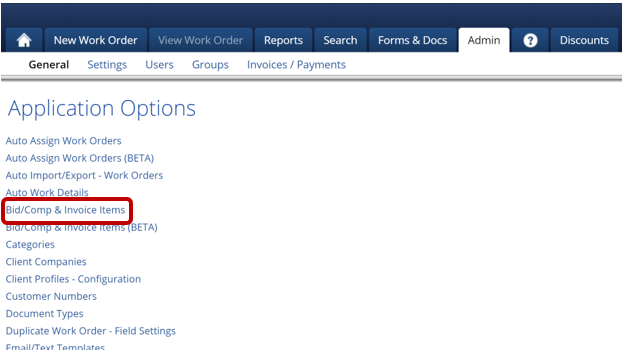
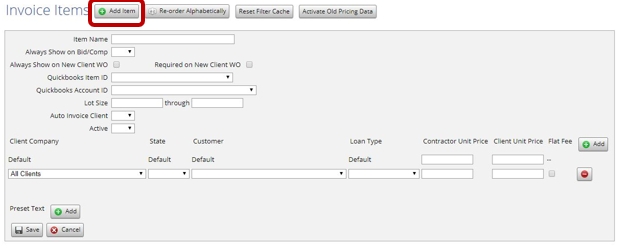
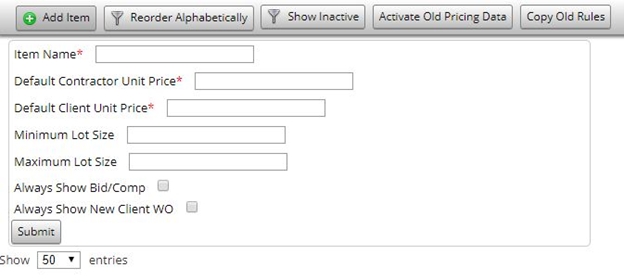
The items that show on this page can be set up under the ‘Bid/Comp & Invoice Items’ portion of PPW which is under the ‘Admin’ tab.
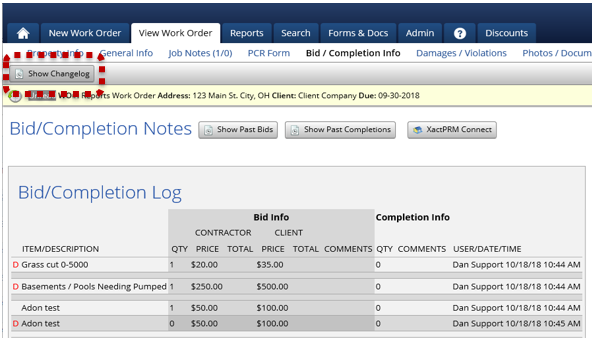
On the Bid / Completion Info page there is a ‘Show Changelog’ button at the top of this page, clicking this will allow you to see the changes that have been made to the bid and completions on this particular work order.
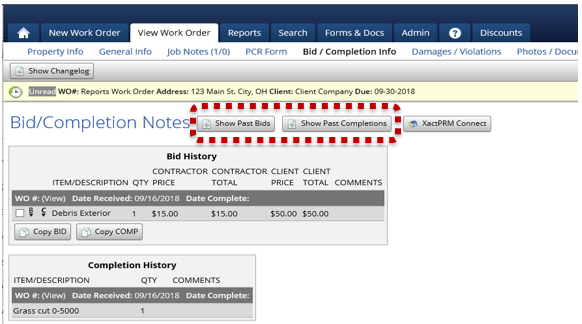
Next on this page are 2 buttons labeled ‘Show Past Bids’ and ‘Show Past Completions’ these buttons have very similar functions. Once clicked, these buttons will show you any past bids or completions for this property. If a bid or completion was added to another work order for the same property, clicking these buttons would display those bids or completions.
Also, when viewing the past bids, you can copy them to the present work order’s bid or completion items by clicking the check box next to the appropriate item and then clicking the ‘Copy Bid’ button to copy the bid to this work order or ‘Copy Comp’ to copy this item as a completion on this order.
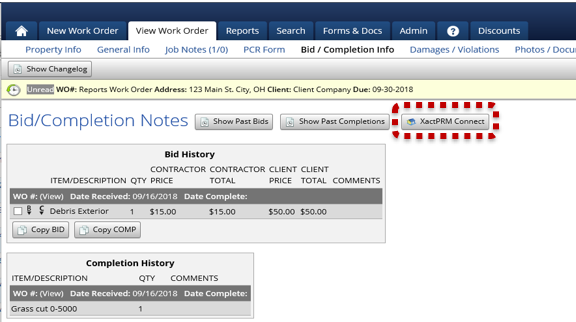
The ‘XactPRM Connect’ button will allow the user to connect this work order to a project in XactPRM. Also, any items added to this order in XactPRM will allow you to copy them to the bid/completions tab of the work order.
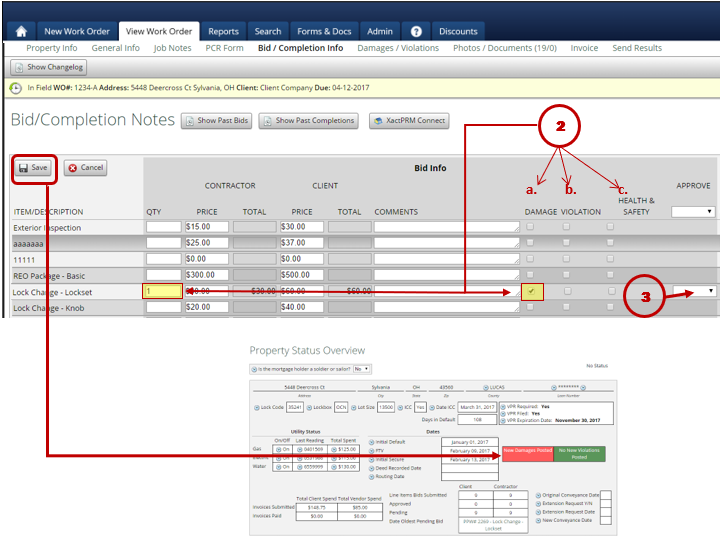
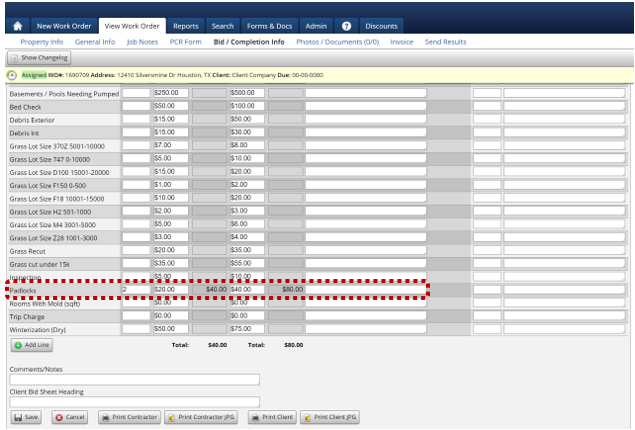
To enter a bid item into PPW, all you have to do is enter a quantity for the bid item, the appropriate pricing for the contractor and the client and if needed, comments can be added.
After a bid item has been saved, and Admin can view the page and Approve or Deny the bid.
To enter a completion item, simply enter a quantity under the Completion Info Section, and if needed, comments can be added.
After a bid item has been saved, and Admin can view the page and Approve or Deny the bid.
To enter a completion item, simply enter a quantity under the Completion Info Section, and if needed, comments can be added.
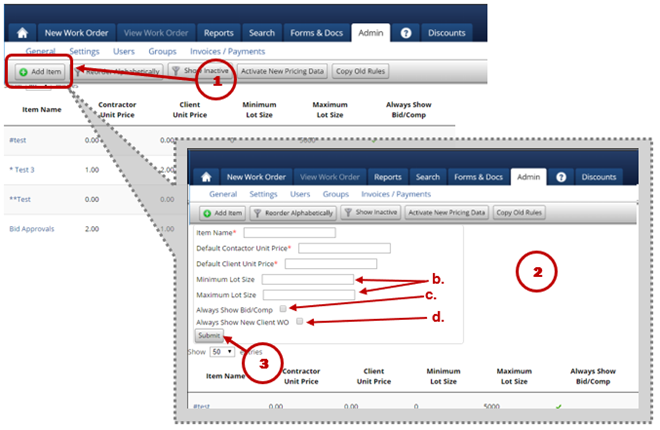
If the correct bid/completion item is not appearing on the screen, or you need to create a one-time-use bid or completion item, scroll down to the bottom of the page and click the ‘Add Line’ button.
After clicking ‘Add Line’ a drop-down menu will appear that will have additional items that were set up in the Admin tab. If you still do not see the appropriate item, there is an ‘*Other’ option. If you select ‘*Other’ this will allow to manually add a one-time-use bid or completion item, after selecting other, type in what you want to name the bid or completion. After entering the name, you will need to enter the appropriate quantity and prices.
Once everything looks good on this screen, click ‘Save.’ If there are any errors, they will be highlighted in red, simply correct the issue and then click ‘Save’ again.
You can also add any generic Comments/Notes to the bottom of the bid/comp page as well. if applicable.
Lastly, you can enter a Client Bid Sheet Heading that will show on the printed version of the clients bid sheet, if applicable.
After saving, you can Print the contractor and/or client version of the bid sheet to a PDF or JPG.
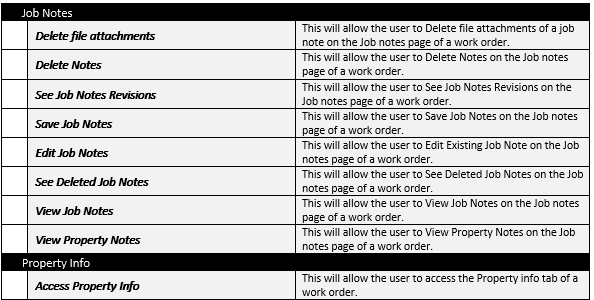
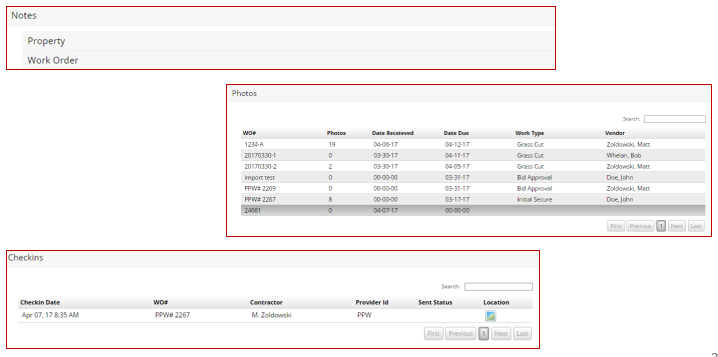
The Job Notes tab allows you or your vendors to send messages back and forth, or to make a note of something regarding this particular work order or the property itself.
The Job Notes tab allows you or your vendors to send messages back and forth, or to make a note of something regarding this particular work order or the property itself.
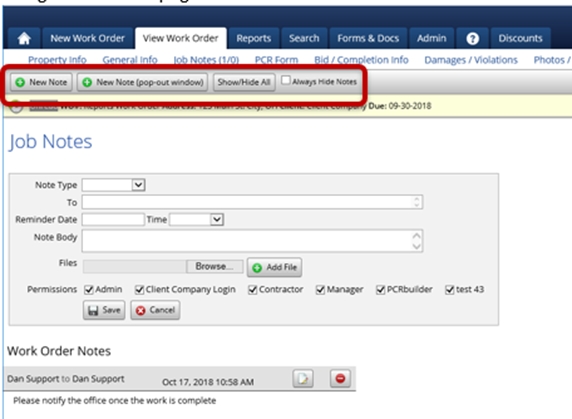
These notes are also visible on the home screen. The number of Work Order notes and Property notes is displayed next to the Job Notes inside the parentheses. When the cursor is placed over Job Notes (0/0), The Work Order Notes and Property Notes associated with this Work Order will be displayed. This is the major communications Tab. When selected, the system will display:
● New Note
● New Note (pop-out window)
● Show/Hide All
● Always Hide Notes
Buttons ‘New Note’ and ‘New Note (pop out window)’ will allow you add a new job note to the work order, the only difference is that New Note (pop out window) will open a new window to enter the job note instead of it being on the same page.
“Show/hide All” will minimize or display all the job notes on this order. This can be useful if there are many notes on the order, you will be able to click this button and it would ‘Hide’ the notes and you would be able to click on the ones you want to see.
If “Always Hide Notes” is checked, then the notes will always be minimized when you open the job notes of the work order and you will have to click on the notes to view them.
There are three applications for Job Notes:
Property Notes
Work Order Notes
Reminder Date
Property Notes stay with the property and repopulate every time a new WO is received for that property such as an address correction, directions, or warnings. Any information which the contractor may need each time they visit the property. Anytime a Property Note is needed, simply type the note into the message box, add files, adjust permissions and save. The note will automatically attach to any new work orders for that property and be displayed in the Property Note section and on the Home Page.
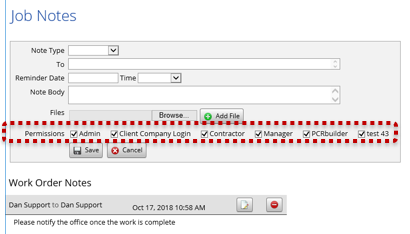
Work Order Notes are specific to the work order. To send a note to someone in the system, simply insert their name. If Admin wants to message a client, enter their email, write the note, attach any files necessary, choose permissions, and save. PPW will automatically send the message. When the client responds, it will post in the Work Order Note and also be sent to the sender’s email in the process providing a record of reference to the communication. This will save the contractor time by eliminating the need to continuously check the system. Likewise, it will save Admin time by attaching to the work order and not having to look through emails to find the message and response. Work Order notes may also be viewed by placing the cursor over the Work Order Note Icon on the Home Screen.
The last feature in Work Order Notes provides the Admin with a convenient method of sending out work order reminders. The Admin will insert the date and time to be transmitted, enter the note, and when the date and time arrive PPW will automatically send the note to the addressee.
When entering a note, you can also set up the permissions of which groups would be able to see a job note. If you do not want a certain group to see the particular job note you are entering, simply uncheck the group before saving the job note and that group will not be able to see this job note.
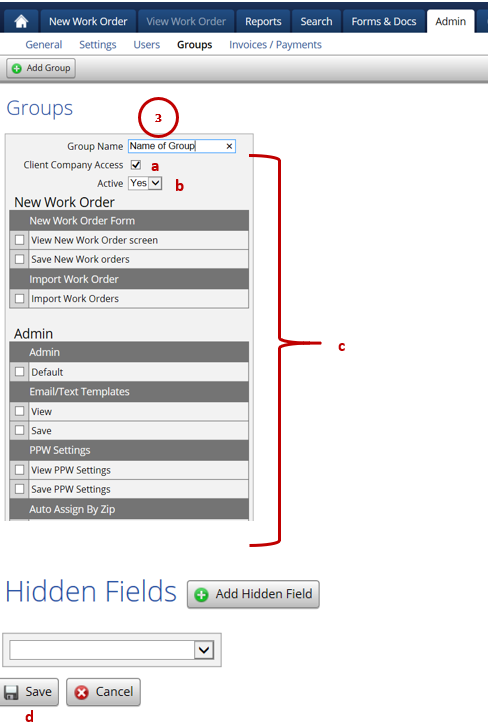
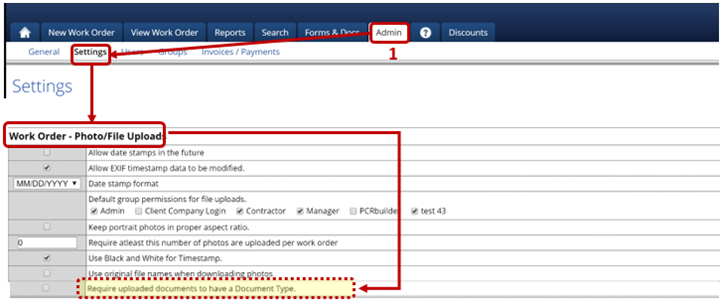
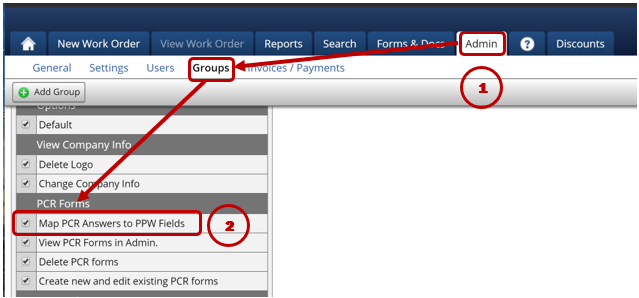
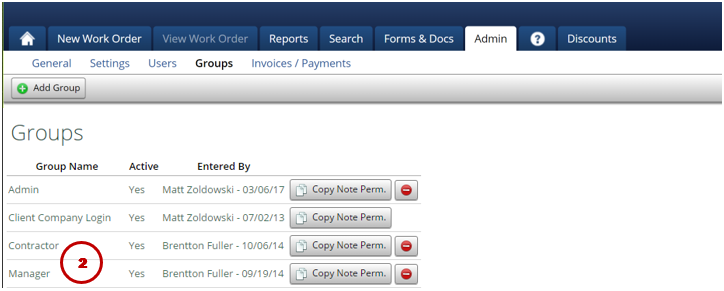
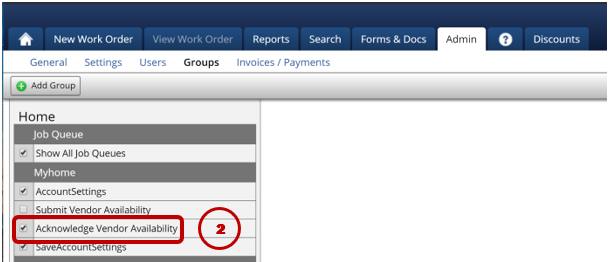
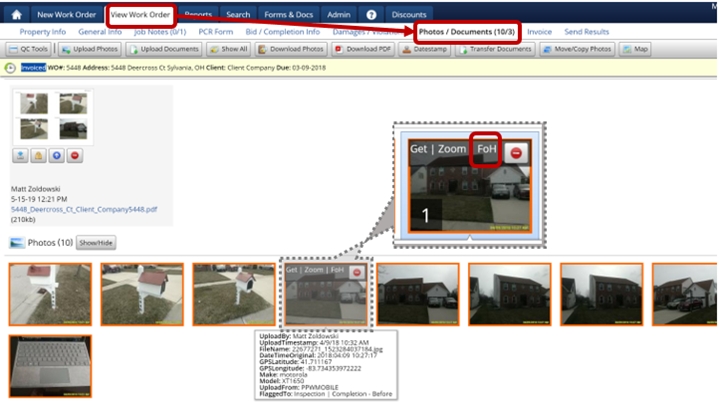
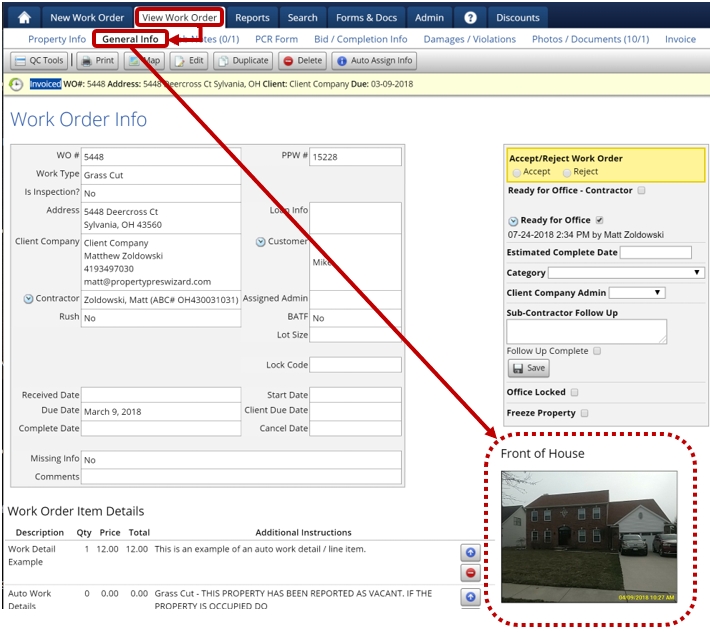
This group permission option will allow office staff/admins to flag a photo as the front of house which will then display it in various locations.
For clients with imports who will send the Front of House (FoH) photo, it will be displayed even if the group permission option has not been activated.
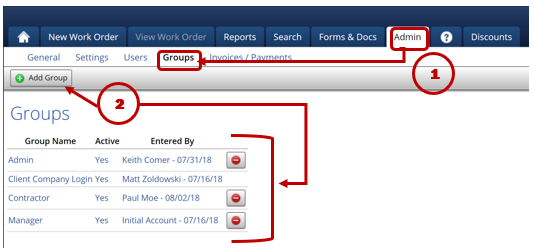
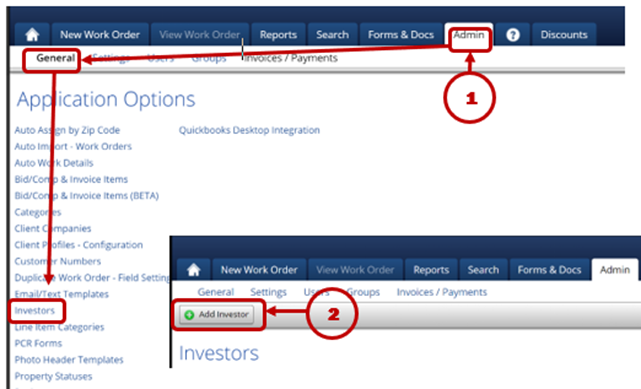
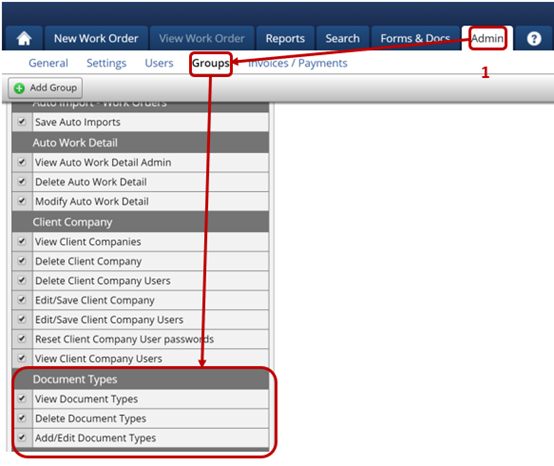
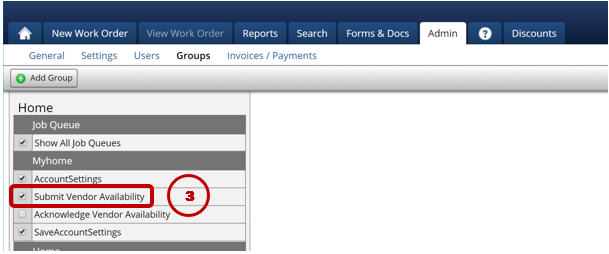
GOTO Admin > Groups:
View Work Order>Photo/File Uploads>Set Property Front of House (FOH) Photo
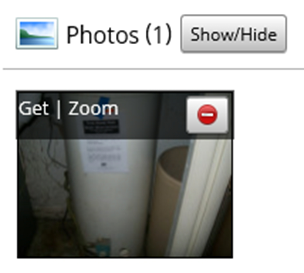
Once the permission is activated, the user will have an additional option when viewing a photo. Along with the ‘Get’ and ‘Zoom’ functions, the user will see the ‘FoH’ option. Clicking this option will flag that photo as the Front of House photo.
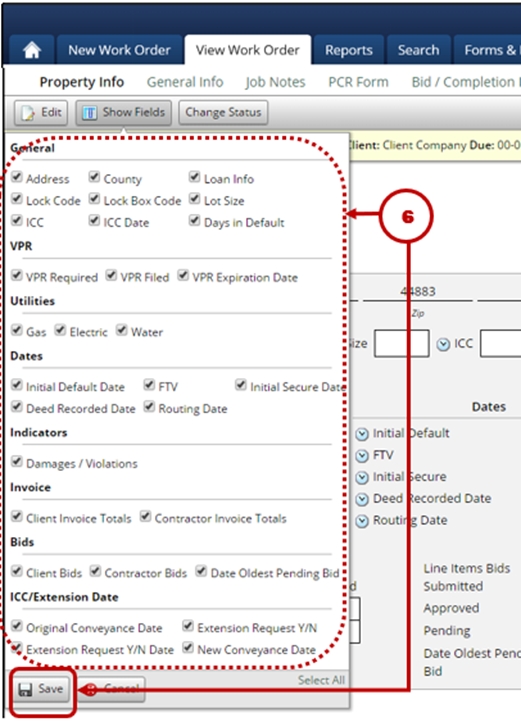
Once a photo has been marked as ‘FoH’ OR has been imported from a client that has sent it, the image will be displayed here on the General Info page of the View Work Order tab.
This view is only available to Premium Package customers.
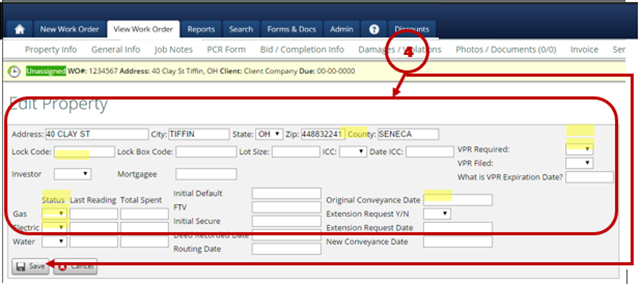
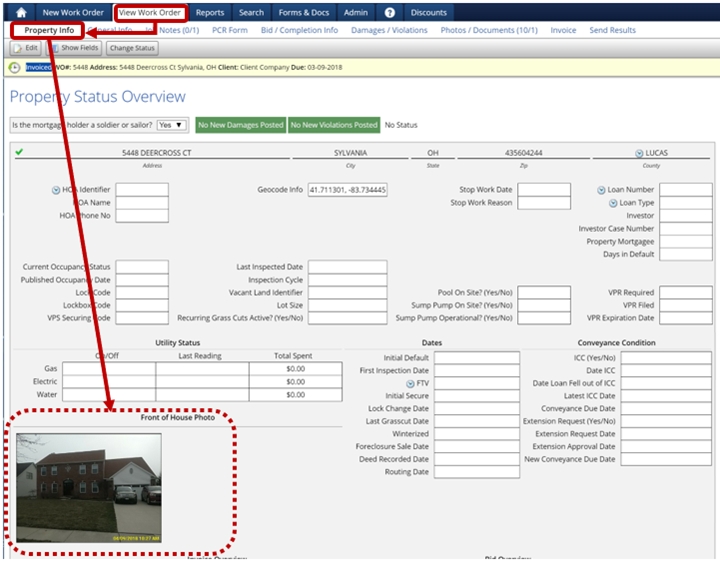
For Premium Package users, the photo which has been marked as ‘FoH’ OR has been imported from a client that has sent it, the image will be displayed here on the Property Info page of the View Work Order tab.
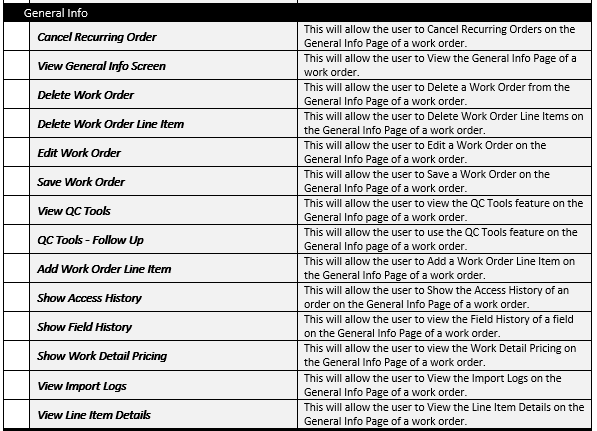
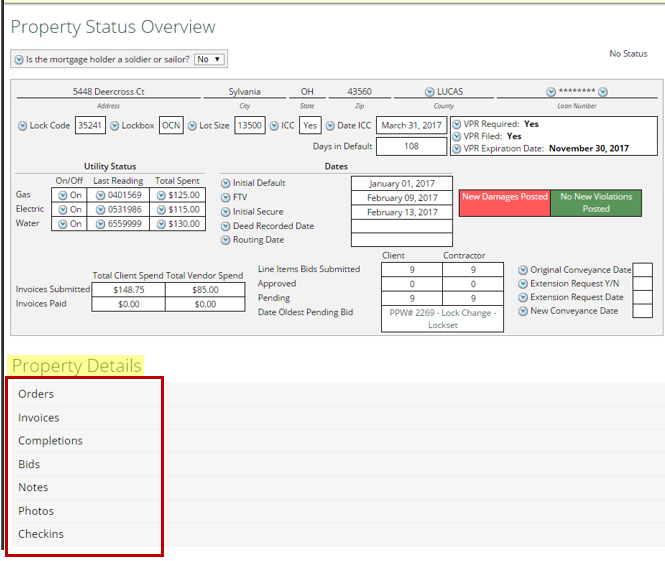
To access a Work Order, simply click on the work order from the home page of PPW and it will take you to the ‘General Info’ page of the work order.
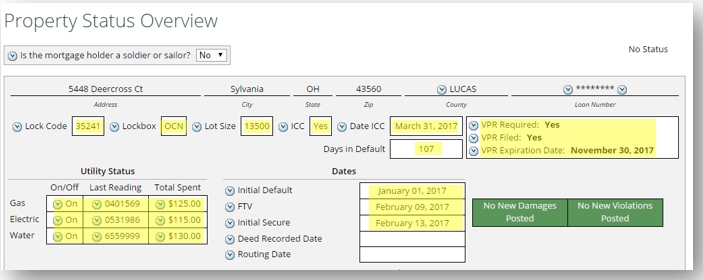
The Work Order Info address section includes the location of the property and other pertinent identification information.
If there is a Clock Icon next to a data block:
It indicates that the information displayed has been modified. Clicking on the icon will display under the Actions Block in the right-hand corner and it will show you the old value, the name of the person who modified the data block, and the date and time the data block was modified.
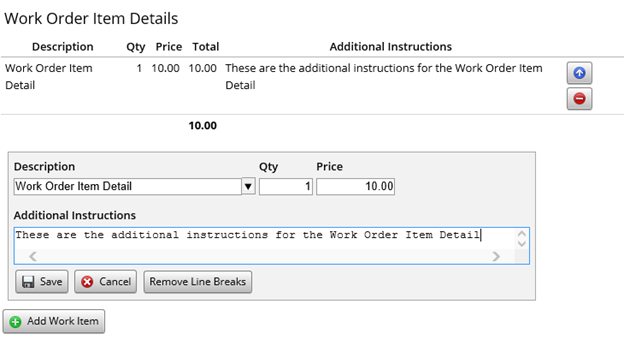
The description of the work to be performed at the property will be displayed in this section. The information is automatically populated when the Work Order is imported from the client. This section can be modified with customized Auto Work Details, which will be covered in the Admin section. To edit this information, simply click on the information to be modified, and the edit screen will be displayed.
Pricing Information: When work is imported, some clients include pricing information in the detail section. There are three options:
1. Do nothing and allow the contractor to see the prices
2. Under the Settings section of PPW there is an option that will highlight the pricing displayed here so that it can be easily reviewed before assigning it to the contractor. Hereis a link to that page.
3. Automatically remove the pricing. Here is a link to the page where this can be enabled.
If you would like to change the pricing that shows or any of the information pertaining to this work item detail, hover over the work order item detail itself and click on it, and this will allow you to edit any of the information that displays.
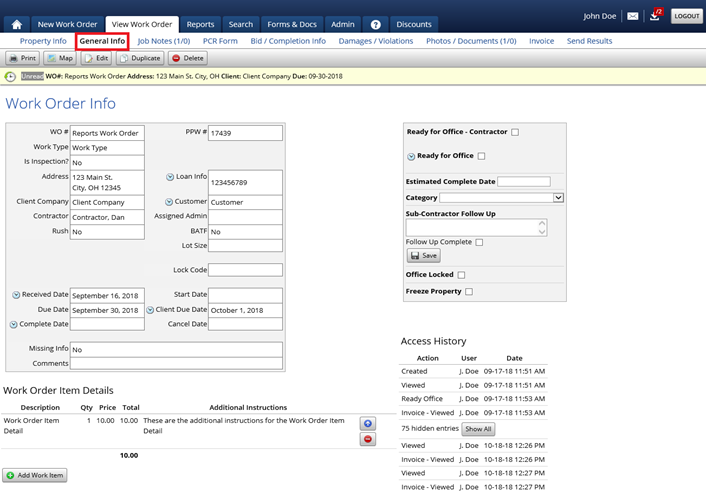
Access History is located on the right-hand side of the screen. This is a complete chronological listing of access to the work order. All activity associated with the Work Order will be displayed (e.g. importing, viewing, saving) along with the date and time and the individual who accessed the Work Order.
If the Work Order is accessed over 18 times, the entries will be hidden and an identification line will appear displaying the number of hidden entries associated with the Work Order. To view hidden entries, click on the Show All button.
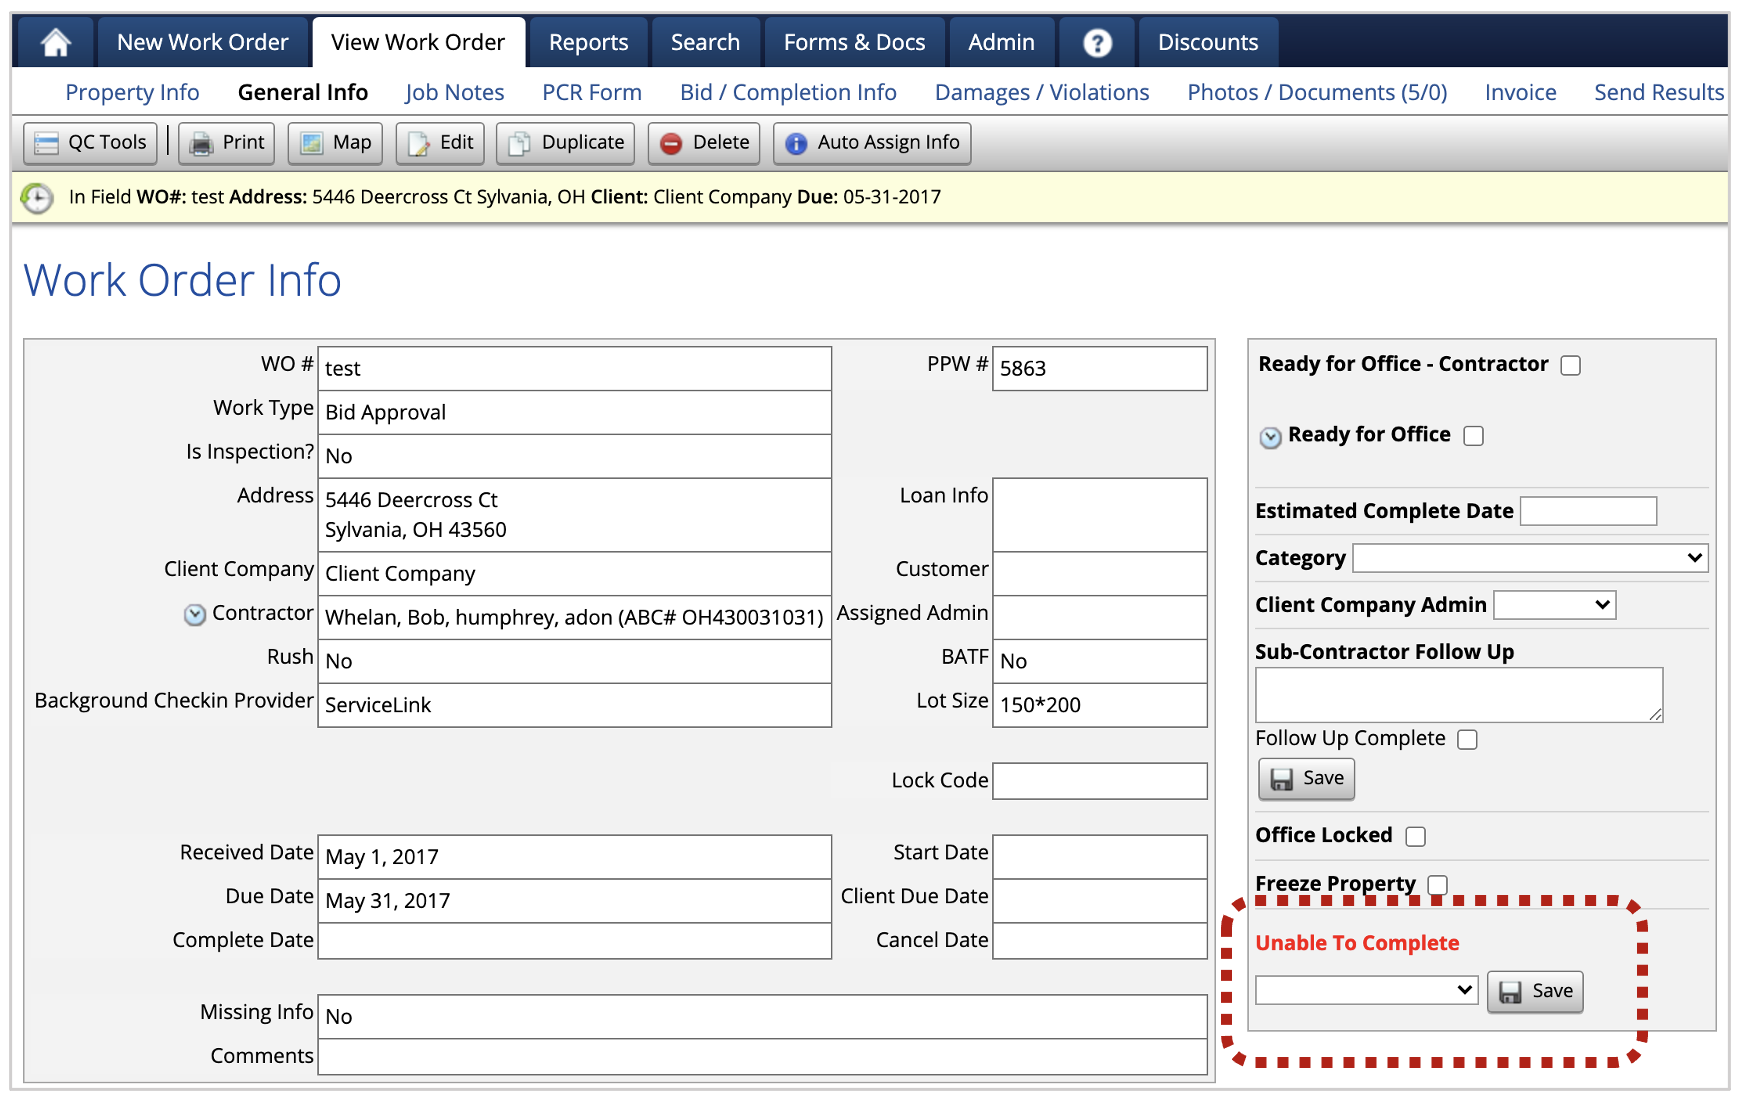
Located at the top right corner is the Actions Block, which gives Admin the ability to "freeze the property". There are times when a contractor will go to a property and find that they cannot access it because it was sold, in bankruptcy, etc. and they can’t go back.
Even though the information is sent to the client they may issue another Work Order for the same or similar services. Upon importation of the Work Order it would be highlighted in red and identified as “Property Frozen.” If there was a duplicate, the user has the opportunity to contact the client to find out if something has changed allowing access to the property.
If there are multiple processors in the operation, each processor may individually lock a Work Order. This ensures that only that specific processor can edit the work order until it is unlocked. The Admin may override the lock, but other processors cannot make any changes. This will allow a processor time to make changes, updates, etc. without anyone else making changes to the Work Order. The Work Orders may be viewed by others, but not edited.
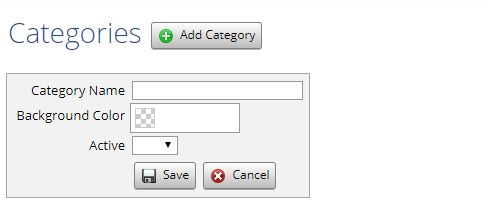
Category is an open field. Categories may be added by the Admin to group, sort, or manipulate Work Orders for those situations which are not normally covered by PPW. Examples include using the categories as sub-work types or sub-property statuses.
Estimated Completion Date is a communications link with the contractors. It displays the date of when the Work Order is expected to be completed. By default, it cannot be pushed past the client completion date; however, there is an option in the Admin section which will allow the Estimated Completion Date to be pushed past the due date.
When the contractor checks the Ready for Office box, the Work Order will be submitted for processing. If there is information missing which is required, a red box will appear above the Ready for Office line identifying what is missing from the Work Order. The contractor can then go back into the Work Order and complete the missing areas. The Work Order cannot be submitted for processing with required information missing.
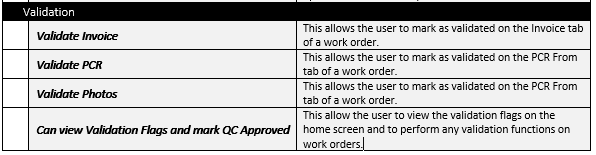
QC Tools: Will allow you to review results from the field and perform other functions. See the 'QC Tools' page in this section.
Print: Selecting Print saves the Work Order to the desktop in a .pdf format for printing at a later time.
Map: The Map function locates the property on a map of the U.S.
Edit: The Edit function allows modification to the Header information of the Work Order. It also allows the user the ability to mark information by checking the Missing info box and entering what is missing or what needs to be changed. This will change the Status to Follow Up and send an email to the contractor. There is also an area for additional Comments to be sent through an email when the editing is finished and the Save function is activated.
Duplicate: Selecting Duplicate creates a new Work Order for the property being serviced.
Delete: Removes the Work Order from the system. When clicking Delete the system will generate a warning message in a bold box: “This will delete the report and all of the information that is associated with it. Do you wish to remove this record?” The user can then select “OK” or “Cancel.”
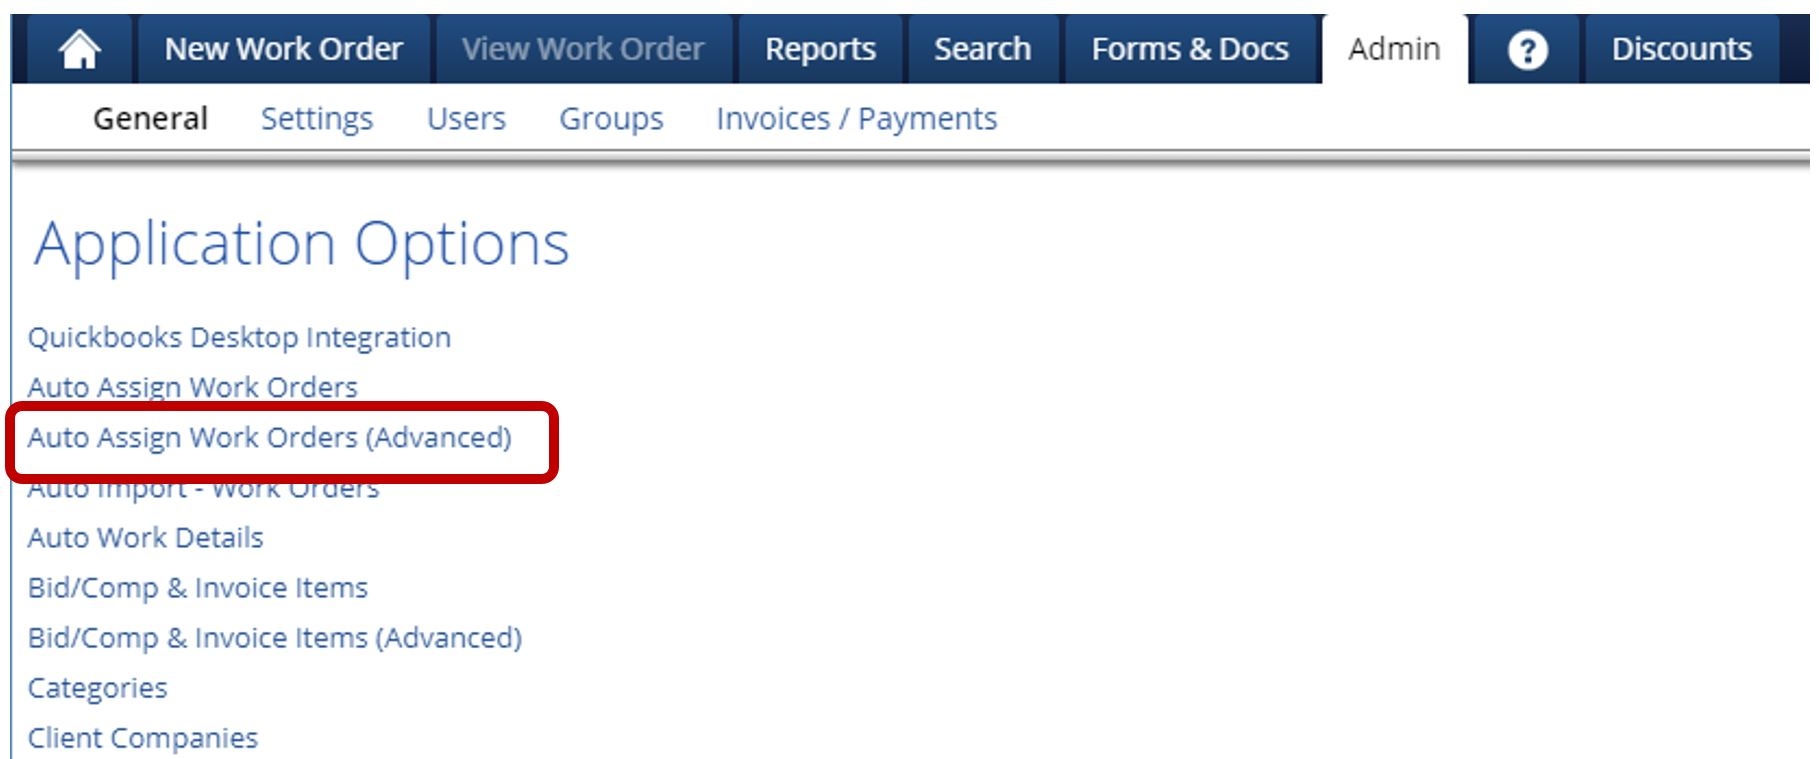
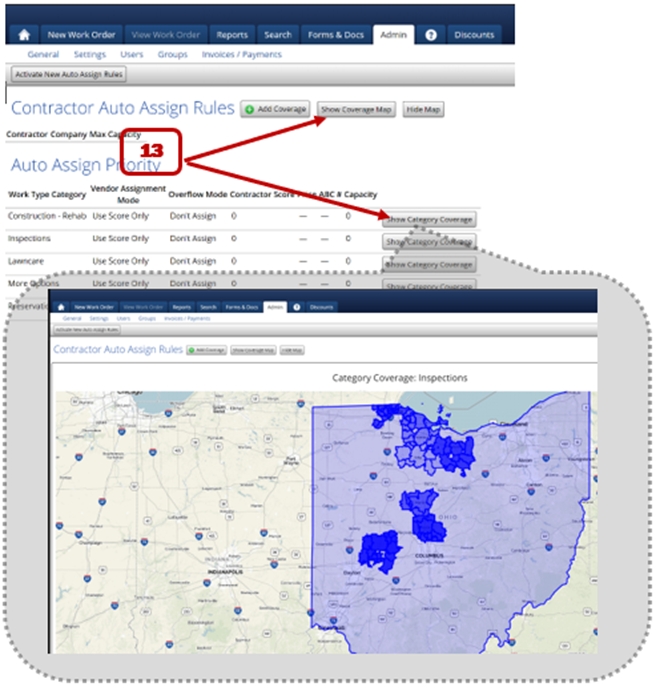
Auto Assign Info: If using the Auto Assign Advanced feature (which is covered in more depth here) clicking this button will advise which contractor should be assigned to this work order
This feature will allow you to more efficiently review results before submitting to your clients. Let’s take a closer look.
1. To begin, click on the ‘QC Tools’ button of an order that has been returned from the field: This button is visible on all pages except Property Info and Damages/Violations.
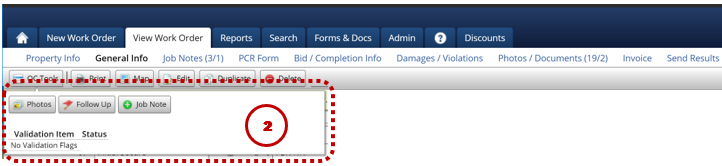
2. When clicked, the following box appears:
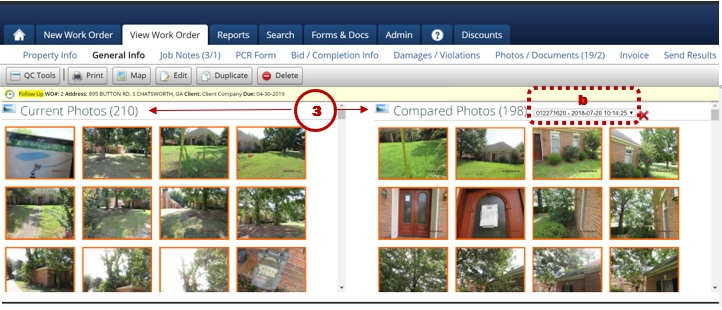
3. Click the ‘Photos’ button to see the current photos on the left and the previous photos, if available, on the right.
a. NOTE: the last photos of the same work type will appear. If none are available, it will display the most recent order’s photos.
b. You can also choose to display any other work order’s photos by selecting the work order from the drop down.
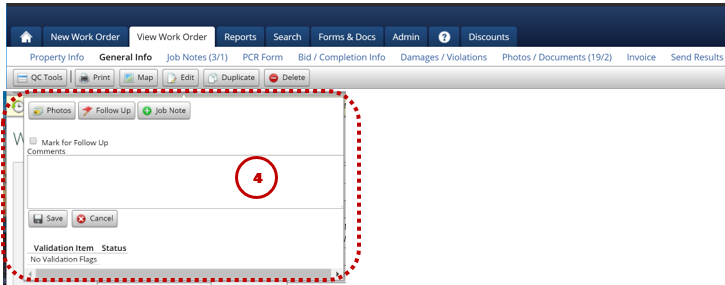
4. Click the ‘Follow Up’ button send a follow up notice to the vendor.
5. Click the ‘Job Note’ button and a pop-up window will appear that will allow you to enter a work order or property note without have to go to the Job Notes page.
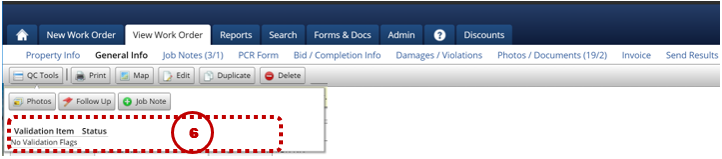
6. Finally, once you have established specific PCR Validation Rules and general Validation Rules (see these sections of the manual), if an order that has been flagged for a specific validation will have the issue listed here.
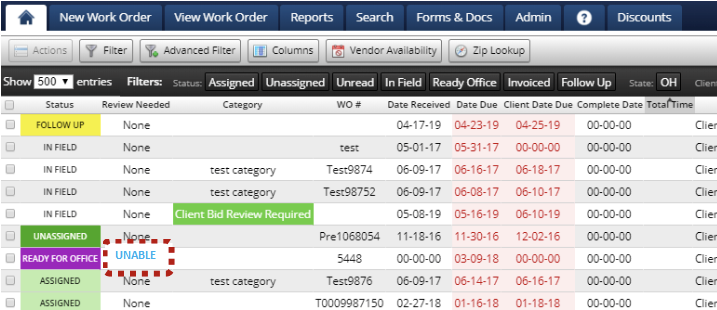
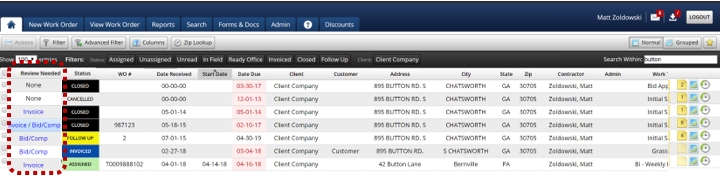
You will also be able to see them on the Home page if you are displaying the “Review Needed” column.
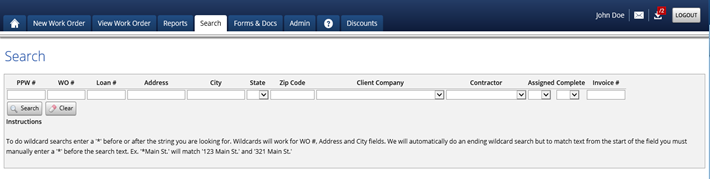
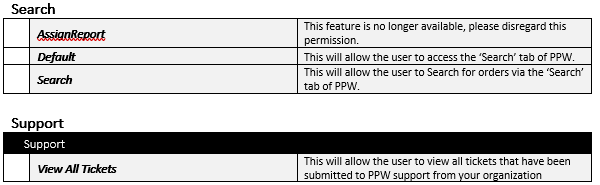
This tab allows for a detailed search of all of the WOs. This is similar to the Home Screen search, but a more open format.
The search format can be broad or as specific as one WO and selecting Search will display the information requested.
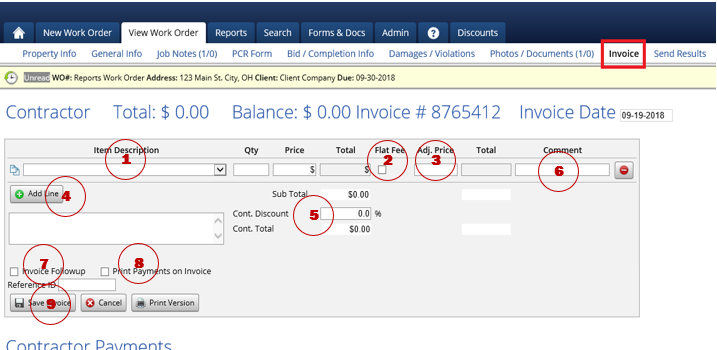
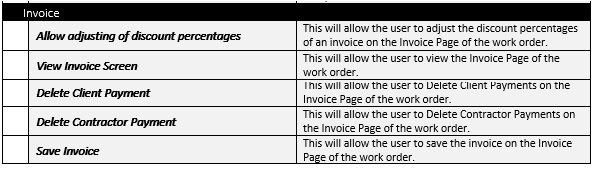
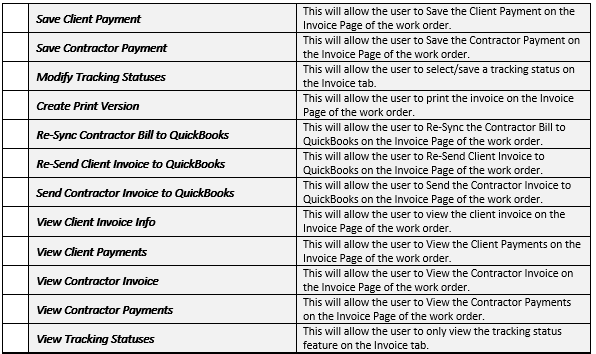
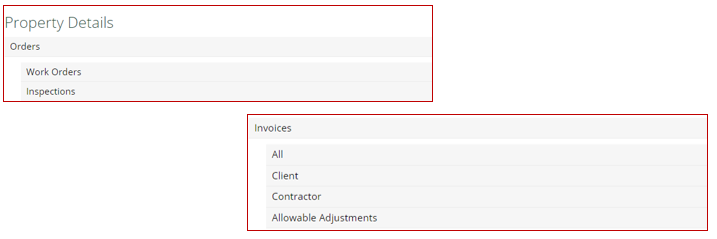
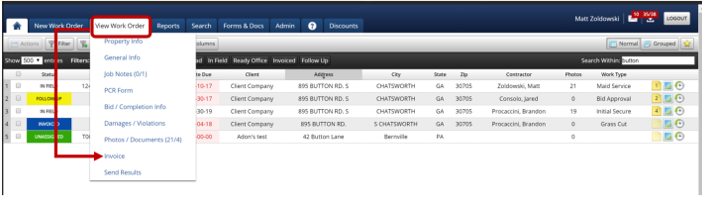
The invoice tab of PPW is where contractors can enter their invoice and you can invoice your clients.
The items that show in both the contractor’s and client invoices are pulled from the Bid/Comp & Invoice items section of the Admin tab.
To select an item for the contractor invoice, simply click on the dropdown menu and select the appropriate item and enter a quantity. The price will automatically fill in.
The Flat Fee option will enter the item as a flat fee, meaning that it will ignore any discounts present.
The Adj. price will allow you enter an adjusted price which will override the Total. The comment field will allow you to enter any comments if needed.
If you need to add multiple invoice items to the invoice simply click the ‘Add Line’ button.
a. If you need to enter a custom or one-time use invoice item, simply click the dropdown menu and select ‘*Other’. After doing this you will be able to type in an invoice name and you will also need to enter a Qty. and price.
Once your items have been entered you will see a preview of the Subtotal along with the total after any discounts are applied.
There is also a location for comments/notes as well.
You can mark the Invoice as follow up, meaning that a correction is needed by the contractor.
Also, there is an option to print the payments when printing the contractor version of the invoice.
To Save the Invoice Click the ‘Save Invoice’ button and when you Save the contractor’s invoice you may be asked the following questions:
Invoice Complete is not checked, would you like to check it now?
If you say YES, the order will move to the invoiced status If you say NO, the order will stay in the current status
Invoice Date is not the current date, would you like to make it the current date?
If you say YES, the invoice date will change to today's date. If you say NO the invoice date will not change.
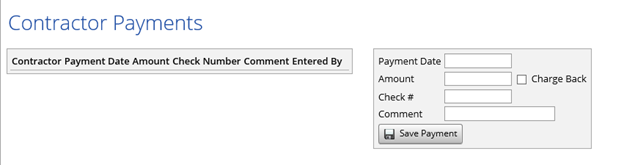
To enter a contractor payment all you will need to do is enter a Payment Date and an Amount.
Also, if applicable, you can enter a Check # and a comment.
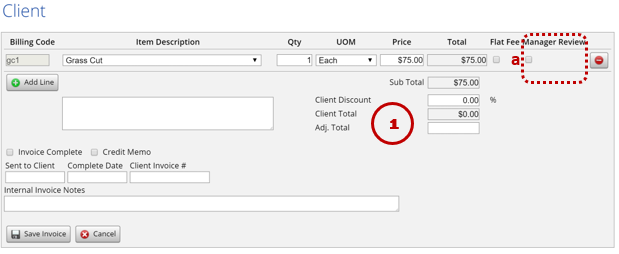
You will want to follow the same steps as you did for the Contractors invoice with the following additional options:
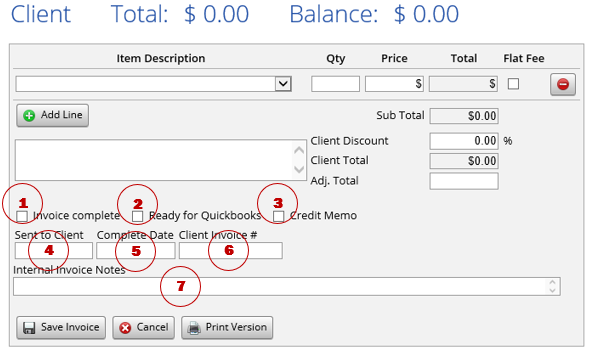
Invoice Complete - This allows for marking the invoice of the order complete & moving it to the invoice status. You will also be prompted to mark this when you click ‘Save’.
Ready for QuickBooks - This will allow you to mark the order as Ready For QuickBooks. (for more info see the QuickBooks portion of the manual)
Credit Memo - This will allow you enter a credit memo on this order.
Sent to Client - This is the date that you sent the order to the client.
Complete Date - This is the date the order was marked as complete.
Client Invoice # - This is the client Invoice #.
Internal Invoice Notes - This is a place for any internal notes about the invoice.
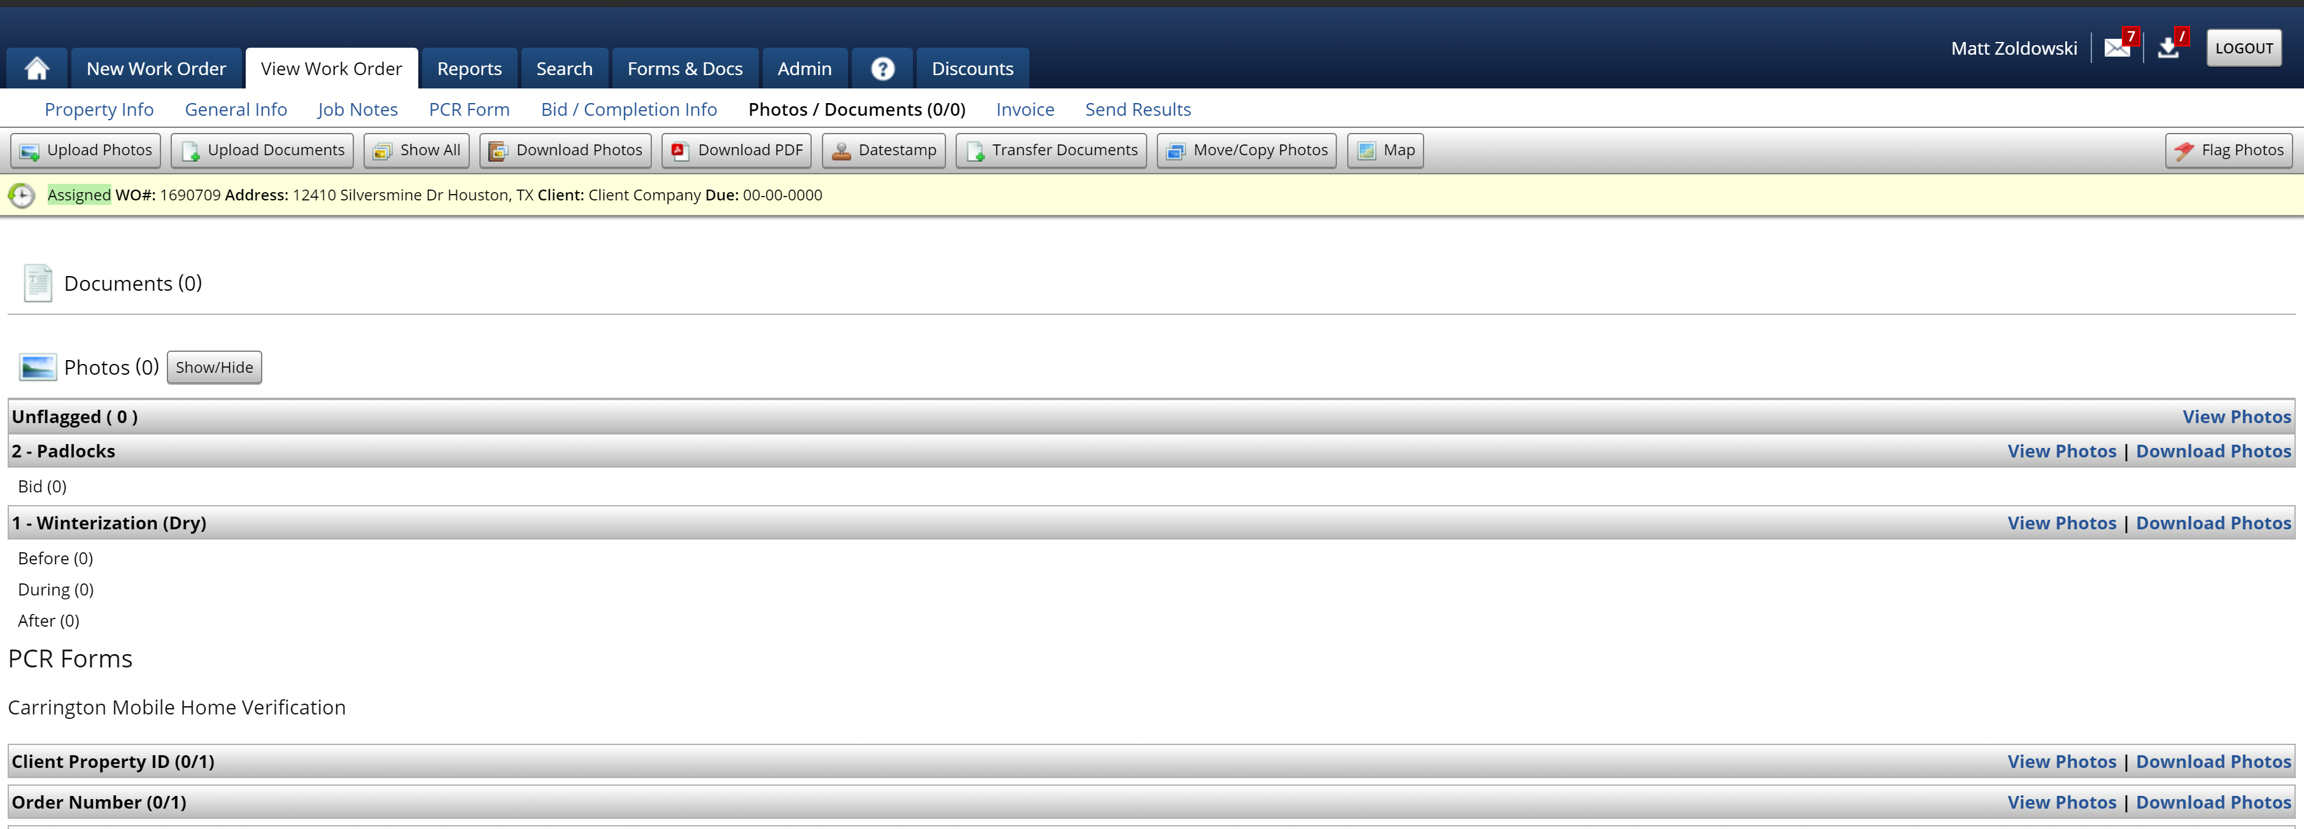
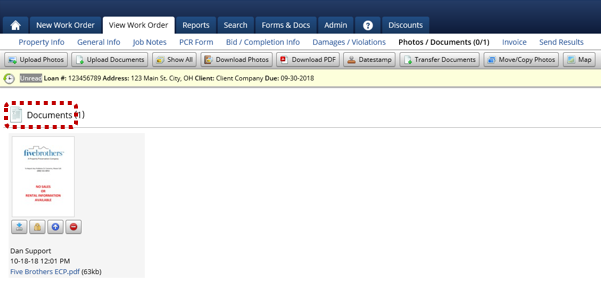
The Photos/Documents tab of PPW is where you can upload/view any photos or documents that were added to this work order.
The buttons in the menu bar are as follows:
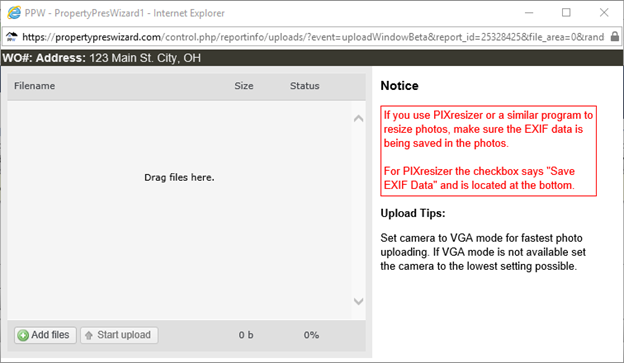
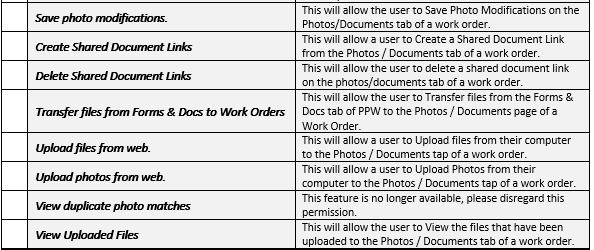
This will allow you to upload photos from your computer, to do so, click on the button and then you can either drag the photos from your PC to where it says ‘Drag Files Here’ or you can click the ‘Add Files’ button and use the file explorer to locate and add the files from here. Once all of the photos are in the screen that says ‘Drag Files Here’ simply click the ‘Start Upload’ button. After the photos are uploaded, simply ‘X’ out of this popup window, the page in PPW will refresh and your photos will now be there.
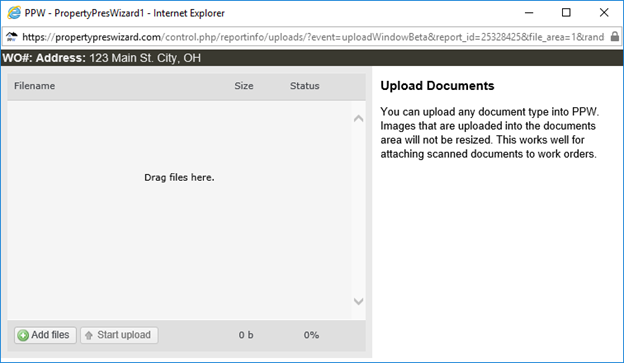
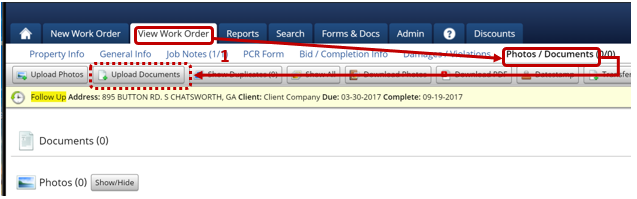
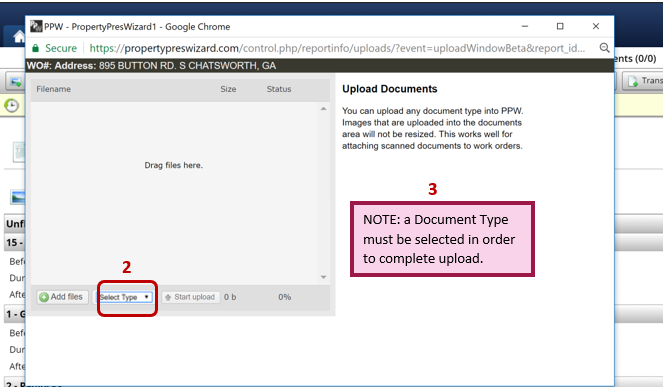
This will allow you to upload Documents from your computer, to do so, click on the button and then you can either drag the Documents from your Computer to where it says ‘Drag Files Here’ or you can click the ‘Add Files’ button and use the file explorer to locate and add the files from here. Once all of the Documents are in the screen that says ‘Drag Files Here’ simply click the ‘Start Upload’ button. After the Documents are uploaded, simply ‘X’ out of this popup window, the page in PPW will refresh and your Documents will now be there.
Clicking this button will display all of the photos on this page.
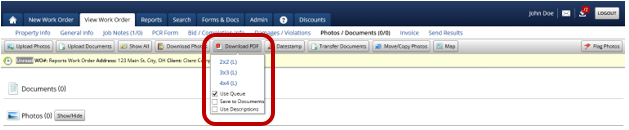
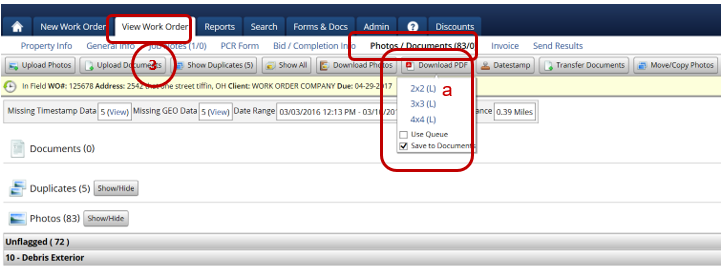
Clicking this button will allow the user to download the photos to their computer.
When you click this button, you will have 3 options:
1. All - This will download all of the photos to a zip file to your computer
2. All (Queue) - This will prepare a download that will appear in your job queue, when you are ready to download the photos, simply go to the job queue and click download and this will download a zip file of all of the photos to your computer.
3. Selected - This will download only the photos you have selected to a zip file on your computer.
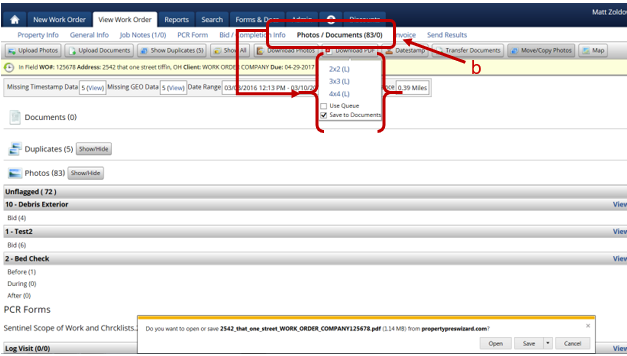
When clicking on this you will have a few options, you can choose for the photos to be in:
a 2x2 pattern on the PDF (4 photos per page)
a 3x3 pattern on the PDF (9 photos per page)
a 4x4 pattern on the PDF (16 photos per page)
Use Queue, if this is checked, the PDF will prepare for download to your job queue.
Save to Documents, if this is a checked the resulting PDF will be added as a document to the work order.
Use Descriptions: When printed the description of the photos will be added.
If the photos do not have a date stamp currently, then you can add a date stamp using this feature. Do note that if the photos already have a date stamp, this feature WILL NOT alter the current date stamp.
To add the date stamp you can manually enter the date to be printed, if you want the time to be printed, you will want to check the box that says ‘Print time’ and you will want to select a time in the Modify time box, set it either to be AM or PM and set a Length of how long it took to take the photos.
Alternatively, if the photos have EXIF data you can check the box that reads ‘Print Date/Time from Exif data’, and the EXIF data will be added as the date and time stamp to the photos.
‘Print Description’ will add the description to the downloaded photo and ‘Don’t Print Date/Time’ will download the photos without a date stamp. After you have set the date/time stamp up how you want it simply download the photos and the downloaded version of the photos will have the selected date/time stamp on them.
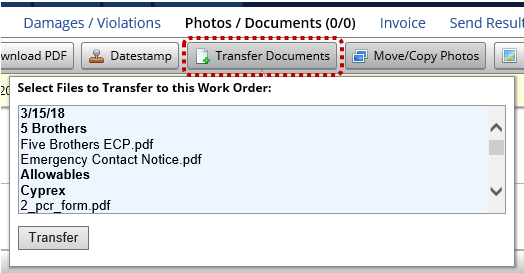
This will allow you to quickly add documents from the 'Forms & Docs' tab of PPW:
To transfer a document, simply select it from the list and click the ‘Transfer’ button and this document will be added to the documents portion of the work order.
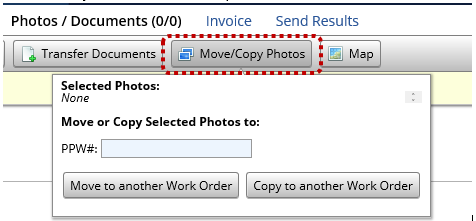
This will allow you to move or copy photos from one work order to another.
To move/copy photos to another work order, go to the order that you want to move the photos to and copy or make a note of the PPW# of that order. Then go to the order that has the photos, select the photos you want to move, click the ‘Move or Copy selected photos to’ button and paste or enter the PPW# of the order you want to move the photos to.
'Move to Another Work Order' Button: This option will remove the photos from this order and add them to another order, this would be used if photos were accidentally taken on the wrong work order and you did not need the photos on this order.
'Copy to Another Work Order' Button: This option will keep the photos on the current order and make a copy of them on the order that you entered the PPW# of.
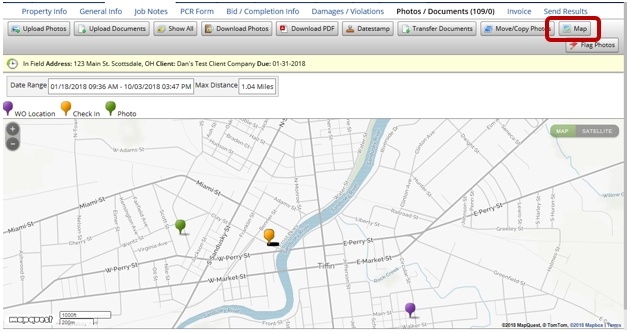
The Map will show you the location of the following:
The Location of the work order (represented by the purple pin)
Where the check-in was performed (represented by the Orange Pin)
Where the photos were taken (represented by a Green Pin)
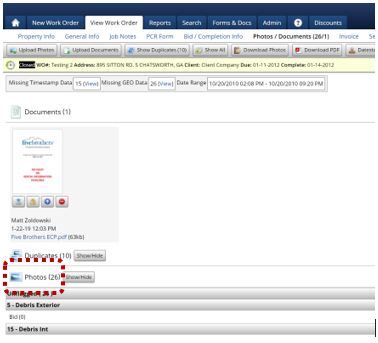
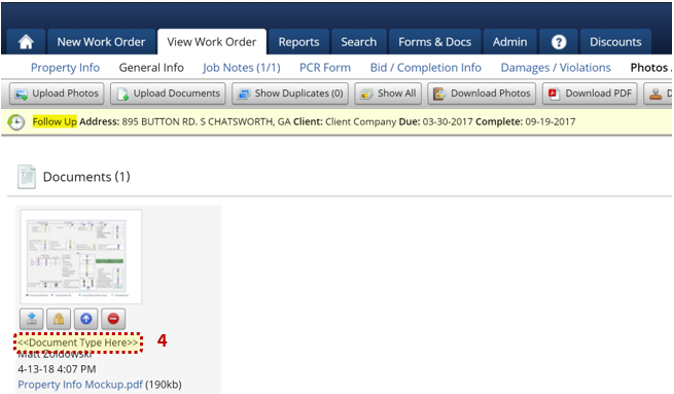
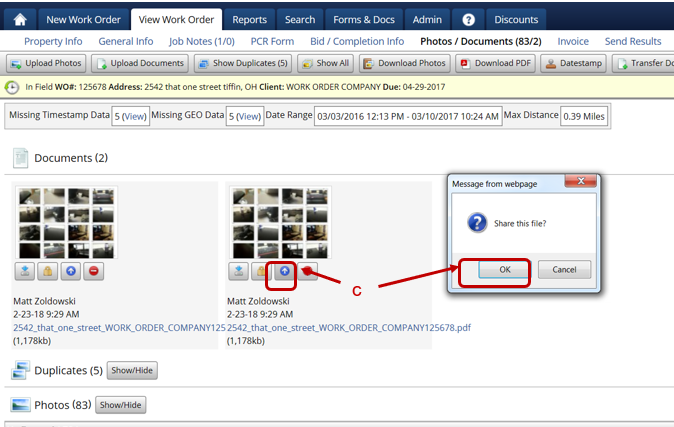
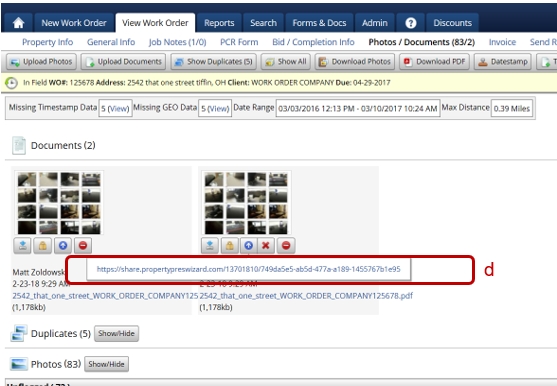
The 'Documents' section of the Photos/Documents tab will display any documents that have been uploaded or added to the work order. On the document that was uploaded you can:
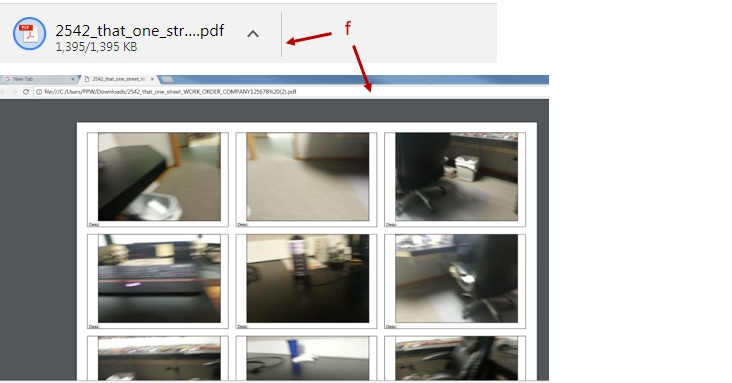
Download it to your computer.
Edit which groups can see the document by clicking on the padlock icon
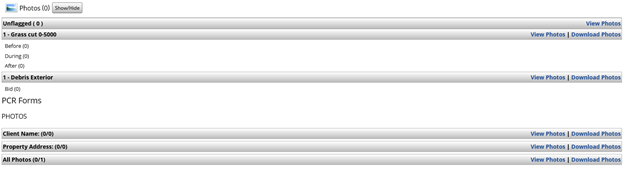
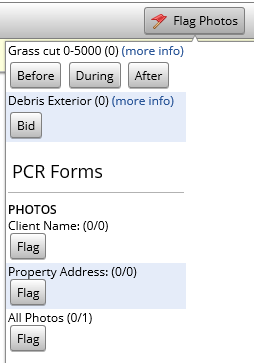
The Photos section of the work order is where you can view the photos that have been added to the work order.
To see all of the photos on the work order, simply click the ‘Show/Hide’ button and it will display all of the photos.
If the photo is outlined in Orange, it means that it is flagged to a flagging option.
To see what it is flagged to simply hover over it and it will display the information about the photo.
On this page it will display the flagging options. The flagging options will be pulled from:
○ Bid items on the Bid/Completion tab
○ Completion Items on the Bid/Completion tab
○ PCR Form questions that require photos
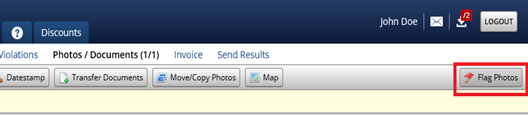
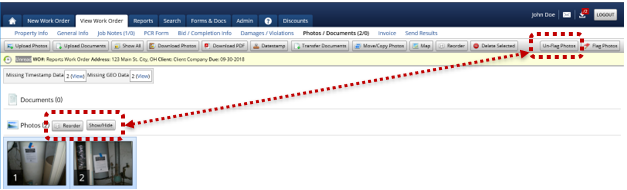
Click on the photo(s) that you want to flag, and click on the ‘Flag Photos’ button in the upper right-hand corner:
After you click 'Flag Photos', you will then be able to choose to what you wish to flag them:
You can hover over a photo ann then you are provided the following options:
'Get' to download that specific photo.
'Zoom' to view a zoomed in version of the photo.
'Delete' to delete that specific photo.
If you have any photos selected, you will see the following additional buttons:
'Reorder' - This will all you to change the order of the photos in PPW.
'Delete Selected' - This will allow you to delete multiple photos at once.
'Un-Flag Photos' - This will allow you to unflag the photos.
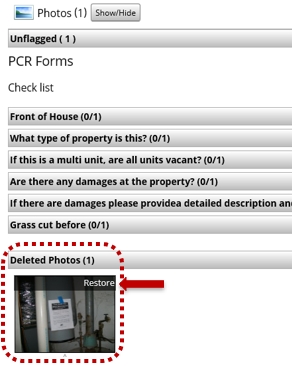
Lastly, if photos have been deleted, you will see them at the bottom of the screen. You can un-delete them by hovering over the photo and clicking on ‘Restore.’
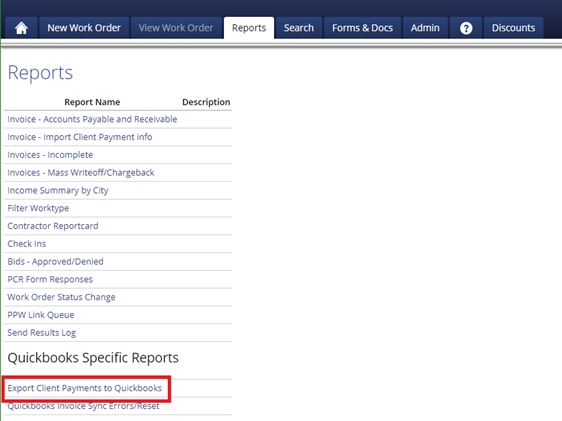
The reports contained within this section only apply to those users who also utilize QuickBooks and the import available within PPW.
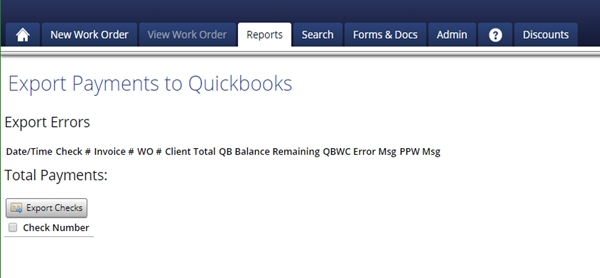
This report will allow you to send your clients payments to the desktop version of QuickBooks (do note that this does not work with QuickBooks Online).
To use this report, if you have any checks to import to QuickBooks, they would show up here. You will be able to click on the work order to view more information about the work order.
When you are ready to send the checks to QuickBooks, you will click on the checkbox next to the work order or click on the checkbox at the very top to select all of the checks. After you have the checks you want to send to QuickBooks selected you will want to run the web connector from QuickBooks and the click the 'Export Checks' button.
If there are any errors, it will show at the top of the page along with all of the info about the order and the reason it could not send.
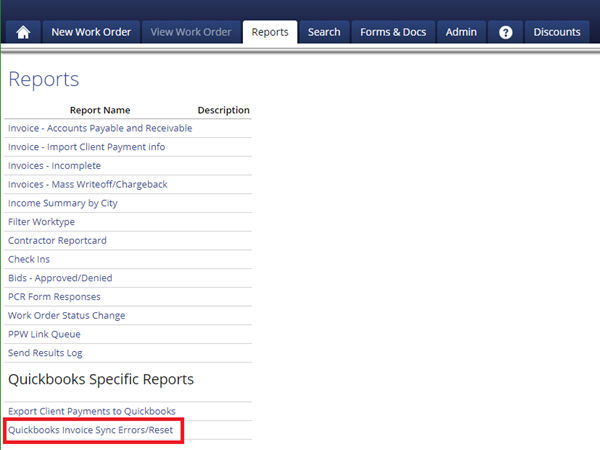
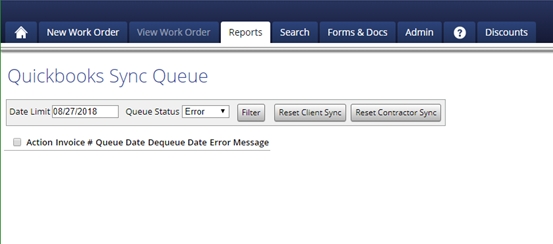
This report will show you any invoices that are not being sent to QuickBooks due to an error message or it will show you the orders that are queued to send to QuickBooks.
When running this report, you will want to put in a Date Limit. This will be how far back the report goes. You will also need to choose a Queue Status. You can choose to show orders that are queued to be sent to QuickBooks or show orders that are not sending to QuickBooks by choosing ‘Error’.
The ‘Filter’ button will show you the orders that match your search criteria, the ‘Reset Client Sync’ and ‘Reset Contractor Sync’ will reset any invoices that have not been sent to QuickBooks.
After you run this report, it will give you the Invoice Number of the order to be sent, Queue Date of when it was queued to be sent to QuickBooks, the Dequeue Date which is the date it was removed from the Queue and lastly, if there was an error when sending this order to QuickBooks, it will show you under the Error Message.
When importing orders via an auto import, depending on the client, you are able to send the results back to them.
To Utilize this feature simply click on the ‘Send Results’ tab.
Below we detail how to send results back if importing from another company that uses PPW. For orders imported from other non-PPW sources, the process may be different. Please consult the Integrations section of the manual.
When Sending the Results, you can:
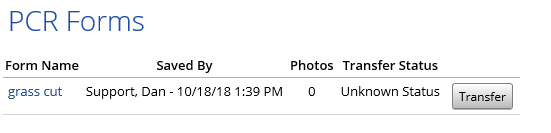
Fill out and transfer the client’s PCR Form back to them by clicking on the ‘Transfer’ button next to PCR form.
Send your ‘Bid/Comp’ items by selecting the client’s version of your bid/comp item in the dropdown box, selecting whether or not you want to send that bid/completion by checking the appropriate box and then clicking ‘Transfer Bid / Completion’.
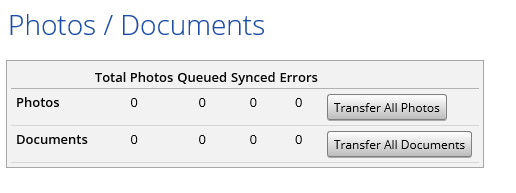
Send all of your Photos/Documents to the client, this will also send your flags as well, but you must send what the photos was flagged to for this to transfer. Ie You flagged a photo to a PCR form question, in order for that photo to be flagged correctly, you must transfer the PCR form as well.
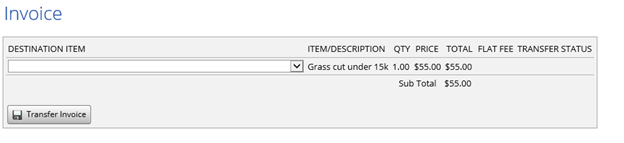
Send the client your Invoice, after you invoice the client on the invoice page of PPW you can select the destination item from the dropdown and transfer your invoice.
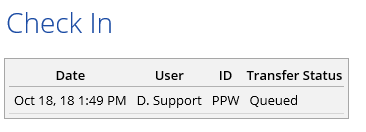
To send your Check-in when a check-in is completed,on an order that was imported from another PPW account, the check-in is automatically sent back to the client. In the following screenshot you can see that the check-in is queued, which means it is in the process of being sent to the client.
Mark the order as Ready for Office in the client’s system. By clicking this button, you will mark the order as Ready for Office in the client's system.
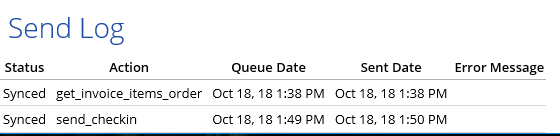
At the bottom of the Send Results Page is the ‘Send Log’ this will show you the data that has been synced, queued, or if there were any errors. If there is an error message, it will display in the error message column:
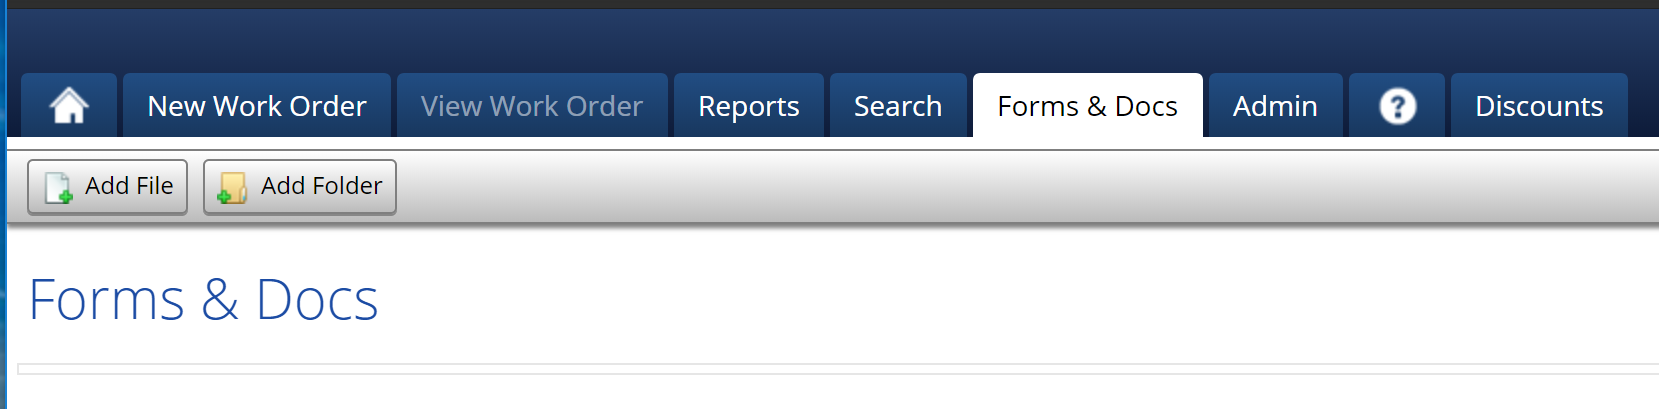
The Forms & Docs tab is a shared file cabinet, which will allow the Admin to store files and documents for reference.
Access to these files and documents can be controlled by giving permission to specific groups. Creating a file or folder is easy!
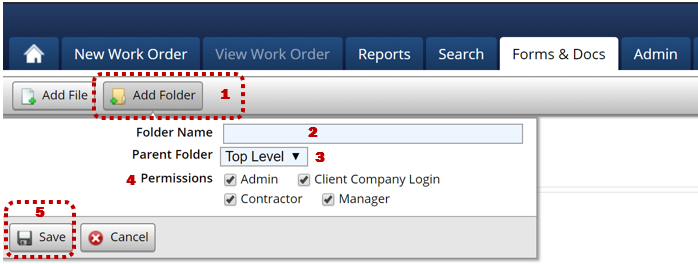
Click the ‘Add Folder’ button.
Enter the Folder Name.
In the Parent Folder dropdown box, choose if this is a parent folder or a subordinate folder.
Select the Permissions to determine who has access to the folder.
Click the ‘Save’ button.
The folder name will be visible depending on whether or not it is the parent folder.
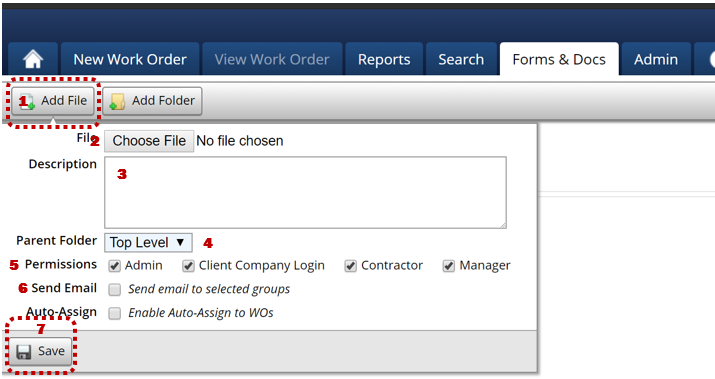
Click the ‘Add File’ button.
Click the ‘Choose File’ button and select the file to be saved.
Enter a Description of the file.
Select Parent Folder.
Select the Permissions to determine who has access to the file.
Determine whether or not to Send Email notifications to the selected groups.
Click the ‘Save’ button.
The file will be available for viewing by selecting the parent folder and then the file. Any type of file format: video, PDF, Excel, Word, etc. This section is commonly used for training, client spec sheets, forms, items that Admin and contractors need to access regularly.
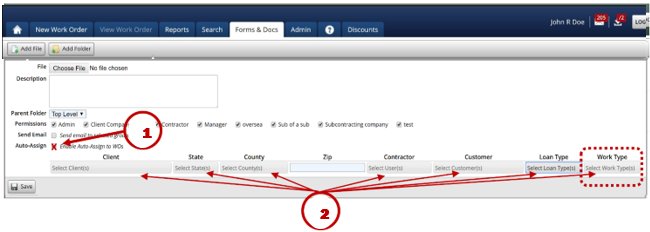
There may be forms like door hangers, signage, etc. that you would like to automatically attach to specific work types once the order is created.
1. Check the “Enable Auto-Assign to WOs” box. This then displays additional selection options.
2. Using the dropdowns provided, select all that apply. BE SURE to include Work type(s) selection(s) and Click “Save”.
3. Repeat Steps 1-2 to add additional forms.
This tab contains various standard reports designed to help manage your business.
In this section, we provide you with detailed instructions on how to run each report listed.
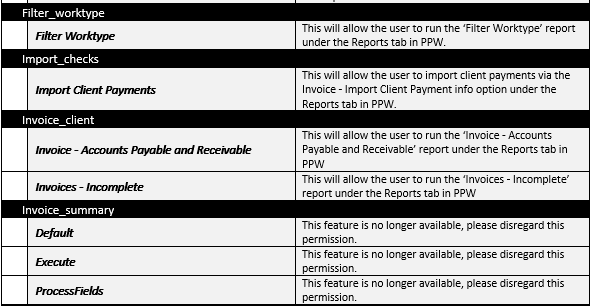
The Accounts Payable and Receivable report is one of the most often accessed reports in PPW.
It is convenient to run this report by date ranges of the following items:
1. Invoice Date
2. Sent to Client
3. Ready for Office
4. Complete Date
5. Create Date
6. Invoice Number
Move the cursor to one of the text boxes next to the area to be accessed and left click on the text box a calendar will appear. Search for the appropriate date, left click on the date, and it will be transferred to the search box. To search a specific range of dates, enter the beginning and ending date.
The data shown in the report can also be filtered by:
7. Client Companies
8. Customers (the Client Companies Customers)
9. Contractors
10. Assigned Admin (who was the processor of the WO)
11. Category (if used)
12. State
If the report is run without selecting a specific Client Company, etc. The default is for all of the available options under Client Companies, Customers, etc. to be included in the report. The Admin can highlight one or more of the options in each box by pressing CTRL and selecting the clients to be included in the report.
Other options on this report include:
13. Invoice Created: This option defaults to ‘Yes’ and if this option is set to ‘Yes’ then the report that is ran will only show orders where an Invoice was created. If it is set to ‘No’ then it will only show orders that do not have an invoice. If it is set to the blank option, then it will show all orders that match the other search criteria whether or not an invoice was created.
14. Invoice marked Complete: This option defaults to ‘Yes’. If this option is set to ‘Yes’ then the report that is ran will only show orders where the Invoice was marked as complete. If it is set to ‘No’, then it will only show orders that do not have the option Invoice Complete marked. If it is set to the blank option, then it will show all orders that match the other search criteria whether or not an Invoice Complete is checked.
15. Ready for QuickBooks: The default for this option is unchecked. If it is checked, then it will only show orders where the option ‘Ready for QuickBooks’ is checked, if it is unchecked then it will show orders where Ready for QuickBooks is not checked.
16. Show Client Totals: This option is checked by default, and if checked, when running the report, the resulting report will show the client totals on the report, if not checked then the resulting report will not display the client totals. The columns that this option effect are: Client Total, Client Discount %, Client Discount Total, Client Paid Date, Write Off Amount and Sent to Client
17. Client Paid: This option defaults to blank which will show all orders no matter if the client’s invoice has a payment on it or not. The following options are available in this drop down:
○ Yes: This option will only show orders where the client has paid you the full amount that you have invoiced them.
○ No: This will show orders where the client has either not paid at all for the order or if they have only paid an amount of the total invoiced amount.
○ Full and Partially: This will show orders where the client has either not paid at all for the order or if they have only paid an amount of the total invoiced amount ○ Partially Only: This will only show orders where a partial amount of the invoice has been paid.
18. Hide $0 invoices: If this option is checked, the report will not display any orders where the clients invoiced amount is $0.
19. Client Paid Date: If a date range is entered here the resulting report will only display orders that have a client payment entered with a payment date that is in between the 2 dates entered.
20. Client Paid Check #: If client checks or remittance numbers are entered when received they may be searched and pulled up with this report. When entering remittances, the check numbers are used.
21. Show Adjusted Grand Total: If you would like the Adjusted Grand Total to be displayed, check this box.
22. Show Write Off Payments Only: If this option is checked, and if the client underpays the invoice and Admin chooses to write it off on the invoice, then those write offs would be displayed.
23. Show Charge Backs: This option is used when running a chargeback report for the client, if this option is checked then it will show chargebacks.
24. Client Invoice #: If a client Invoice number is entered on the invoice, you can run a report for that specific client invoice number here.
25. Show Contractor Totals: This option is checked by default, and if checked, when running the report, the resulting report will show the contractors totals on the report, if not checked then the resulting report will not display the contractors totals. The columns that this option effects are: Contractor Discount%, Contractor Total, and Contractor Paid Amount.
26. Contractor Paid: This option defaults to blank which will show all orders no matter if the contractor’s invoice has a payment on it or not. The following options are available in this drop down:
○ Yes: This option will only show orders where the contractor has been paid the full amount that they have invoiced for.
○ No: This will show orders where the contractor has either not been paid at all for the order or if a partial payment has been made towards the total invoiced amount.
27. Hide $0 invoices: If this option is checked, the report will not display any orders where the contractors invoiced amount is $0.
28. Contractor Paid Date: If a date range is entered here the resulting report will only display orders that have a contractor payment entered with a payment date that is in between the 2 dates entered.
29. Contractor Paid Check #: If a check number has been entered when entering a contractor payment, then this field may be used to search for orders with this check number.
30. Show Charge Backs: Please see below for the proper procedure to enter a chargeback.
31. Deduct Charge Backs: Please see below for the proper procedure to enter a chargeback.
32. Chargebacks Processed: Please see below for the proper procedure to enter a chargeback.
33. Show Contractor Ref. ID: If a contractor Reference ID is entered on the invoice and this option is checked, the Reference ID will be displayed.
34. Group By Options: When running a report, if you want the results to be grouped differently than the default option, then you can group the resulting report by the following options:
○ Client Company: If running a report for multiple client companies at once, you can check this option and the results of the report will be grouped by client company.
○ Assigned Admin: If running a report that includes multiple Assigned Admins at once, you can check this option and the results of the report will be grouped by the Assigned Admin.
○ Contractor: If running a report that includes multiple Contractors at once, you can check this option and the results of the report will be grouped by the Contractor.
○ Sub-Contractor Company: If you use Sub-Contractor Companies to further assign orders, then when running a report that includes multiple Sub-Contractor Companies at once, you can check this option and the results of the report will be grouped by the Sub-Contractor Company.
35. Extra Columns: These are columns that can be displayed when running a report, these are not shown by default, but if you would like the information to be displayed, simply click the check box next to each option you would like displayed. These options include: Category, Date Complete, Client Invoice #, Client WO #, Sent to Client, Follow up, Ready for Office, Contractor Paid Date, Share Link, and Lot Size.
Run Report: This button will allow you to run the report and will then display the orders that match the criteria that you entered above.
Cancel: This will set all of the options back to their default setting.
Export to Excel (Job Queue): This will create an excel version of the spreadsheet, however, it will be added you your job queue and you will need to go to the job Queue to download the spreadsheet.
The Following Buttons will only appear after clicking the ‘Run Report’ Button:
Export To Excel: After clicking the ‘Run Report’ button, this button will appear and it will allow you to download the report you ran into an excel spreadsheet.
Client Payments: This button will allow you to enter Client Payments in mass. To use this, click the button, enter a paid date and a check number (if applicable) and then click on the check boxes next to the orders that you want to mark as paid. After the checkbox is clicked, the remaining balance of the invoice will appear, and, if needed, you can change the amount in this text box.
Once you have checked all of the work orders and verified the payment amount, click ‘Save Client Payments’ and those payments will be entered.
Contractor Payments: This button will allow you to enter Contractor payments in in mass. To use this, click the button, enter a paid date and a check number (if applicable) and then click on the check boxes next to the orders that you want to mark as paid. After the checkbox is clicked, the remaining balance of the invoice will appear, and, if needed, you can change the amount in this text box.
Once you have checked all of the work orders and verified the payment amount, click ‘Save Contractor Payments’ and those payments will be entered.
Client Invoices: This button allows you to download PDF versions of the clients invoice for all of the work orders displayed.
QuickBooks Sync: This will allow you to sync these invoices to QuickBooks. The following options will allow you to: Sync all Contractor invoices w/QuickBooks or Sync all Client invoices w/QuickBooks, or you can choose which orders to sync to QuickBooks using the check boxes next to each order.
Chargeback reports must be run separately from the Accounts Payable and Receivable report. Chargebacks are designed to work after you have already paid the contractor. If you have not paid the contractor use the Invoice Adjustment feature.
When in the invoice of the order, here is what to enter:
Payment Date: This is a reference date. Enter the pay date you will be deducting the money.
Amount: Enter a positive amount for the chargeback.
Chargeback: Check this box.
Check: Normally left blank.
Comments: Describe the reason for the chargeback.
Save Payment: Click this to save the chargeback. The screen will now show this:
When you wish to Run a chargeback report, please follow these directions:
Check Group By Contractor.
Check Show Contractor Totals.
Check Show Chargebacks Only.
Enter the date(s) you want to run for chargebacks. This date reflects when you entered the chargeback not the pay date.
If you want to run a report on chargebacks that have not been deducted, Select “No” in the Chargebacks Processed drop down. If you want to review previous Chargebacks Select “Yes”.
Click the 'Run Report' button.
Select Contractor Payment to process the Chargeback. Enter a “Pay Date” and select the Charge Backs you want to process. 'Save' Payment.
This report is normally run before generating the Invoice-Accounts Payable and Receivable report. Left clicking on the report displays a list of clients, which PPW is set up to auto- import.
The way Admin auto-imports depends on the Client’s preferences. To import Altisource and Safeguard payments, copy and paste the remittance email into the Check Data dialog box, which will display after left clicking on the client. Select the Client Company by scrolling and highlighting the appropriate client, and then left click on Process or Cancel.
Other clients may have you import an Excel or PDF file. If those are the requirements, the user will be asked to Select File in place of the Check Data dialog box.
In order to process payments from clients who are not listed but transmit the information electronically:
1. Open an Excel Spreadsheet
2. Label column A “Work Order Number” for work order
3. Label Column B “Payment Amount”.
4. Enter the appropriate information from the client in this file and then Save the file.
To import:
1. Select Excel, CSV, Tab from the client list.
2. Choose the file.
3. Enter the Check # and Check Date, Client Company.
4. Then click Process. This will import the data into the system, and it will not have to be completed manually. If needed, here is a link to a video that walks you through this process: https://vimeo.com/133355531
This report provides a list of invoices which may have been overlooked and not marked Complete.
When running this report, there are a few different options that will allow you to filter the results. You can use the following fields to run the report:
Complete Date
Invoice Number
By Contractor
By Client Company
After clicking the ’Run Report’ Button, the resulting report will show orders where the invoice has not yet been marked as complete.
The 'Cancel' Button will clear out any data that you have entered and also un-select any contractors/clients that you have selected.
The ‘Export to Excel’ Button appears once the report is generated and will export the results of the report to a MS Excel spreadsheet.
The Mass Write-off/Chargeback report will allow for multiple write-offs or chargebacks to be entered into the system for the client invoices in mass.
When running this report, the first thing that you will need to do is to choose whether you are going to be entering:
Write-off or
Chargeback
Next, a date range will need to be entered into the Start Date and End Date field, this date range is referring to the invoice date of the work order.
The Remaining Amount $ and Greater than or less than buttons are used together to determine how much of the invoice you want to Write-off or Chargeback. For example, if you wanted to write-off any invoices that had $0.01 left, you would put ‘0.01’ into the ‘Remaining Amount’ text box and then choose ‘Less Than.’ Now, when you run the report, it will only show orders that have a client invoice of $0.01 or less.
Client Company
Contractor
Work Type
After all of the filters have been set, click the ‘Get Unpaid Invoices’ button and the orders with invoices that match your filters will be displayed.
Alternatively, if you wish to clear the filters/dates you entered, simply click the ‘Clear Fields’ button and the report will be reset.
If Write-off was selected, you will see another button that says, ‘Make Write-offs’ and ‘Reset.’ The ‘Reset’ button will allow you to Reset the filters and clear any results on the screen. The ‘Comment’ checkbox will allow you to enter a comment to be entered when entering the write-offs. Note that the comment must be entered before the ‘Make Write-offs’ button is clicked.
Once everything is set as required, you will select which work orders you want to write-off by clicking the checkbox next to each order or clicking the checkbox at the very top which will select all of the orders. After the orders are selected, you will click the ‘Make Write-offs’ button and the ‘Amount Remaining’ listed in the far-right hand column will now be written off.
If you wish to run the Chargeback report you will do the same as above, however, the chargeback report is for contractor chargebacks and not client chargebacks.
In the next screenshot, the contractor invoiced for $15, and they were paid $10, but we are issuing a chargeback for $5.
We have the report ran, and you can see that we still have an option to enter a comment and in the far-right hand column we can enter how much we are charging back, the system will enter a default amount of the Amount Remaining, so you do not have to enter the amount for each order.
Once everything looks good, we will click the ‘Make Chargebacks’ button and a chargeback of $5.00 will be entered on this work order.
To run this report, enter your Client Paid Date or range, select Contractors and the report will list all of the amounts paid to contractors and list them by city and state.
The Filter Worktype report is a management tool to help the Admin understand the concentration and intricacies impacting their business.
This report can be run by:
Received Date
Ready for Office Date
Work Type
Client Company
Customer
When running this report, there are a 2 different date options that can be used, the Receive Date of the order (the Receive Date can be found on the General Info page of the work order), and the date the order was marked Ready for Office.
The results can be further filtered down based on the Work Type of the order, the Client Company and the Customer.
Also, if you would like to run this report with multiple work types, client companies, or contractors at one time, you can hold the ‘CTRL’ button down and select multiple options.
Clicking the ‘Run Report’ button will run the report, and the ‘Cancel’ button will clear any date ranges or any other filter options that you have selected.
Once the report has been generated, you can export this report to MS Excel by clicking the ‘Export to Excel’ link at the top of the page.
The report information displayed includes:
Receive Date
Ready for Office
Complete Date
Address
Loan number
Work Order number
Client Company
Customer
Work Type
Contractor
Client Paid Amount
If you want to view the work order, you can click on blue link on any of the fields and it will take you straight to the General Info page of the order.
To run this report, select:
Ready for Office Date or date range
Client Company
Contractor
Work Type or leave it blank for an overall report
State
Click the 'Run Report' button.
When ‘Run Report’ is selected, it will display selected contractors and their On-Time submissions versus their Late submissions. The number of days late or early will also be incorporated into the report.
Once the report generates, you will be able to export to MS Excel by clicking the 'Export to Excel' button.
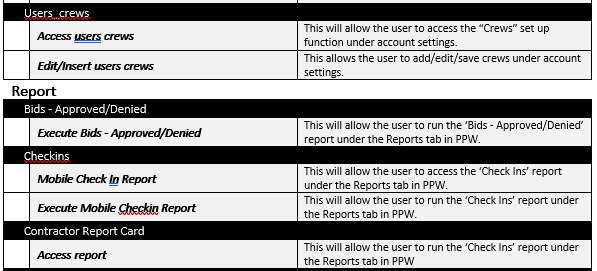
This report will allow you to run reports based on the contractor's check ins and will show you information about each one.
This report can be run using the following criteria:
Check-in Date
Ready for Office Date
Invoiced Date
By Client Company
By Contractor
After you click the ‘Run Report’ button, you will see the following columns:
● Check-In Performed
● PPW number
● WO Number
● Address, City, State and Zip Code
● Contractor
● Client Company
● Customer
● Work Type
● Provider Type (which is the type of check-in that as performed)
● Task Reference Number (if applicable)
● Provider ID (generally the ABC number of the user who performed the check-in)
● Date and Time the check in was performed
● Latitude and Longitude the user was at when they checked in
● Date the check-in was sent to the client
● Status of the check-in
If there is an error with sending the check-in, it will show here and on the general info page of a work order.
Lastly, this report can be exported to MS Excel if needed by clicking the 'Export to Excel' button.
You have the ability to run a report to more effectively review the Checkout data, if enabled in your system.
In order to utilize this report, the following permission must be enabled:
Access & Run Check-in/Check-out Report – this will allow the group to run the new report.
The user would utilize the following criteria to run the report:
Date Range – both a starting and ending date are required. Limited to a 30-day period.
Loan Number – be able to enter a specific loan number and get all total time for each work order.
Address, City, State, Zip – Would need a box to enter each.
PPW # – be able to enter a specific order number and get all data for that order only.
Client Company – choose a specific client company, from a dropdown list of all client companies, to display all work order total time.
Contractor – choose a specific contractor, from a dropdown list of all contractors, to display all work order total time data for orders they completed.
Work Type – choose a specific work type, from a dropdown of all available work types, to display total time for each work order of that type.
PLEASE NOTE: All variations of this report will be limited to a 30-day date range.
Once the appropriate criteria have been selected and the “Run Report” button clicked, it will display on the screen AND have a button to allow for Export to MS Excel.
This report will allow you to run a report based on the whether or not the bids on a certain work order have been approved or denied.
When running this report:
Select a Bid Status.
Enter a Ready for Office Date date range The date range cannot exceed 30 days.
You can also narrow down your search results by selecting a Client Company.
You can save this report so that you can easily run it later. To save the report, simply type the name you would like to save it as in the Save Report Name.
Click ‘Run Report’ and the next time you come back to this page, you can simply click on the report name to re-run it.
When running this report, you can use the Bid Status to search for all bids by leaving the field blank, bids that have no status by selecting 'No Status' or you can see all Approved or Denied bids by selecting 'Approved' or 'Denied'' respectively.
After clicking the ‘Run Report’ button you will then see the following:
● PPW number
● WO Number
● Address, City State & Zip Code
● Contractor
● Client Company
● Customer
● Work Type
● Category
● Ready for Office Date
● Contractor Bids Total
● Client Bids Total
● Total dollar amounts of all bids that have not been Approved or Denied
● Approved bids amount for Contractor
● Approved bids amount from Client
● Denied bids total for Contractor
● Denied bids total from Client
You can also column-sort the results by the following options:
● State
● Work Type
● Ready for Office Date
● Contractor or Client total
● Pending, Approved, or Denied
Lastly, you can export this report to MS Excel by clicking the 'Export' button on the top of the page.
This report will allow you to run a report based on an answer to a specific question on a certain PCR form.
When running this report, you will need to:
Select from the PCR Form drop down list.
Select 1 or more questions by choosing a question in the PCR Question field.
You can also run this report based on the Ready for Office Date of an order, but this is optional.
You also can filter the results down by choosing a Client Company.
If you wish to save this report, type in a name of the report in the Saved Report Name field.
If you have previously saved a report and wish to run it again you can click on the name of the saved report and that report will automatically run.
After you have run the report you will be able to see the work orders that meet the criteria. The information that is shown is the following:
● PPW Number
● WO Number
● Address, City, State and Zip
● Contractor
● Client
● Customer
● Work Type
● Category (if applicable) Ready for Office Date
This report will allow to see the status change history of work orders. You will be able to see what time/date an order was moved from one status to another and which user caused the order to change statuses.
When running this report, you will enter/select the following:
1. Start Date
2. End Date - must not exceed a 30-day period
3. Create Report By:
WO Number
PW Number
Client
Customer
Contractor
Work Type
Category
4. Choose an option from a drop down or type in a Work order or PPW number.
After clicking the ‘Run Report’ button, you will see:
· Work Order #
· Status
· Changed By
· Date of Change
So, in the screenshot below, the order was in the 'Unread' status, but Dan Support changed it on September 17th, 2018 at 10:51 am to the status of Ready for Office. Next, you can see the order was moved to the Invoiced status by Dan Support on September 17th, 2018 at 10:53am.
Once the report has run, you can export it to CSV or Excel but clicking on the respective button.
This report will show you the results of when you use the Send Results feature of PPW.
You will choose the date that you want to run the report based on the date the results were sent and then clicking on the 'Get Report' button.
The resulting report will show you the Work Order Number, the Status of the order, who queued the order, the date it was queued and when it was synced.
This allows access to the page where the setup and connection between PPW and QuickBooks Desktop is created. Note, it must be QuickBooks Desktop for PC, not Mac.
● Enable Integration - Allows the connection between Property Pres Wizard and QuickBooks to work.
● QBWC Username - A random, unique value generated by Property Pres Wizard to facilitate the connection between PPW and QuickBooks.
● QBWC Password - This is created by you and must be entered in to allow Property Pres Wizard and QuickBooks to connect. It will be entered in on the web connector as well.
● Re-type QBWC Password - What you created must be entered in again to allow Property Pres Wizard and QuickBooks to connect. It will be entered in on the web connector as well.
● Default Bill Account - The account that information will display as in QuickBooks.
● Default Bill Item - The title that will display in QuickBooks if no identification is associated in PPW. For reference, it must be an expense account.
● Default Invoice Line Item - The title that will display in QuickBooks if no identification is associated in PPW.
● Default Invoice Discount Item - The title that will display in QuickBooks if no identification is associated in PPW.
● Use Jobs/Sub Customers for Invoices - When checked, will populate a box where you can set pre-set variables to send into the jobs section on an invoice in QuickBooks.
● Job Name format - Displays and allows you to select preset variables in a desired sequence to the jobs section on the invoice, for example, an address and contractor
● Download QWC - Allows you to download the QuickBooks Web Connector file that is necessary to integrate PPW with QuickBooks Desktop. For reference, it can only be QuickBooks Desktop for PC, not Mac.
● Sync Customers - This brings the customer list from QuickBooks into PPW so you can choose from them in the drop-down menu when you create a client company.
● Sync Vendors This brings the Vendor list from QuickBooks into PPW so you can choose from the drop-down menu when creating a user.
● Sync Items - This brings the item list from QuickBooks into Property Pres Wizard so you can select from them in the drop-down menu when creating bid completion items.
● Sync Accounts - This brings the accounts from QuickBooks into Property Pres Wizard so you can choose them in the drop-down menu on the QuickBooks integration page as well as creating a bid completion item.
● Sync Classes - This brings in the classes from QuickBooks into Property Pres Wizard so you can choose them in the drop-down menu on the creation of a user or client company
● Save - Saves QuickBooks integrations settings.
Avatax is a web service that will allow the tax rate to be calculated based on the location or address of the work order.
Each item in PPW will be mapped to an Avatax ID. Exemptions or exceptions to the tax rule will also be required. The feature is being designed so the default is to calculate tax on all items but then have a few exemptions.
Clicking on the Sales Tax - Avalara link will take you to a page that lists all the Bid/Comp and Invoice line items for the org. The columns displayed are Item Name, Avatax Code, and Update Date.
The toolbar on the Sales Tax - Avalara will have a button that enables and disables the Avalara tax integration. The button will flip between Enable and Disable based on the current status of the integration.
The Show Inactive button will show and hide the inactive line items in the list. By default, we don’t want to show inactive items.
The text box in the Avatax Code column will be a multi-function input element. Users can manually enter an Avatax Code into the text box. Codes must be a valid Avatax Code to be saved.
Another way to enter codes is by searching. Users can enter text and then click the search button next to the Avatax Code. The Avatax web service will be queried and show any Avatax Codes that match the text the user has entered. A pop-up element will display all the Avatax Codes that match in a table. Clicking on any of these Tax Codes will enter the Code into the text box.
Once a valid code has been entered the field will auto save.
A configuration button will be added to the Sales Tax - Avalara toolbar. This button will display a form to setup the Account, License and URL fields. A save button will save this info. A button to test the connection is displayed next to the save button. This will ping the Avalara web service and verify the information is setup properly.
Client Companies can be exempted from taxes on their invoices. The Admin > Client Companies page will have a checkbox labeled Use Avatax Exempt Types. If this box is checked, any invoice on orders for this Client Company will not be taxed. The Tax-Exempt Type must be selected if the Use Avatax Exempt Types box is checked.
Verify the Avatax codes are saved and populate properly when reloading or navigating away and back to the Sales Tax - Avalara page. Add a new Bid / Comp & Invoice Item. Verify the new item appears in the list and can have an Avatax Code entered and saved correctly.
Verify the Tax-Exempt fields save and populates correctly when editing existing client company records.
The Client Invoice is where all the sales tax will be calculated and saved.
If the Avatax integration is enabled, and the Client Company is not exempt, the client invoice screen will have a column for the Tax Code. If a preset invoice line item is selected, the Tax Code field will be read only and set to the Avatax Code linked to the invoice item. If an “Other” line item is used, the Tax Code textbox will allow the user to type a Tax Code directly into the box or enter text to search for a tax code. Searching for a tax code here will work exactly the same way as on the Admin > Sales Tax - Avalara page when associating Invoice Items to Avatax Codes.
When the Avatax integration is enabled, an invoice cannot be saved unless all lines on the invoice have a valid Tax Code entered. Either automatically chosen or manually entered for Other lines. An error should be displayed to the user if this occurs.
The After Disc columns next to the invoice line is the total of the line, minus the Client Discount rate. The Rate column is the tax rate as returned by Avatax. The Tax Amnt column is the total tax for the line. The Tax Code column is the auto selected tax code or the manually entered code for Other invoice lines.
If the tax feature is enabled for the client invoice, several new total fields will be displayed below the invoice line items. Below the Client Discount field, the Total Before Tax box will display the total after the Client Discount has been subtracted. The Total Before Tax input is read only and cannot be edited by the user. The Tax Amount field will display the total tax amount. The Tax Amount field is read only and cannot be edited by the user. The Client Total field is the Total Before Tax plus the Tax Amount.
Saving an invoice when the Avalara Sales Tax integration is enabled will trigger the Avatax Transaction process. A new transaction will be sent to the Avatax API. The results of the Transaction will then be stored in PPW.
Saving an existing invoice will require checking if the existing line items were updated at all. If the invoice had any changes, we will have to update the transaction in Avatax and store the updated tax information for the invoice.
A message indicating the status of the Avatax transaction will be displayed on the page. Example status indicator below.
Creating new invoices and editing existing invoices by adding new lines, editing existing lines and deleting existing lines should be tested fully. Being logged in as a PPW user who can view/edit contractor invoices only and as a user who can view/edit client invoices should be tested. Some users may be able to view/edit both contractor and client invoices. We must ensure this functionality is not affected.
After invoices have been sent to Avatax, the data in PPW should be validated with the data in Avatax to verify all fields have been sent properly to Avatax. We need to validate the data can be searched on and reported on using the Avatax application.
Go to Admin > Groups:
Admin > Admin/Sales Tax>Edit Tax Codes
Admin > Admin/Sales Tax>Enable/Disable Avatax Integration
Admin > Admin/Sales Tax>Enable/Disable recording Avatax Transaction
Admin > Admin/Sales Tax>Sync PPW Client to Avatax Admin > Admin/Sales Tax>View Sales Tax Avatax Page
Settings are not specific to any one group or set of permissions. They are global, meaning they impact functionality system-wide.
These settings can be found in Admin->Settings. Here are definitions of each field:
Allow contractors to "Reject" work orders. - If this feature is turned on, then contractors will be able to reject or accept work orders. Before turning this feature on, please contact support at 866-790-7709 Ext. 2 as there are repercussions to turning this on and we want to make sure that you are aware of these repercussions.
Auto Increment recurring/copied new order numbers. - If you have any work orders that are set to recur, then the work order number of the order that is automatically created for you will be set to one number above the previous order. For example, if the work order number of the original order is 123, then the order that recurs from that order with have a work order number of 124
Automatically send new Work Orders to the assigned Contractor. If not checked then new Work Orders will only show in the contractor's queue if Ready for Field is marked. - If this option is checked, then the work orders will be visible to the assigned contractor as soon as the orders are assigned to them. If this option is not checked then the order must be marked as ready for field. This can be done two ways, firstly you can view the work order, click on ‘Edit’ and ensure that ‘Ready For Field’ is checked and then click ‘Save.’ Alternatively, you can do this from the home page using the ‘Actions’ Button and choosing the option ‘Send to Field.’
Company short name for alerts - If this variable is used in the Admin-General-Email/Text Templates, then when an alert is sent to a user from the PPW system, this is the variable that will be used.
Contractor sorting in menu options. - When selecting a contractor in a drop down, this setting will set how the contractor is displayed, the options that you can choose from are:
● Last Name, First Name
● First Name, Last Name
● Company name (which is added to their account under Admin-Users)
● Vendor ID
Custom title bar caption - What is typed in here will appear on the title bar in your and your user's internet browser, so if you can type whatever you would like here and it will show in your browser’s title bar
Default Timezone - This is the default time zone that PPW will use for your company’s account, the options here are as follows:
● Central (CDT)
● Eastern (EST)
● Mountain (MDT)
● Pacific (PDT)
● Hawaii (HST)
● Guam (ChST)
Email addresses for User Documents expire alerts. - Enter a list of email addresses separated by commas. - If you want to be alerted when user documents expired, you will put in an email address here, and that email address will be sent a notification when a user document expires. If you want more that one email address to be alerted, you can type as many email addresses as you would like here as long as they are separated by a column
Require estimated complete date. - If this option is checked it will require the contractor to enter an estimated completion date on a work order
Send new work order alerts to Assigned Admin - If this is checked, when an Admin is assigned to a new work order, it will send them an alert letting them know
Send one email when assigning Work Orders on Home Screen or Importing. - Alternative sends individual emails for each work order - If this is checked and you assign orders from the home screen using the ‘Actions’ button, it will send one email to the user you are assigning the orders to with a list of the work orders. If this is not checked then they will receive one email for every order they are assigned to.
Show Line Items on New Work Order form. - Unfortunately, this is an old feature that does not have an effect on the system now.
Use Contracting Companies to delegate access - If you would like to use subcontracting companies within your PPW account, you will need to check this option first
When using subcontracting companies, only show office staff company name. - if your company is using subcontracting companies, then if this is enabled it will only show the subcontracting companies name as the contractor. If this is not checked, then it will show the name of the contractor who is assigned to the order.
"Ready for Office" removes work order from contractor's queue - If this option is checked, once an order if marked as Ready for Office it will remove the order from the contractor's queue and it will not show on their home page of PPW. They will still be able to use the Search tab and if they have access to run reports, the order will display there as well. If this option is not checked, they will still be able to view the orders that have been marked as Ready For Office on their home page.
Always show "Follow Up" work orders for contractors. - If this option is checked and an order is marked as Follow Up, it will always show in the contractor's queue no matter what. If it is not checked then the option of ‘Follow Up’ will show in their filter options.
Assigned and Unread alert timeout. - If an order is in the Unread Status and is currently late, then this will set how many hours after it is late an alert will send.
Assigned and Unread late. Send email alert. - If this option is checked then the user will receive an alert after the number of hours that is set in the option above.
Color for "Accepted" orders. - This is the color that orders in the ‘Accepted’ status will appear on the home screen
Color for "Cancelled" orders. - This is the color that orders in the ‘Cancelled’ status will appear on the home screen
Color for "In Field" orders. - This is the color that orders in the ‘In Field’ status will appear on the home screen
Color for "Ready Office" when marked multiple times - This is the color that orders that have been marked as ‘Ready For Office’ multiple times will appear on the home screen
Color for "Ready Office" work orders - This is the color that orders in the ‘Ready For Office’ status will appear on the home screen
Color for "Rejected" orders - This is the color that orders in the ‘Rejected’ status will appear on the home screen.
Color for Assigned Work Orders. Used for work orders that have not been marked "Ready for Field" - This is the color that orders in the ‘Assigned’ status will appear on the home screen
Color for Complete/Closed work orders - This is the color that orders in the ‘Complete/Closed’ status will appear on the home screen
Color for Invoiced work orders - This is the color that orders in the ‘Invoiced’ status will appear on the home screen
Color for missing info work orders - This is the color that orders in the ‘Follow Up’ status will appear on the home screen
Color for Unassigned work orders - This is the color that orders in the ‘Unassigned ’ status will appear on the home screen
Color for Unread LATE work orders - This is the color that orders in the ‘Unread LATE’ status will appear on the home screen
Color for Unread work orders - This is the color that orders in the ‘Unread’ status will appear on the home screen
Auto assign Work Orders based on previous contractors at the property. - if this is checked then when orders are imported the contractor will auto assign to the last contractor that was at this property
Remove dollar amounts from comments and work order line items - If this option is checked then when you are importing work order the dollar amounts in the comments and work order line items will be removed
Allow duplicate work order numbers - If this option is checked the when you are creating a new work order it will allow you to use a work order number that is already in use
Import Work Order Line Items as Service Items. Will also flag photos for each line item. - If you are using Pruvan and PPW and if this option is checked then when the order is imported into Pruvan, the work order line items will be imported as Service Items, the photos will also be flagged to those line items.
Pruvan survey namespace user (Typically the Master ID) - If you are using Pruvan and PPW, then you will want to put your Pruvan survey namespace username here, this is typically the Master ID.
Push Key - If you are using Pruvan and PPW then you will need to put the Push Key (which is provided to you by Pruvan) here.
Show all preset Bid/Comp items. Alternative is to have them in dropdowns. - If this option is checked then all of your preset bid/comp items will be displayed, if this is not checked then you will need to add those items via a drop-down menu.
Show the hazards grid at bottom of Bid and Completion notes - If this option is checked, then the hazards grid will appear on the bottom of the bid/comp page
Use Bid Date – choose from various options.
Allow estimated complete dates past the due date. - If this option is checked then when entering an estimated completion date on an order, it will allow the estimated completion date that is past the due date of the work order.
Auto-fill ready for Office date - If this option is checked then when an order is marked as ready for office then the ready for office date will automatically populate to today's date. If this option is not checked then a date must be manually typed in.
Detect pricing in Work Line Items - If this option is checked then pricing in Additional Instructions of the Work Order Item Details will be highlighted
Prevent sending work orders to field if the property is frozen. – any order where the property has been marked frozen will not assign.
Require all Photo Flag options have a photo. - If this option is checked then this means that ALL photo flagging options must have at least 1 flagged photos before the order can be marked as ready for office.
Require all photos be flagged. - If this option is checked then ALL photos on the work order must be flagged before the order can be marked as ready for office.
Require estimated complete date. – force vendor to provide an estimated complete date on each order.
Use rich text for comment boxes. (General info only) - If this option is checked then you can use Rich Text in the order, this will allow you to highlight, italicize, underling, and otherwise format the text that you type in.
Work order PDF sub header text. - This is the subheading text that will appear on a printed version of a work order.
Allow Client Invoices to be Credit Memos – allows for client invoices to be negative amounts
Allow invoice number to be modified. - This setting will allow you to manually change the invoice number of an invoice
Auto set Invoice Number to specific field - This setting will automatically set the invoice number of a work order to a specific PPW field, the following options can be used:
● PPW Number
● Work Order Number
Auto transfer comments from Bid/Completion screen. - If this option is selected then the comments on the bid/comp page of a work order will automatically transfer to the invoice of the work order
Auto transfer completion line items to invoices. - If this option is checked then when a completion item is added to a work order, it will automatically add the completion item to the invoice.
Calculate Contractor total based on Client invoice total. - This option will calculate the contractor's invoice amount based off of the client’s invoiced amount.
Enable Flat-Fee on invoice line items. - This will allow you to make an item a flat fee that the discount percentage of the client/contractor will not affect.
Include Company Logo in Invoice – allows the company logo to appear on all invoices.
Include Flagged Photos in Invoice – all flagged photos will be attached to the invoice.
Include the ABC number on Invoice PDF. - If this option is checked then the ABC number of the contractor who performed the work will print on the PDF version of the invoice.
Print "Invoice Date" on Client PDF invoices - If this option is checked the the Invoice Date of the work order will be printed on the client’s PDF versions of the invoice
Uncheck all group permissions by default. - If this option is checked then when adding a job note ALL of the group permissions will be unchecked, you will need to manually select the groups that you will want to be able to see the job note
Allow date stamps in the future. – leaving this unchecked will ensure that photos do not reflect a date greater than the date the work was market RFO.
Allow EXIF timestamp data to be modified. – leaving this unchecked prevents others from tampering with EXIF data.
Date stamp format. – allows you to choose from various date formation options.
Default group permission for file uploads. – check the groups that have permission to upload files by default.
Keep portrait photos in proper aspect ratio. – keeps photo in the same aspect of how it was taken.
Require at least this number of photos are uploaded per work order – set a minimum number of required photos per order.
Require uploaded documents to have a Document Type – when using the Document Types feature, this will require the uploader to choose one before uploading a document of any kind.
Use Black and White for Timestamp on Photo PDF exports. - If this option is checked then when a PDF of the photos is printed a Black and White timestamp will be used.
Use original file names when downloading photos - If this option is checked then when you download photos from PPW the original names of the photos will be used if this is not checked then the name of the photos will be based on what the photos are flagged too.
This section contains information for all standard application options in PPW.
There are 2 ways to set this up for a contractor. The first is to click on the ‘Add’ button and set up rules using the 3 drop downs available. Please keep in mind you will only see the states you currently have active. You can set up more than one rule by clicking on the 'Add' button multiple times.
The other way to set up is to manually enter the zip codes in the text box and then click ‘Save’.
This feature allows for more variables in the auto assign process based on the criteria your set up. It can vary by work type, client, vendor capacity, area, etc.
Whether you are using Auto Assign Work Orders by Zip Code OR Auto Assign Work Orders (BETA), be sure that the contractors to be auto assigned are not marked to be skipped during auto assign.
Click the “Add Coverage” button.
This box appears which will allow you to begin defining coverage, etc.
Select the desired contractor, all parameters that apply and define and establish maximum total open orders.
To set capacities by Work Type Category, click the “Update Capacity” button.
5. Enter specific capacities and then click the “Update” button. 6. Click “Save Contractor” in order to save the results.You can also “Save Template” to save the parameters laid out in the coverage profile.
7. Repeat Steps 1-6 to add more vendor coverage.
8. To set the Auto Assign Priority, start by clicking one of the Work Type Categories:
9. Choose the mode in which vendors will be assigned, if you'd like to always use the same contractor, if you'd like to ensure that the vendor changes as much as possible or if you'd like to just use the scores setup.
10. Choose the Overflow mode to determine what happens when an auto-assign vendor reaches max capacity.
11. Assign a value of -10 to 10 to each different factor you wish to utilize to calculate an assignment score for each vendor. Assigning a factor with -10 will greatly decrease their score and vice versa. The vendor with the highest score will be assigned the work order.
12. Finally, click the “Save” button.
13. You are also able to display vendor coverage by specific vendor OR Work Type Category. Click the appropriate button to display a map:
NOTE: If you are currently using the Auto Assign by Zip Code option, you can set up the BETA version without disrupting your current auto assign process. When ready, click the ‘Activate New Auto Assign Rules’ button in the toolbar:
To set up an auto import, click on the 'Setup New Import' button.
Once the ‘Setup New Import’ button is clicked, the form above will populate. This will allow you to set up the auto import by completing the following options:
Import From - Sets where you are pulling the work orders from.
Set Client Company - Sets the client company, this needs to be created using the client company section of the admin tab before setting up the auto import.
Login Name - This is where you will add your login name for the client’s side.
Password - This is the associated password for the Login Name above.
Alert Email - Sets an email that will receive email notifications for when there are new work orders to import.
Friendly Name - This sets a name that will show in the New Work Order section.
Skip Comments - Allows you to not import the comments in the work order.
Skip Line Items - Allows you to not import the line items in the work order.
Set Category - Allows you to assign any category that you have created.
State Filter - Allows you to filter the work orders by the state assigned.
Discount % for this Import - Sets a discount percentage for the work orders imported through this import that reflects on the contractor’s invoice.
Active - Makes the auto import active, this will need to be set to yes for the auto import to run.
You are able to set up your system to automatically submit results once they are complete. This saves valuable review time if all criteria for submission have been met including successfully passing all validation rules. Auto Submit can be specified by client, work type, state, etc. to only deliver the results you choose.
Complete all of the General Information.
Complete all pertinent Auto Export Information in order for it to function properly.
Hit the “Save” button.
This section also lists all of your auto imports once they are created so that you can edit them as needed.
PPW Link (PPWL) is used to transfer data from one PPW account to another.
Select PPW Link - Property Pres Wizard-v2 from the Import From menu.
Set the client company you would like to assign to these orders.
Enter your Login Name and Password.
Answer the rest of the import options. These are not different from other auto imports.
Set the import as active. If an import is not active orders will not import.
Work orders are imported using the Auto Import Queue. Orders in the status of Unread, In Field, Follow Up, Accepted, or Rejected will be imported. Basic work order information, auto work detail line items and PCR forms will be transferred. PCR forms will have the same requirements as the originating PPW account. The form rules cannot be modified in the PPW account into which it has been imported.
Third Party companies may have a custom PPW Link URL. If you have received specific instructions from this company, please follow them. Contact them if you have any questions about their integration with PPW Link.
Auto Work Details are preset details that you can set up to automatically generate based on the parameters you choose. Let’s review how you can create Auto Work Details.
1. Go To Admin->General->Auto Work Details.
2. To create an auto work detail, click on the 'Add New' button.
From the Description drop down, select the line item for which you would like to create a work detail. Select “Yes” from the Active drop down and then click the 'Add' button.
4. Select the following and then click Save:
a. Client Company – use the default of All Clients or select a specific one.
b. Customer – use the default or select a specific one.
c. Work Type – use the default or select a specific one. You will need to add multiple lines if this work detail is to appear on multiple different work types.
d. Loan Type – enter a specific loan type or leave blank for all.
e. Quantity
f. Price
g. Additional – copy paste the details that you would like to appear on the order.
Repeat Steps 3-4 to add additional Auto Work Details.
This section of the admin tab allows you to set up your bid/comp and invoice items in PPW.
To begin, click the 'Add Item' button and then fill out the details of that item.
Item Name - here is where you will manually name the bid/comp item.
Always show on Bid/Comp - This setting forces the item to always populate on work orders if it is set to yes.
Always Show on New Client Work Order - Forces the bid/comp item to show on new client work orders.
Required on New Client Work Order - Requires the bid/comp item on new client work orders.
QuickBooks Item ID - Sets the related QuickBooks item if you are integrated with QuickBooks.
QuickBooks Account ID - Sets the bid/comp items QuickBooks account ID.
Lot Size - Allows you to set a lot size range for the bid/comp item.
Auto Invoice Client - If this is set to yes and this item is selected as a completion item it will auto invoice the client. This will show on the invoice section of the work order.
Active - Sets the bid/comp item to active or not active, not active bid/comp items will not populate on work orders.
From this option, you can also set up the default contractor and client prices. You can also click the ‘Add Item’ button to set up specific pricing based on client, state, customer, and loan type. This pricing can also be checked as flat fee items as well.
Once a Bid/Comp Item is created, it will show in a list in this section of the admin tab. There are also options to re-order alphabetically, reset filter cache, and if you have access to the BETA version of the bid/comp pricing, there will be an option to activate the old pricing if the BETA pricing is active.
This feature allows for multiple client and/or vendor pricing models under the same line item. Negotiated vendor pricing no longer is a matter that will require manually tracking by your accounting team. Once the new pricing model is set, all special pricing will be in place.
1. To copy existing rules over to the new pricing data, click the “Copy Old Rules” button.
1. To add a new line item, click the “Add Item” button.
2. A new box appears:
a. Enter information in these required fields. If entering multiple prices for a single line item, we recommend setting the default unit prices for both to 0.00 (no dollar sign but must include decimal)
b. These boxes are useful when entering lawn maintenance line items
c. Checking this box will enable this line item to always display on the Bids/Completions tab. Leaving unchecked will leave it in the dropdown for selection.
d. Checking this box will add this specific line item to every new work order created.
3. Click the ‘Submit’ button to save the changes.
1. To set up special vendor pricing, begin by clicking on the item name of the one you wish to update. We will use Item Name “**Test” as our example.
2. Before setting up a new pricing rule, let’s review these items:
a. These will be the default prices you created for this specific line item.
b. Checking the “Disable Default” box will make it so the line item will not show if there is no matching criteria from the pricing rules.
c. You can toggle the “Always Show on Bid/Comp” in the drop down. As you recall, this determines if it always is listed or must be selected from the drop down on the Bids/Completions tab.
d. Here you can check the “Always Show on New Client WO” box will add this specific line item to every new work order created. Leave unchecked if this is not what you desire.
e. Check this box if you wish to require this line item. The client must put in 0 or greater.
f. Under “Active” you can toggle between yes or no on whether this line item is currently active.
g. Mark if this line item is eligible for auto invoicing to client. * Only available for select clients. *
h. Only used for line items that contain lawn maintenance.
3. To set up a vendor pricing rule, select as many of these parameters as you would like. The system will select the rule with the most matches of the selected criteria:
a. You can either select specific clients, states, etc., you can use the “Select All” box or you can select none.
i. In order for something to appear in the “County” drop down, you must first select a state.
b. If it will only be for a specific vendor, be sure to select the proper name for them “Contractor” dropdown.
c. Enter the appropriate vendor and client prices here.
d. Check the “Flat Fee” box if you will not be taking any discount on this line item.
e. Checking this box will not allow the vendor to change this price.
f. To delete a pricing rule, click this symbol.
4. Click the “Save Filter” button to save the pricing rule.
To add more pricing rules, click the “Add Filter” button and repeat Step 3-4.
For a work order, the filter rule with the highest number of matches is chosen. When there is more than one filter rule with highest number of matches, the following criteria is used to pick the correct filter rule for the respective work order:
If there is only one filter rule matching the "Client Company", then that filter is chosen for the work order; otherwise, the next criteria is applied on the set of filter rules matching the "Client Company".
If there is only one filter rule matching "Contractor", then that filter is chosen for the work order; otherwise, the next criteria is applied on the set of filter rules matching "Contractor".
Filter rule at the top of the list has a better priority than the ones below it. For instance, if there are eight filter rules, the second filter rule has better priority than the fifth filter rule.
1. Note the warning that this pricing data is not active.
2. Click the 'Activate New Pricing Data' button.
3. Once clicked, the warning disappears as this pricing data is now active and the button now would revert to the old pricing data.
This section allows you to set up custom categories that can be used to further filter or sort work orders or can be used as sub-statuses.
Clicking on the ‘Add Category’ button will let you name the category, set a background color that will show on the home screen, and make the category active or inactive. Once the category is saved it will show in a list in this section of the Admin tab.
This option will allow you to set up your client companies and their options.
Each one of your clients are considered a Client Company within your system. You will set up a Client Company for each client from whom you will be handling orders, bids, etc. Let’s review how to set them up:
1. Click the “Add Company” button.
2. Enter all the appropriate fields and then click the ‘Save’ button.
a. Company Name – how you would like it to display throughout the system.
b. Discount %:
i. Client – what percentage your client would take off the top of your invoices.
ii. Contractor – what percentage you will take off the top of their invoices.
iii. NOTE: if you or your client will not be taking a discount, enter “0” in either or both.
c. Billing Address – the way the client wishes it to appear on any PDF invoices.
d. Comments/Notes – any unique details regarding the client like primary contact, billing cycles accepted, etc.
e. Due Date Offset – allows for a cushion between getting the results in and on-time delivery to the client.
f. Photo Re-size – only used if your client has a very specific photo size requirement.
g. Allow adjusted invoice total – adds a place for an invoice adjustment before submission (default checked).
h. Enable client login – used when not utilizing the multiple client login feature (default checked).
i. Rep ID – your organization’s login ID to this specific client’s system.
j. Start Date-Lock Order – locks order from completion if it has not reached the established order start date (default checked) Only applicable when setting an order Start Date at time of order creation.
k. Date/Time Overlay on PPW mobile – select an option as to how you would like/not like the client’s photos date/time stamped.
l. Mobile Check-in Provider – select if the client has a specific check-in requirement.
m. Active – set to “Yes” to make visible for selection during order creation.
Once created and saved, the client company will show in a list in this section of the admin tab.
This section is only used to link the client Wolverine’s line items with the line items in PPW. To link the line items, you will need to match the Wolverine line items with the line items in your PPW account using the dropdown boxes and then click save at the bottom of the page.
This section allows you to create customer numbers that can be set to work orders for additional filtering and sorting.
This section allows you to set which fields get duplicated when you use the ‘Duplicate Work Order’ button on the General Info section of a work order.
Simply check and un-check the fields you wish to duplicate and then click save. These settings will work for all duplicated work orders and will only change if you re-save the settings in this section.
This option allows you to change what information is shown on the email/text alerts using the given variables.
Simply copy and paste the variables on the left into the boxes in the order you desire. The templates for New Work Order, Un-Assigned Work Order, Job Note, and Unread Late email/text alerts can be changed. Once complete, click the ‘Save’ button.
The PCR Form option will allow you to create and manage your existing work orders. You will also be able to set filters for the PCR and import your existing PCR forms.
From this page, you will be able to see several columns:
1. Validation – This indicates if there are any questions/answers set for validation
2. Version - This will show the current Version number
3. Default Required - This will show you if the form is set to be required to fill out
4. Transfer Prev. Form - This will show if the setting to allow you to Transfer answers from Previous work order of the same property is enabled.
5. Photos Required - This will show if the form has photos required
6. Active - This will let you know if the form is currently active
7. Unpublished Changes - This will show you if there are any changes to the form that still need to be published
8. Entered By - This will show you who created the PCR form
9. Add/Edit Questions – allows for the addition/editing of any PCR questions
10. Copy- The copy Button will allow you to create a copy of any PCR form you have in your list. The copy will have the same name as the original but have copy at the end of the name. This can be used to create different versions of the same form.
11. Export PCR - The Export PCR button allows you to export the PCR form into a Json file onto your computer. You will also be able to send this Json to other PPW users and they can import the PCR form into their system.
12. Pruvan JSON - This button will create a JSON file that can be uploaded into your Pruvan account.
1. To start the creation of a PCR form, you will first have to press the “Add PCR Form” button. Complete the following where applicable:
a. PCR Form Name: This will determine the name of the PCR form.
b. Form ID: This will determine the file ID for the form and will automatically populate after the PCR form name is entered.
c. Default Required: This will make the form required to be answered before it can be marked Ready for Office.
d. Transfer Prev. Form: This will allow the user to copy the answers from the previous work order of the property.
e. Photos Required: this will require the PCR form to have photos.
f. Required on New client WO:
g. Pruvan Survey Ver. #:
h. Third Party Integration:
i. Active: This will determine if this is an active form.
j. Filter: The filters can be used to automatically apply your PCR forms to specific work order. You will be able to set them by client company, work type, customer or loan type.
After you create the PCR form you will have to add the questions to the form. The “Add/Edit Questions” button will allow you to create your PCR form questions, photo requirements and PCR form rules.
Click the “Add/Edit Questions” button. At the top of the page, you will see several buttons:
1. The Forms List button will just send you back to your list of PCR forms.
2. The New Question button will allow you to create new questions for your PCR form.
3. Preview will show you what the PCR form will look like when it is being filled out.
4. The Default Show All button will set all your questions to default show. This will make all questions appear for the form.
5. Every time there has been a change made to a question an option Publish Form will appear at the top of the page as well. NOTE: To have the new changes added to the PCR form, you will have to press the 'Publish Form' button. This will also change the version number of the form as well.
To start adding your questions, click the ‘New Question’ button:
1. Select the question type. There are Ten different Question Types:
a. Check Boxes - Check boxes will allow you to create a question were the user can select multiple.
b. Comment Boxes - This will allow you to put in a text field for comments. This will work for descriptions and any additional comments.
c. Drop down Menu - The drop down type will allow your to create a question with a list of answers in a drop down menu.
d. PPW Field - The PPW field Type will allow you to pick from a list of PPW fields and will automatically populate an answer for the question depending on how it is answered in that PPW field.
e. Radio Boxes - This field will allow you to create multiple checkboxes but the user will only be able to select one.
f. Text Boxes - Will allow you to set a text box similar to the comment box option.
g. Title - The title type can be used to title a different section of the PCR form.
h. Date - Sets a date field
i. Numeric - This Question Type will only select numbers for the answer. Question Example: How many rooms are in the Property.
j. Photo - Photo rules only accept photos for the answer. Question Example: Please provide photo of the street address.
2. Create the question. After you select the question type you must then enter the question. This will determine how it appears on the form when the user is completing it. If you enter “Are you able to locate the property?”, the question will appear on the form exactly as you have typed it. Some question types such as radio and check boxes require you to create Answer Options. These will create the options that the vendor can choose from in the form.
3. Add Field Rules - Apply to a question specifically. For example, if you create a comments box question, you can determine how many characters the comments must have or if it needs to contain a certain word or number.
4. Add Action Rules - These rules are designed to take certain actions if a question is answered in a specific way. This can be used to show/hide questions, so the user doesn’t have to answer questions unrelated or not applicable to the property. Here is an example. If there is a question that states “Were you able to enter the property?”. If the answer is “no”, you will be able to set an action rule so other questions that involve the inside of the property will not show. This can also be used to show questions. So, if they answer “yes”, you can show questions that will apply to the interior.
5. Add Photo Rules - You can create a photo rule for questions that you have created so they require a specific number of photos when answered a certain way. The photo rules work like how the action rules work. Example: “Did you arrive at the property? If so, please take a picture of the front door.” If they select “yes” for the answer it will require a minimum of one photo. If the answer is “no”, then no photos will be required because the default rule is set to zero.
6. Validation Rules - You also have the option to flag specific responses to PCR questions. This flag will automatically mark the order for review based on the criteria you selected.
An example: Selecting “Answer Change” and if the answer is different from the previous time the form was completed, the order will be flagged for review. To add a PCR validation rule:
1. Click on the 'Add Validation Rule' button.
2. When box appears, make appropriate selections from BOTH dropdowns.
3. Click the 'Save' button. Repeat process to create other validations on other questions/PCR.
To edit and existing PCR form you will click on the PCR Form Name in your list to edit the basic settings and the work order filters. This will allow you to edit the PCR form name as well as the PCR form ID and any of the other options listed.
To edit the questions of a previous form, you will press the ‘Add/Edit Questions’ button. Then you will press the ‘Edit’ button to the far right of the question. Question information will display as follows:
Question name - This will show the name of the question
Question Form - This will show the type of question
Active - This will display if the question is currently active
Default Show - This will display if the question will show on the form by default.
Default Required - This will show if the question is required to be answered.
Field Rules - Will display the number of field rules for the question.
Action Rules - Will display how many action rules have been setup
Photo Rules - Will display how many photo rules have been setup
Photo Defaults - shows if the question requires a minimum or maximum number of photos.
This option works similar to the Email/Alerts Templates option. Simply copy the variables over to the box for the header template. The difference is that this section is assigned by clients. You can also set the photo filename template as well as set it as a PDF header template.
Here is where you can label the Rushes that, when active, can be added to a work order by editing its information. That rush then shows in the work order’s General Info screen.
The system allows you to select within which states your organization will be servicing properties. If a state has not been activated, it will not allow for an order to be created for a property within that state. Let's review how to activate a state(s):
1. On the screen, a list of all states appears with each indicated as Active “No”.
2. Click on one of the states and change the Active “No” to a “Yes” and click the ‘Save’ button.
3. Repeat this process for each state you wish to activate.
This option allows you to set up a subcontracting company so that if a contractor has subs under them you can allow them to assign the work in your PPW account.
Once the information is filled out and saved you will then be able to assign the user accounts to the sub-contracting company when you are creating the users.
This option allows you to add documents for your users. They can be either a PDF or a JPG file. Upon upload, you will select the user, name the file and can enter the date received, expiration date, an alert date, and a comment.
Once the file has been saved and uploaded it will show in this section under the user’s name. You will be able to see the user, the number of documents, and the number of expired documents will show in red.
By clicking on the user’s name in this section you will be able to see the dates entered for the document as well as comments and the file itself. From there you will be able to edit and delete the user’s files as well.
Validation Rules define what criteria the system will look for on any/all work type(s) to ensure the overall quality of deliverables. Those orders are then flagged for review on the Home Page.
1. The Default setting will do the following for any work type category that does not have a set rule:
a. Invoice Change - If the contractor price for any of the Completion line items were changed then the order will be flagged.
b. Contractor Invoice Saved – Work order will be flagged if it does not contain a contractor invoice or if the total invoice is not greater than zero dollars.
c. Client Invoice Saved – Work order will be flagged if it does not contain a client invoice or if the total invoice is not greater than zero dollars.
d. Missing Photos – Will flag the order for review if any of the bid/completion line items were missing photos.
e. Photo Geo/Timestamping – Will flag for review if any photos are missing EXIF data or if Geo data from the WO is missing.
2. To establish variable rules based a work type category OR specific work type, Select the appropriate ones and then check all boxes that apply and hit the “Save” button.
Should an order match one of these validation rules, the order will be flagged for review. These orders can be identified by displaying the "Review Needed" column on the Home page.
This option allows you to create the work types you will use for your work orders when you import or manually create them.
From here you will be able to name the work type, make it active or inactive, and set it as always recurring if that work type is an always recurring work order. Once created and saved the work type will display in a list in this section and can be edited at any time.
1. Click the “Add Work Type” button.
1. To create a work type:
a. Work Type – enter name (required)
b. Work Type Category – used to group like work types together.
c. Active – select Yes or No.
d. Always Recurring – check if this is a recurring work type order.
e. Is Inspection – check if it is an inspection work type
f. Auto Invoice – Used to create invoices automatically.
3. Once all appropriate items have been entered/selected, click ‘Save’.
4. For each additional work type to be utilized for all initial end to end testing, repeat 1 thru 3.
1. You should already have work types in your system. To manage/add Work Type Groups, click the 'Manage Work Type Categories' button.
2. In order to describe functionality, we have added four (4) general categories as an example. In your instance of PPW, no Work Type Categories will be present.
4. Once you have set up your Work Type Categories you must assign your company’s appropriate Work Types. To do so, go to Admin>General>Work Types again and then click on one of the Work Types listed.
5. The box at the top will appear and you will select the appropriate work type category from the dropdown then click “Save”.
This process will enable auto invoicing by work type. This will be another valuable timesaver in the deliverable process.
1. For a specific work type, check the box “Auto Invoice”.
2. When checked, two lines appear to select invoice line items for contractor and client. Make selections for all line items that apply.
3. Click the “Save” button before moving on to the next work type.
4. Repeat Steps 1-3 for each Work Type for which you would like to Auto Invoice.
5. To remove a Work Type from Auto Invoice, simply click the Work Type again, Uncheck the “Auto Invoice” box and then click “Save”.
To do this, simply click on the 'Sort' icon next to the columns header.
Enter the Link URL. This is the website address of the system you are connecting to. Example:
3. To add a new Work Type Category, click the “Add Category” button which adds another box to the list for you to enter the new name. Once entered, click the “Save” button. You can remove any you no longer want by clicking the delete button to the right of the category name.
Groups are used to establish functionality settings for a group of individuals that will be using your system. They allow you to set up internal, client and contractor users differently.
Let’s review how to set up Groups.
1. To begin, Go To Admin->Groups.
2. The system has already created four (4) default groups. Click the “Add Group” button to create a group.
3. When creating a new group, you will need to:
a. Create a group name
b. Mark it Active
c. Check mark all permission you wish to assign to that group. i. Review the default groups to see what has been selected for other groups. ii. CONSULT PPW for more information about any permissions for which you are unsure.
4. You can also select specific fields to hide from the group. Click the “Add Hidden Field” and then choose the one you wish to hide. REPEAT for each additional field.
5. Always click “Save” when making any changes to a Group.
A User is created for any individual that will require access to your PPW system.
1. Go To Admin->Users
2. To add a new user, click the “Add User” button. This will open a new screen which contains the following sections:
a. User Information
b. Message Alert Options
c. Sub-Contracting Company Associations
d. Misc. Settings
3. Enter User Information:
4. Set the appropriate message/alert options:
a. We recommend setting up these base email options and allow the user to add/remove others:
i. Notes
ii. New WOs
iii. Follow Up
5. Utilize these fields, if applicable:
a. Contractor Score
i. Used to store a score calculated based on your specific contractor SLAs
b. Insurance Expire
i. Place a date here if you would like to receive alerts when insurance is about to expire.
c. ABC # Used to store a contractor’s ABC #, if applicable
First Name: The First name of the contractor, this will appear on the website.
Last Name: The Last name of the contractor, this will appear on the website.
Company Name: The company name of the contractor, can be used in combination with the admin setting to display company name rather than first and last name.
Login Name: This is the login name that the contractor will use to login.
Password: This is the password that the contractor will use to login.
Generate Password: This auto generates a random password into the password field.
Email New Password: A check box that allows a newly created password to be emailed to the email associated with the account (Only enter when adding a new account or to change password of existing account.)
Email: The email associated with the account, this is the email the user will receive all email notifications as well as their password resets.
Group: This assigns the contractor to a group from your existing groups that grant their permissions.
Show In List: These two boxes allow the user to show in either the contractor drop down to assign work, or the admin drop down.
Active: This allows you to make a user active. Inactive users are unable to login to PPW.
Display all Work Orders: This grants the user the ability to see all work orders in your system even if they are not assigned to the work order.
View All WO History: Allows the user to view all of the access history for the work orders they are viewing.
Discount Percentage: Sets the users individual discount percentage.
Time Zone: Sets the users time zone.
Skip on Auto-Assign: This will allow the user to be skipped if they are set up to receive work via auto assign.
End User's Legal Name: This section is for record keeping of the user.
● Legal First Name:
● Legal Last Name:
● Cell Phone:
● Address:
● City:
● State:
● Zip:
Copy account name to legal name: This pulls over the users first and last name from the above section as their first and last legal name.
Comments/Notes: Allows the addition of comments and/or notes to be entered in regard to the user.
These features are designed to facilitate asset management by tracking all facets of property activity.
These features facilitate the tracking of key timeline dates, allowables, Spent to Date, violations and utilities. To fully enable them requires several steps.
Investors would be organizations such as FHA, VA, HUD, FNMA, FDMC, etc. who would have their own set of allowable parameters.
1. To set up, Go To Admin>General>Investors.
2. Click the “Add Investor” Button.
3. Enter the following information:
a. The name of the Investor (i.e. FHA, VA, etc.).
b. Mark as “Active” from dropdown.
c. Enter Start Date of guidelines/mortgagee letter.
d. Since an End Date is never published, set a date far in the future. It can always be edited later.
c. Enter the maximum allowable amount per property/loan number.
4. Click the “Save” button.
5. Repeat Steps 2 – 4 for each additional Investor you would like to add.
6. As you add new Investors, they will appear in list form for quick review. To remove any entry, Click the ‘Delete’ button found to the far right of the entry.
Line Item Categories allow you to group like line items together so that the total allowable amount may be tracked properly.
1. To create, Go To Admin>General>Line Item Categories.
2. Click the “Add Category” button.
3. Type the name for the new line item category and select “Yes” from the Active dropdown.
4. To ADD line items to the category, simply click on each that applies under the “Unassociated Line Items” column. This will automatically move it to the “Associated Line Items” column.
5. Click the ‘Save’ button.
6. To add additional Line Item Categories, Repeat Steps 2-5.
7. Once you have created your Line Item Categories, they will display in list form for reference. You can click on the category name to see the line items associated.
Now that you have created your Investors and organized your Line Item Categories, the next step in the process is to specify allowables accordingly.
1. To begin, return to Admin>General>Investors.
2. Click on an Investor name.
3. Click the 'Edit' button for the appropriate overall allowable.
4. In the new box, enter the individual line item categories accordingly then hit the ‘Save’ button.
5. Should the overall allowable change or expire, you can enter new ones by clicking the “Overall Allowable” button. Fill in the Start, End and Amount boxes and then hit the ‘Save’ button.
With Premium, you have the ability to track various statuses of the property. You define the status names and color-coding for quick recognition. See below on how to set & change a Property Status. Here is how to create them:
1. Go To Admin>General>Property Statuses and then click the “Add Status” button.
2. Enter the name of the first Status you would like to create.
3. Click the “Background Color” box and then select a color range from the right-hand side.
3. Click around inside the large color block until you find the color you prefer. Then simply click outside the color block and click ‘Save’. Repeat Steps 1-5 to add all remaining statuses.
Now that you have completed the setup of vital pieces of the Property Based feature, it is now time to review how to use it in order to effectively manage at the property level.
1. To view, open an order from the Home Screen by selecting it.
2. This will open in Work Order View under the General Info tab. Click the Property Info tab which will display the Property Status Overview.
3. This view, when a property is added to your inventory for the first time, will display many fields that are blank to allow you to monitor the asset data. There are also three (3) buttons available:
a. Edit – to input editable fields
b. Show Fields – to alter the fields that display on the screen
c. Change Status – to modify the current property status
4. Click the ‘Edit’ button to display the editable fields. Enter data and use dropdowns where they are available. Click the ‘Save’ button to store the data. Return any time to update as necessary. Be sure to always click ‘Save’ before exiting.
Here is an example of data entered:
5. To change the fields that display, first, click the ‘Show Fields’ button.
6. To change, un-check or check the boxes and then click the ‘Save’ button. The fields displayed can be different for each user.
7. Set a Property Status by clicking the ‘Change Status’ button, select from the dropdown and then click ‘Save’.
8. These fields are not editable. Data auto-updates as more orders/bids are completed or entries are made.
9. To view details as it relates to Client & Vendor Total Spend, scroll to Property Details>Invoices>All. This will display all completed order specifics and allows you to export to Excel or PDF.
10. …scrolling further you will see a display of “Allowables by Line Item Category” grouped by Investor and showing remaining allowable balances.
1. Should you inherit a property from another provider, you may have allowable dollars already spent that will need posted so that you do not exceed the mandated amount. To enter for tracking, go to Property Detail>Invoices>Allowable Adjustments and then click the ‘Add’ button.
2. Use the dropdown box and enter the appropriate information. Click the ‘Save’ button. Repeat Steps 1-2 for additional adjustments.
There are two (2) ways to enter Damages & Violations so that you can track them at the property level:
On the Bids/Completion Info tab – typically used by vendor network when bidding.
On the Damages/Violations tab – used internally when receiving notifications.
When entries are made and they remain unresolved, these boxes change from Green to Red providing a visible reference requiring attention.
1. Click on the Bids/Completion Info tab.
2. When a vendor enters data for a Bid line item, they can check these boxes indicating whether it is a:
a. Damage
b. Violation
c. Health & Safety issue
Once selected and Saved, it will post to the Property Info tab and log the additional damage or violation information on the Damages/Violations page.
3. This field can be utilized internally to Approve/Deny your vendor’s bids. Likewise, it could be used by Client Companies with user access to review and approve items.
1. Click on the Damages/Violations tab
2. You can add either a Damage or Violation by clicking the appropriate ‘Add’ button.
3. Depending on the ‘Add’ button clicked, one of these boxes will appear where you will enter all pertinent information and click ‘Save’.
Below the Property Status Overview, you will find the Property Details section. Here you will have the option to explore the following:
Orders
Invoices
Completions
Bids
Notes
Photos
Check-ins
Depending on which category you select, you will be presented with additional options for viewing. Click around and explore the level of detail that is available from this one location.
This feature allows for multiple users under a client company to login and perform designated tasks based on group permissions. These users are NOT billable users on your account. PLEASE NOTE that only those with Admin Group permissions are able to set up multiple client logins.
To begin, Go To Admin>General>Client Companies.
2. Click the’ Add Company’ button if you do not already have your client listed. If you do have your client listed, click on their name.
1. Fill in the client information if you do not have a client or if you do have a client:
a. Check in the box for Enable Client Login. The Login ID will automatically populate when the box is checked. You cannot edit this ID.
b. Create a password for that client.
c. Click Save.
1. To begin, go to Admin>Groups.
2. Click on Add Group.
3. Name the group
a. Check in the Client Company Access box.
b. Set the group to Active.
c. Proceed checking in permissions you would like a user in this group, for a client, to perform.
d. Scroll to the bottom and click Save.
1. To begin, Go To Admin>General>Client Companies.
2. Click on Users for the client for whom you wish to create a User.
3. Click Add User:
a. Fill out a First Name, Last Name, Company Name, Username, Password, and Email.
b. Select the group you would like that user to be a part of. The group was created in a previous step.
c. Select whether you want that user Active.
d. Enter in any notes about the user and enter in their Phone Number, Address, City, State, Zip, and Time Zone
e. Click ‘Save’.
This application option adds the ability to create Document Types, which will be permissions based, and then require that every document be labeled with one.
1. Go To Admin->Settings. Under the Work Order – Photo/File Uploads section, select “Require uploaded documents to have a Document Type.”
2. Scroll to bottom and click 'Save'.
1. Go To Admin->Groups->Admin->Document Types. Select The following permissions:
a. View Document Types
b. Delete Document Types
b. Add/Edit Document Types
2. Scroll to the bottom and click' Save'.
1. Go To Admin->General->Document Types.
2. When “Document Types” is clicked, the following screen appears. Click the ‘Add Document Type’ button.
3. Enter the name of the Document Type you wish to create.
4. The ‘Active’ box allows to indicate if the Documents Type will be active, yes or no.
5. Click the ‘Save’ button and then the new/edited Document Type will appear in the list below.
1. Go To View Work Order->Photos/Documents. Click on the 'Upload Documents' button.
2. To the RIGHT> of the ‘Add Files’ button, you will see a dropdown selection box. Dropdown selections will include all Document Types created by the customer.
3. If user tries to Start Upload before making types selection, a warning message displays.
4. Once document uploads, the Document Type will display here.
This feature is designed to be able to auto-populate information to the Property Info screen from results gathered in the field.
First, to enable this feature for those that have permission to create and edit existing PCR Forms:
1. Go to Admin->Groups and select the Group that has permissions to edit/create PCR Forms.
2. Scroll to the Admin->PCR Forms section and check the “Map PCR Answers to PPW Fields” permission.
3. Scroll to bottom and click the ‘Save’ button.
Go To Admin>General>PCR Forms.
1. For a newly created or existing PCR, click the ‘Add/Edit Questions/Rules’ button.
2. Click on ‘New Question’ or ‘Edit’ question buttons.
3. Go To the section below the question details called “Answer Mapping”:
a. Click the “Add Answer Mapping” button to select one of the Property Info Fields to which you can map answers:
Selecting one or more field(s) and saving it will cause the results from that form question to populate the appropriate Property Info field(s).
EACH TIME A ORDER IS INVOICED, THE PROPERTY INFO FIELD WILL BE UPDATED.
Once assignments are completed in the field, you will want to establish rules for reviewing the vendor deliverables. This process will allow you to pinpoint those results for specific work types, vendors (new or under-performing) or newly on-boarded clients. You can even set combinations of criteria to identify only those in need of review.
1. Go To Admin>General>QC Rules.
2. Click the ‘Add Rule’ button to set up the new criteria.
3. Select from the dropdowns any of the criteria that will apply to your first rule.
4. Be sure to enter a Frequency of the QC rule (i.e. you enter “4” then every 4th order marked “Ready for Office” will be flagged for QC review).
6. To add more QC rules, repeat Steps 2-5.
This option allows you to create various tracking statuses that can be utilized on the Bid/Completion and Invoice pages of work orders.
1. Go To Admin->General->Tracking Statuses.
2. Begin by clicking the 'Add Tracking' button.
3. Create a Tracking Status by:
a. Entering a Name.
b. Check if you would like it to be an option on the Comp/Bid page.
c. Check if you would like it as an option on the Invoice page.
d. Select which groups will have permission to view the tracking status.
e. Select which groups will have permission to utilize the tracking status.
f. Click ‘Save’ once complete.
4. Repeat Steps 2-3 for each additional Tracking Status you wish to create.
5. Once each is created, it will appear in list form on the Tracking Statuses page:
a. Shows on which pages it is available
b. Displays which groups can access or modify
Go To View Work Order->Bid/Completion Info:
1. To the FAR RIGHT> of Completion Info, you will see:
a. A multi-select dropdown selection box labelled “Tracking”. Dropdown selection options will come from the customer-created list of Tracking Statuses found in the Admin tab Application Options.
Go To View Work Order->Invoice:
1. On the CLIENT invoice, to the RIGHT> of the Flat Fee checkbox, you will see:
a. A checkbox for each status you created and set to display on the client invoice.
Go To Admin > Groups:
Admin > Admin/Tracking>View Tracking Statuses
Admin > Admin/Tracking>Delete Tracking Statuses
Admin > Admin/Tracking>Add/Modify Tracking Statuses
Admin View Work Order/Bid/Completion Info>Modify Tracking Statuses
Admin View Work Order/Bid/Completion Info>View Tracking Statuses
Admin View Work Order/Invoice>Modify Tracking Statuses
Admin View Work Order/Invoice>View Tracking Statuses
Units of Measure are utilized in conjunction with Bid/Comp & Invoice items. This establishes a set unit of measure for each item you create and determines in what increments those items will be invoiced.
Let’s review how to set them up:
1. Go To Admin->General->Units Of Measure.
2. Clicking on Units of Measure will take you to a new screen. Click the ‘Add UOM’ button.
3. A box will appear that allows for the UOM Name and Code for the new unit of measure to be entered.
4. It will also include a dropdown selection box that will allow to indicate if it is Active, yes or no.
5. Once entered and Saved, the information will appear in list view also logging who entered the UOM.
On the General Info page of the View Work Order tab, this feature allows a vendor to report that they are unable to complete that specific work order. This will also flag the order for customer internal review. On the Application Options page of the Admin tab, there is an option to create/edit reason selections that the vendor may select from a drop down. This feature will be permissions based so that functionality may be controlled for various permission groups.
Under Admin->Groups, we will add the following permissions:
Admin section, add sub-section called “Unable To Complete” with permissions:
View Unable Options Set Up
Edit/Delete Unable Options
View Work Order->General Info section, add permission:
Enable Unable to Complete
Under Admin->General->Application Options, add a new option called “Unable To Complete”.
2. When ‘Unable To Complete’ is clicked, the following page will load. Click the ‘Add Option’ button to create a Reason Option for the dropdown on the View Work Order->General Info page.
3. When created Option is Saved, it will appear in list form. Click on an Option name to edit or make inactive.
4. Click the “Delete” symbol to remove that option.
NOTICE: YOU ARE LIMITED TO A MAXIMUM OF TEN (10) “ACTIVE” UNABLE TO COMPLETE OPTIONS AT ONE TIME.
Under the View Work Order->General Info page of a work order, when the applicable permission has been checked, it will display:
When a vendor selects a Reason option from the drop down and hits the ‘Save’ button, then subsequently marks the order Ready for Office, the order will submit as -is without meeting any specific form or photo requirements.
This will trigger the order to be flagged for review and will display an “UNABLE” flag in the Review Needed column on the Home screen. Internal customer staff can then review and determine next steps for the order:
This feature allows you to send a link of just photos, documents or both for a work order to anyone.
1. To begin, go to Home Screen and Click on a work order.
2. There are two places to share documents via a link to anyone you wish. The first is under the PCR Form section once in the View Work Order Tab.
a. Click on Share on any form you want to send to someone.
b. Select whether or not you would like photos that are flagged for this PCR form to attach to the shared link and click Share.
c. Click on Copy Link.
d. A link will populate in a box and you can copy that link.
e. Paste that link into your URL on your browser.
f. A download will commence. Click on the download once it is complete to view the form in either your browser or PDF viewer.
3. The second place to share documents is under the Photos and Documents section on the View Work Order tab.
a. Click on Download PDF and choose Save to Documents. Select either 2x2, 3x3, or 4x4.
b. A download will appear. Once it does, click on the Photos/Documents tab.
c. The screen will refresh and there will now be a document containing your photos. Click the blue up arrow and then when the pop up appears asking to share file, click Ok.
d. A link will appear below the blue up arrow. Copy that link.
e. Paste that link into your browser.
f. A download will commence. Click on the download once it is complete to view the photos in either your browser or PDF viewer.
In order to utilize this feature, the following Group permissions must be enabled:
Go To Admin > Groups:
View Work Order > PCR Form > Share Form Link
View Work Order > Photo/File Uploads > Create Shared Document Links
View Work Order > Photo/File Uploads > Delete Shared Document Links
You now have the ability to complete several types of invoice alterations in bulk using the Actions button on the Home screen.
1. Check mark the orders for which you wish to complete bulk invoice actions.
2. Click the Actions button.
3. Click “Alter Invoice” from the list of options and to display the list of actions available:
a. Add/Alter Line Items
b. Change Quantity
c. Alter Price
d. Alter Total
e. Mark Invoice as Complete
All changes can either append what is already present or replace it entirely, if altering line items.
4. Click the ‘Go’ button to initiate changes.
In order to utilize this feature, the following Group permissions must be enabled:
Go To Admin > Groups:
Home > Home > Append Items to Invoice
This new feature has been created for all vendors to notify you of when they may be unavailable to accept new assignments for a period time for situations related to vacation, personal matters, excess workload, etc.
First, to enable this feature for your vendor network, your PPW Admin must check the appropriate box in the Group setting used for your vendors. The steps are as follows:
1. Click the Admin tab and then Groups
2. From the list of Groups, click the one that corresponds with your vendor network.
3. Scroll down to the Home section and check the box for “Submit Vendor Availability”. DO NOT check the “Acknowledge Vendor Availability”. This should only be checked for the Group(s) you choose to allow to authorize such as managers, admins, etc.
4. To identify who within your organization is notified when a vendor submits, you will also need to provide which emails to contact. Go to Admin->Settings and then enter email address here. If multiples are to receive it, separate addresses with commas.
A vendor may report unavailability by following these steps:
Click their name in the upper right to the left of the Logout Button:
2. To add a notification, they click the ’Add Availability Notification’ button:
3. Select the appropriate Starting and Returning dates and then click ‘Save Request’:
The request is submitted to the appropriate individuals for review and is listed here on the vendor’s screen as Pending:
The Vendor Availability feature allows the office team to be aware of any time a vendor may be unavailable. Depending on the settings of the Group, a user can either view only or acknowledge availability notifications. Access to Vendor Availability happens on the Home Screen button:
1. Clicking the ‘Vendor Availability’ button opens a pop-up window allowing to view submitted and pending notifications:
In order to acknowledge notifications, the user’s Group must have authorization to do so. To set group permissions:
1. Select Admin > Groups > appropriate Group Name.
2. Scroll down to the Home section and, unlike the Vendor permissions, check the box for “Acknowledge Vendor Availability”. DO NOT check the “Submit Vendor Availability”.
Now that permissions are set for the appropriate Group(s), the users can review and approve/deny notifications. To do so:
1. From the Home screen, click the ‘Vendor Availability’ button.
2. Check vendor coverage for the areas the vendor submitting notification handles by using the ‘Zip Lookup’ button.
3. Enter a “Response” if one is appropriate.
4. Select “Acknowledged” from the Status drop down if there is other coverage available during this time.
5. Click the ‘Save’ button.
Below are directions on how to add PPW login functionality to your company website.
<script type=”text/javascript”>
ppwLoginForm();
</script>
You can pass 2 variables to the ppwLoginForm() function, background color and text color. As hex values for example, you can also leave them blank and go with the defaults.
ppwLoginForm(‘#ffffff’, #000000′);
For any other questions, please consult with the PPW Support Team.
8. To Delete a Line Item Category, click the button to the far right.
5. Click the ‘Save’ button to save this rule. You can always delete later if necessary, by clicking the button to the far right.
<script type=”text/javascript” src=””></script>
· HOA Identifier
· Recurring Grass Cuts Active
· HOA Name
· Pool On Site?
· HOA Phone No.
· Sump Pump on site?
· Geocode Info
· Sump Pump Operational
· Stop Work Date
· First Inspection
· Stop Work Reason
· Lock Change Date
· Investor Case #
· Last Grass Cut Date
· Current Occupancy Status
· Winterized
· Published Occupancy Date
· Foreclosure Sale Date
· VPS Securing Code
· Date Loan Fell out of ICC
· Last Inspected Date
· Latest ICC Date
· Inspection Cycle
· Extension Approval Date
· Lot Size