Loading...
Loading...
Loading...
Loading...
Loading...
Loading...
Loading...
Loading...
Loading...
Loading...
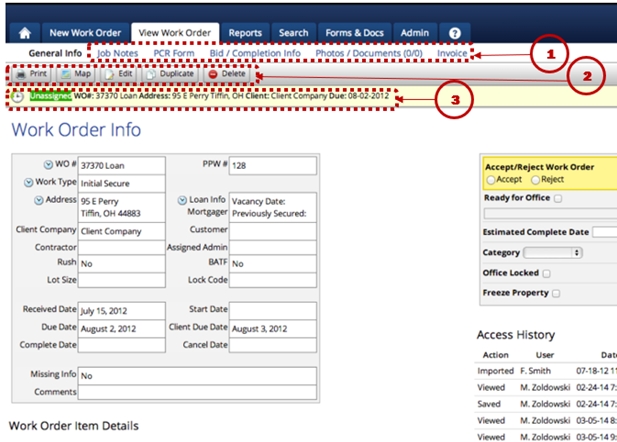
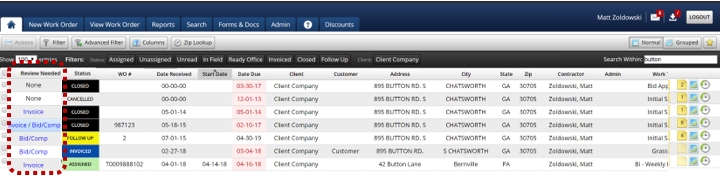
This tab will allow you to drill down into various parts of a specific work order.
To access a WO, simply click on the appropriate data line on the Home Page.
1. The WO will be automatically displayed under the View Work Order tab. Directly below will be a header with five (5) tabs used to enter various types of information into the WO:
Job Notes
PCR Form
Bid/Completion Info.
Photo/Documents (0/0)
Invoice
2. There are also five (5) self-explanatory Action Buttons: Print, Map, Edit, Duplicate, Delete. 3. Below the action buttons the current Status, ID Number, Address, and Due Date of the WOs.
It is useful to understand the information presented in the Work Order Info display and work backwards into the control Action Buttons and 5 Function Tabs.
To access a Work Order, simply click on the work order from the home page of PPW and it will take you to the ‘General Info’ page of the work order.
The Work Order Info address section includes the location of the property and other pertinent identification information.
If there is a Clock Icon next to a data block:
It indicates that the information displayed has been modified. Clicking on the icon will display under the Actions Block in the right-hand corner and it will show you the old value, the name of the person who modified the data block, and the date and time the data block was modified.
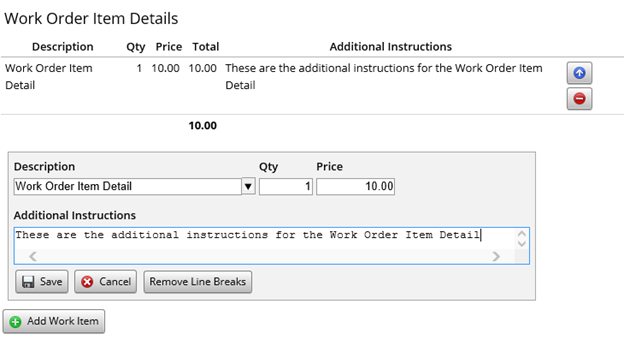
The description of the work to be performed at the property will be displayed in this section. The information is automatically populated when the Work Order is imported from the client. This section can be modified with customized Auto Work Details, which will be covered in the Admin section. To edit this information, simply click on the information to be modified, and the edit screen will be displayed.
Pricing Information: When work is imported, some clients include pricing information in the detail section. There are three options:
1. Do nothing and allow the contractor to see the prices
2. Under the Settings section of PPW there is an option that will highlight the pricing displayed here so that it can be easily reviewed before assigning it to the contractor. Hereis a link to that page.
3. Automatically remove the pricing. Here is a link to the page where this can be enabled.
If you would like to change the pricing that shows or any of the information pertaining to this work item detail, hover over the work order item detail itself and click on it, and this will allow you to edit any of the information that displays.
Access History is located on the right-hand side of the screen. This is a complete chronological listing of access to the work order. All activity associated with the Work Order will be displayed (e.g. importing, viewing, saving) along with the date and time and the individual who accessed the Work Order.
If the Work Order is accessed over 18 times, the entries will be hidden and an identification line will appear displaying the number of hidden entries associated with the Work Order. To view hidden entries, click on the Show All button.
Located at the top right corner is the Actions Block, which gives Admin the ability to "freeze the property". There are times when a contractor will go to a property and find that they cannot access it because it was sold, in bankruptcy, etc. and they can’t go back.
Even though the information is sent to the client they may issue another Work Order for the same or similar services. Upon importation of the Work Order it would be highlighted in red and identified as “Property Frozen.” If there was a duplicate, the user has the opportunity to contact the client to find out if something has changed allowing access to the property.
If there are multiple processors in the operation, each processor may individually lock a Work Order. This ensures that only that specific processor can edit the work order until it is unlocked. The Admin may override the lock, but other processors cannot make any changes. This will allow a processor time to make changes, updates, etc. without anyone else making changes to the Work Order. The Work Orders may be viewed by others, but not edited.
Category is an open field. Categories may be added by the Admin to group, sort, or manipulate Work Orders for those situations which are not normally covered by PPW. Examples include using the categories as sub-work types or sub-property statuses.
Estimated Completion Date is a communications link with the contractors. It displays the date of when the Work Order is expected to be completed. By default, it cannot be pushed past the client completion date; however, there is an option in the Admin section which will allow the Estimated Completion Date to be pushed past the due date.
When the contractor checks the Ready for Office box, the Work Order will be submitted for processing. If there is information missing which is required, a red box will appear above the Ready for Office line identifying what is missing from the Work Order. The contractor can then go back into the Work Order and complete the missing areas. The Work Order cannot be submitted for processing with required information missing.
QC Tools: Will allow you to review results from the field and perform other functions. See the 'QC Tools' page in this section.
Print: Selecting Print saves the Work Order to the desktop in a .pdf format for printing at a later time.
Map: The Map function locates the property on a map of the U.S.
Edit: The Edit function allows modification to the Header information of the Work Order. It also allows the user the ability to mark information by checking the Missing info box and entering what is missing or what needs to be changed. This will change the Status to Follow Up and send an email to the contractor. There is also an area for additional Comments to be sent through an email when the editing is finished and the Save function is activated.
Duplicate: Selecting Duplicate creates a new Work Order for the property being serviced.
Delete: Removes the Work Order from the system. When clicking Delete the system will generate a warning message in a bold box: “This will delete the report and all of the information that is associated with it. Do you wish to remove this record?” The user can then select “OK” or “Cancel.”
Auto Assign Info: If using the Auto Assign Advanced feature (which is covered in more depth here) clicking this button will advise which contractor should be assigned to this work order
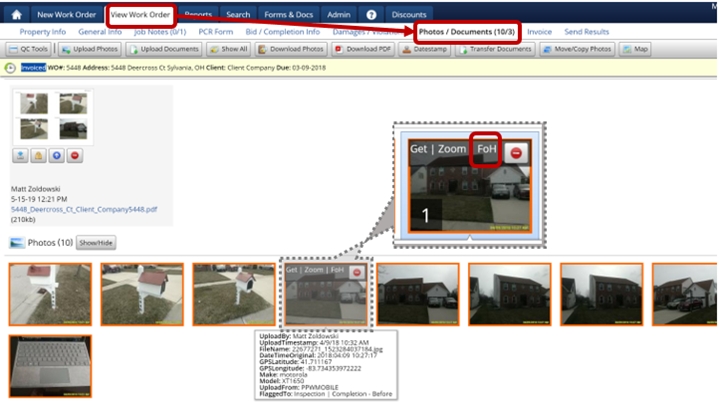
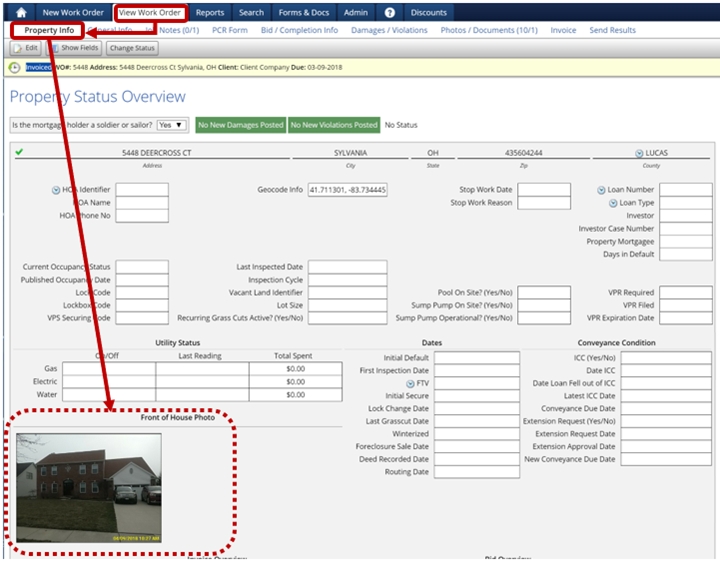
This group permission option will allow office staff/admins to flag a photo as the front of house which will then display it in various locations.
For clients with imports who will send the Front of House (FoH) photo, it will be displayed even if the group permission option has not been activated.
GOTO Admin > Groups:
View Work Order>Photo/File Uploads>Set Property Front of House (FOH) Photo
Once the permission is activated, the user will have an additional option when viewing a photo. Along with the ‘Get’ and ‘Zoom’ functions, the user will see the ‘FoH’ option. Clicking this option will flag that photo as the Front of House photo.
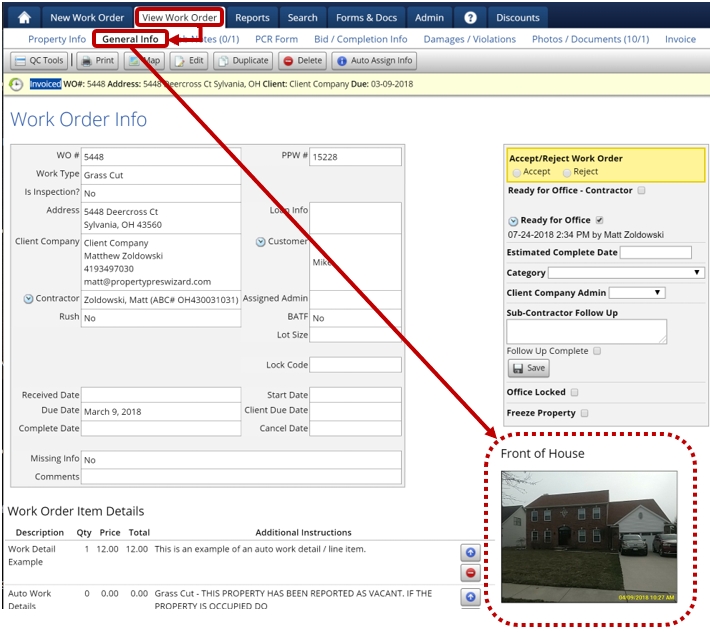
Once a photo has been marked as ‘FoH’ OR has been imported from a client that has sent it, the image will be displayed here on the General Info page of the View Work Order tab.
This view is only available to Premium Package customers.
For Premium Package users, the photo which has been marked as ‘FoH’ OR has been imported from a client that has sent it, the image will be displayed here on the Property Info page of the View Work Order tab.
The Job Notes tab allows you or your vendors to send messages back and forth, or to make a note of something regarding this particular work order or the property itself.
The Job Notes tab allows you or your vendors to send messages back and forth, or to make a note of something regarding this particular work order or the property itself.
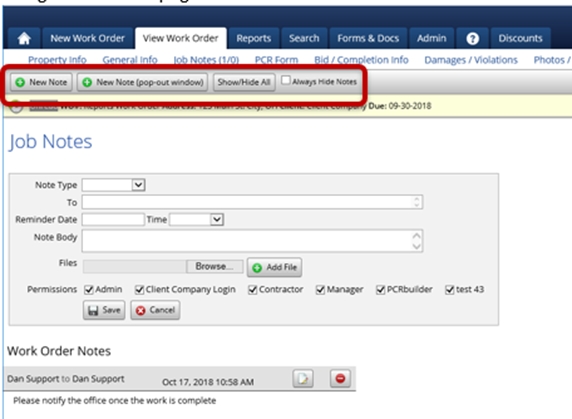
These notes are also visible on the home screen. The number of Work Order notes and Property notes is displayed next to the Job Notes inside the parentheses. When the cursor is placed over Job Notes (0/0), The Work Order Notes and Property Notes associated with this Work Order will be displayed. This is the major communications Tab. When selected, the system will display:
● New Note
● New Note (pop-out window)
● Show/Hide All
● Always Hide Notes
Buttons ‘New Note’ and ‘New Note (pop out window)’ will allow you add a new job note to the work order, the only difference is that New Note (pop out window) will open a new window to enter the job note instead of it being on the same page.
“Show/hide All” will minimize or display all the job notes on this order. This can be useful if there are many notes on the order, you will be able to click this button and it would ‘Hide’ the notes and you would be able to click on the ones you want to see.
If “Always Hide Notes” is checked, then the notes will always be minimized when you open the job notes of the work order and you will have to click on the notes to view them.
There are three applications for Job Notes:
Property Notes
Work Order Notes
Reminder Date
Property Notes stay with the property and repopulate every time a new WO is received for that property such as an address correction, directions, or warnings. Any information which the contractor may need each time they visit the property. Anytime a Property Note is needed, simply type the note into the message box, add files, adjust permissions and save. The note will automatically attach to any new work orders for that property and be displayed in the Property Note section and on the Home Page.
Work Order Notes are specific to the work order. To send a note to someone in the system, simply insert their name. If Admin wants to message a client, enter their email, write the note, attach any files necessary, choose permissions, and save. PPW will automatically send the message. When the client responds, it will post in the Work Order Note and also be sent to the sender’s email in the process providing a record of reference to the communication. This will save the contractor time by eliminating the need to continuously check the system. Likewise, it will save Admin time by attaching to the work order and not having to look through emails to find the message and response. Work Order notes may also be viewed by placing the cursor over the Work Order Note Icon on the Home Screen.
The last feature in Work Order Notes provides the Admin with a convenient method of sending out work order reminders. The Admin will insert the date and time to be transmitted, enter the note, and when the date and time arrive PPW will automatically send the note to the addressee.
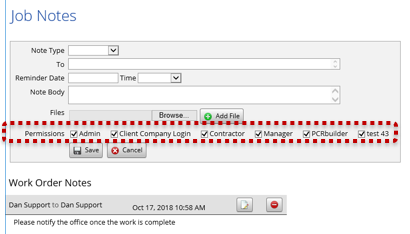
When entering a note, you can also set up the permissions of which groups would be able to see a job note. If you do not want a certain group to see the particular job note you are entering, simply uncheck the group before saving the job note and that group will not be able to see this job note.
This feature will allow you to more efficiently review results before submitting to your clients. Let’s take a closer look.
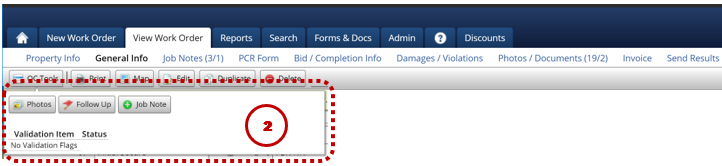
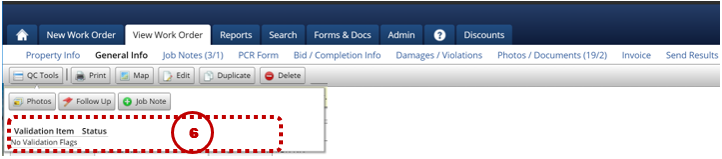
1. To begin, click on the ‘QC Tools’ button of an order that has been returned from the field: This button is visible on all pages except Property Info and Damages/Violations.
2. When clicked, the following box appears:
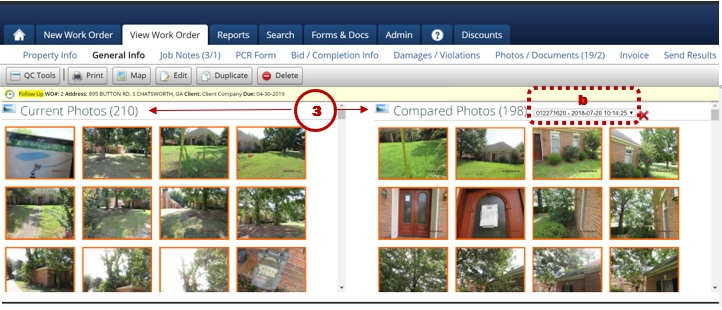
3. Click the ‘Photos’ button to see the current photos on the left and the previous photos, if available, on the right.
a. NOTE: the last photos of the same work type will appear. If none are available, it will display the most recent order’s photos.
b. You can also choose to display any other work order’s photos by selecting the work order from the drop down.
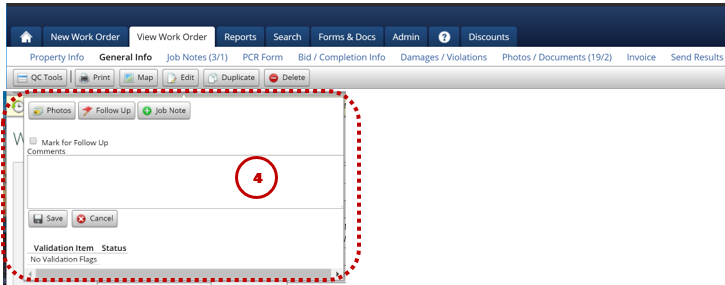
4. Click the ‘Follow Up’ button send a follow up notice to the vendor.
5. Click the ‘Job Note’ button and a pop-up window will appear that will allow you to enter a work order or property note without have to go to the Job Notes page.
6. Finally, once you have established specific PCR Validation Rules and general Validation Rules (see these sections of the manual), if an order that has been flagged for a specific validation will have the issue listed here.
You will also be able to see them on the Home page if you are displaying the “Review Needed” column.
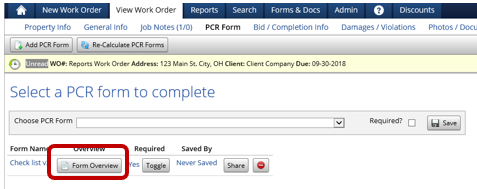
The Property Condition Report (PCR) is basically a questionnaire which can be created in the system.
There are several standard PCR forms available from which to choose. Questions can also be added to the standard PCR forms. Adding to or creating a PCR form provides the Admin the ability to make rules such as: which WOs they apply to, or which clients, etc. If the Admin makes this a required form, the contractor will not be able to submit their work until they have filled out the required PCR Form.
To access the form simply left click on the appropriate form, if the contractor has a smartphone or tablet, they can fill out the form at the property. If the contractor is going to be in an area without known internet access at the work site, they can print a PDF version and take it with them.
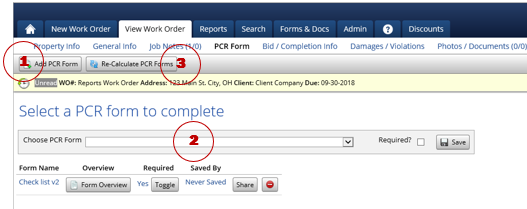
Click the ‘Add PCR Form’ button which will bring up a drop-down menu that will display all of the PCR forms in your system.
To add a PCR form, simply select the form from the list, choose whether or not to make the form required and then click the ‘Save’ button, this PCR form will now be added to this work order.
The ‘Re-Calculate PCR Forms’ button will allow you to recalculate your PCR forms. What this means is that if you have created a new PCR form and have added filters to that PCR form in the Admin section, you would then click the ‘Re-Calculate PCR Forms’ button and the PCR form will automatically be added to this order.
To fill out the Form from the web simply click on the 'Form Name' and a new tab will open allowing you to fill out the form. To answer the question, simply select or type in the answer and the form will automatically save that answer, there is no save button to press as the system saves the form as you answer questions.
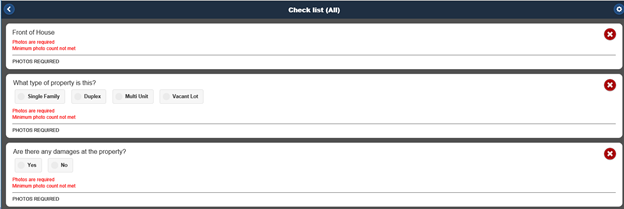
If the photo requirement has not been met, you will see an error message below the question.
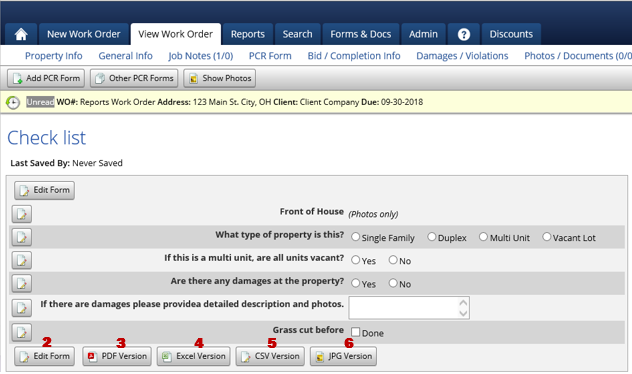
After the form is filled out you can close the window where you answered the questions and then to review the form, you can click on the ‘Form Overview’ and this will allow you to do a few things.
From the Form Overview page, you will be able to:
Review the answers to the form.
Edit the Form, which will take you to where you can answer the questions.
Print a PDF version of the form.
Print an Excel version of the form.
Print a CSV version of the form.
Print a JPG version of the form.
Going back to the main portion of the PCR Form page you will also be able to toggle whether or not this form is required, if the form is required, the order will not be able to be made Ready for Office until all of the questions are answered. You will also be able to see the last user that saved the PCR form along with the date and time it was saved.
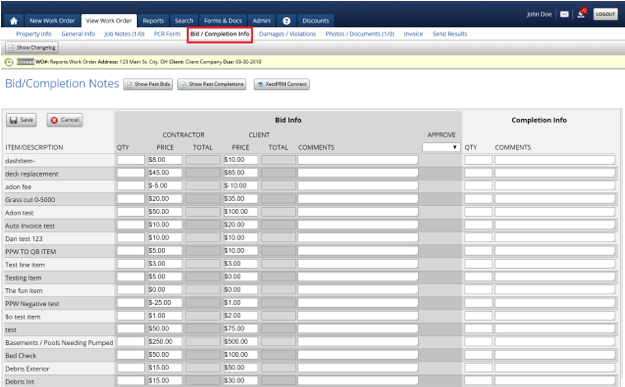
The Bid / Completion Info tab of PPW is where Bid items and completion items can be entered.
The items that show on this page can be set up under the ‘Bid/Comp & Invoice Items’ portion of PPW which is under the ‘Admin’ tab.
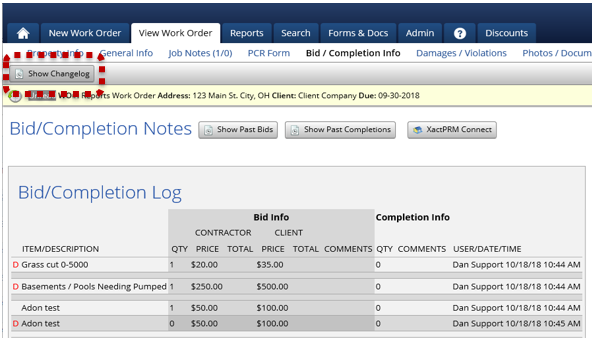
On the Bid / Completion Info page there is a ‘Show Changelog’ button at the top of this page, clicking this will allow you to see the changes that have been made to the bid and completions on this particular work order.
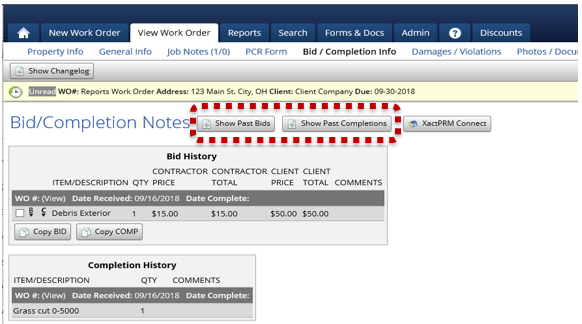
Next on this page are 2 buttons labeled ‘Show Past Bids’ and ‘Show Past Completions’ these buttons have very similar functions. Once clicked, these buttons will show you any past bids or completions for this property. If a bid or completion was added to another work order for the same property, clicking these buttons would display those bids or completions.
Also, when viewing the past bids, you can copy them to the present work order’s bid or completion items by clicking the check box next to the appropriate item and then clicking the ‘Copy Bid’ button to copy the bid to this work order or ‘Copy Comp’ to copy this item as a completion on this order.
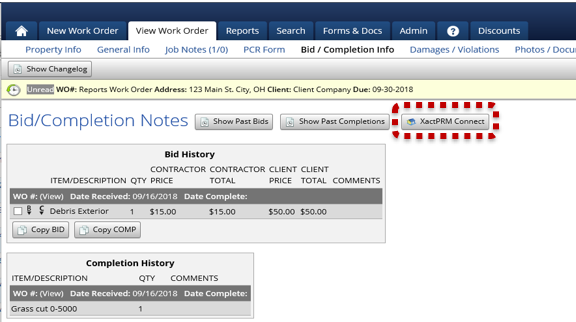
The ‘XactPRM Connect’ button will allow the user to connect this work order to a project in XactPRM. Also, any items added to this order in XactPRM will allow you to copy them to the bid/completions tab of the work order.
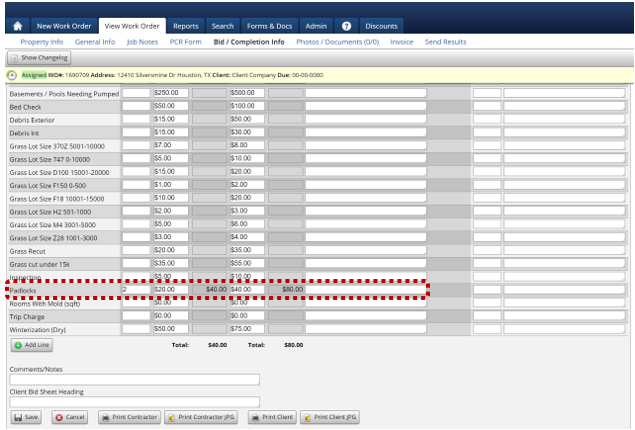
To enter a bid item into PPW, all you have to do is enter a quantity for the bid item, the appropriate pricing for the contractor and the client and if needed, comments can be added.
After a bid item has been saved, and Admin can view the page and Approve or Deny the bid.
To enter a completion item, simply enter a quantity under the Completion Info Section, and if needed, comments can be added.
After a bid item has been saved, and Admin can view the page and Approve or Deny the bid.
To enter a completion item, simply enter a quantity under the Completion Info Section, and if needed, comments can be added.
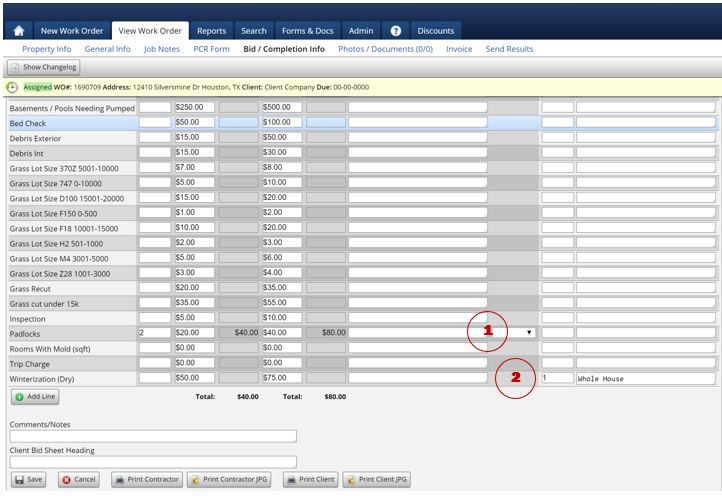
If the correct bid/completion item is not appearing on the screen, or you need to create a one-time-use bid or completion item, scroll down to the bottom of the page and click the ‘Add Line’ button.
After clicking ‘Add Line’ a drop-down menu will appear that will have additional items that were set up in the Admin tab. If you still do not see the appropriate item, there is an ‘*Other’ option. If you select ‘*Other’ this will allow to manually add a one-time-use bid or completion item, after selecting other, type in what you want to name the bid or completion. After entering the name, you will need to enter the appropriate quantity and prices.
Once everything looks good on this screen, click ‘Save.’ If there are any errors, they will be highlighted in red, simply correct the issue and then click ‘Save’ again.
You can also add any generic Comments/Notes to the bottom of the bid/comp page as well. if applicable.
Lastly, you can enter a Client Bid Sheet Heading that will show on the printed version of the clients bid sheet, if applicable.
After saving, you can Print the contractor and/or client version of the bid sheet to a PDF or JPG.
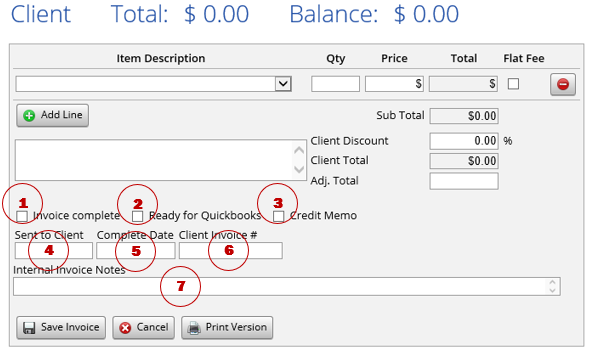
The invoice tab of PPW is where contractors can enter their invoice and you can invoice your clients.
The items that show in both the contractor’s and client invoices are pulled from the Bid/Comp & Invoice items section of the Admin tab.
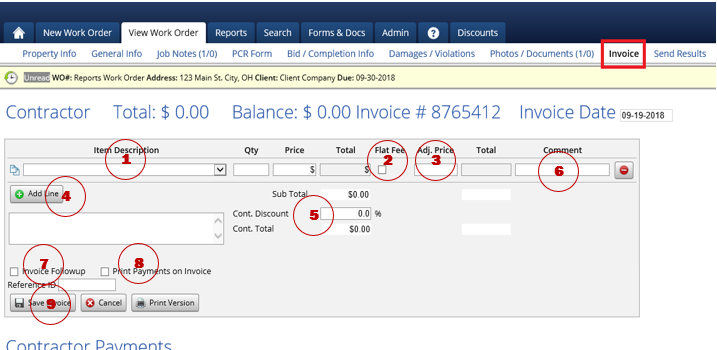
To select an item for the contractor invoice, simply click on the dropdown menu and select the appropriate item and enter a quantity. The price will automatically fill in.
The Flat Fee option will enter the item as a flat fee, meaning that it will ignore any discounts present.
The Adj. price will allow you enter an adjusted price which will override the Total. The comment field will allow you to enter any comments if needed.
If you need to add multiple invoice items to the invoice simply click the ‘Add Line’ button.
a. If you need to enter a custom or one-time use invoice item, simply click the dropdown menu and select ‘*Other’. After doing this you will be able to type in an invoice name and you will also need to enter a Qty. and price.
Once your items have been entered you will see a preview of the Subtotal along with the total after any discounts are applied.
There is also a location for comments/notes as well.
You can mark the Invoice as follow up, meaning that a correction is needed by the contractor.
Also, there is an option to print the payments when printing the contractor version of the invoice.
To Save the Invoice Click the ‘Save Invoice’ button and when you Save the contractor’s invoice you may be asked the following questions:
Invoice Complete is not checked, would you like to check it now?
If you say YES, the order will move to the invoiced status If you say NO, the order will stay in the current status
Invoice Date is not the current date, would you like to make it the current date?
If you say YES, the invoice date will change to today's date. If you say NO the invoice date will not change.
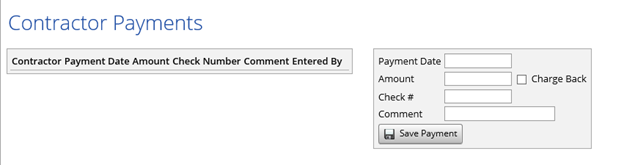
To enter a contractor payment all you will need to do is enter a Payment Date and an Amount.
Also, if applicable, you can enter a Check # and a comment.
You will want to follow the same steps as you did for the Contractors invoice with the following additional options:
Invoice Complete - This allows for marking the invoice of the order complete & moving it to the invoice status. You will also be prompted to mark this when you click ‘Save’.
Ready for QuickBooks - This will allow you to mark the order as Ready For QuickBooks. (for more info see the QuickBooks portion of the manual)
Credit Memo - This will allow you enter a credit memo on this order.
Sent to Client - This is the date that you sent the order to the client.
Complete Date - This is the date the order was marked as complete.
Client Invoice # - This is the client Invoice #.
Internal Invoice Notes - This is a place for any internal notes about the invoice.
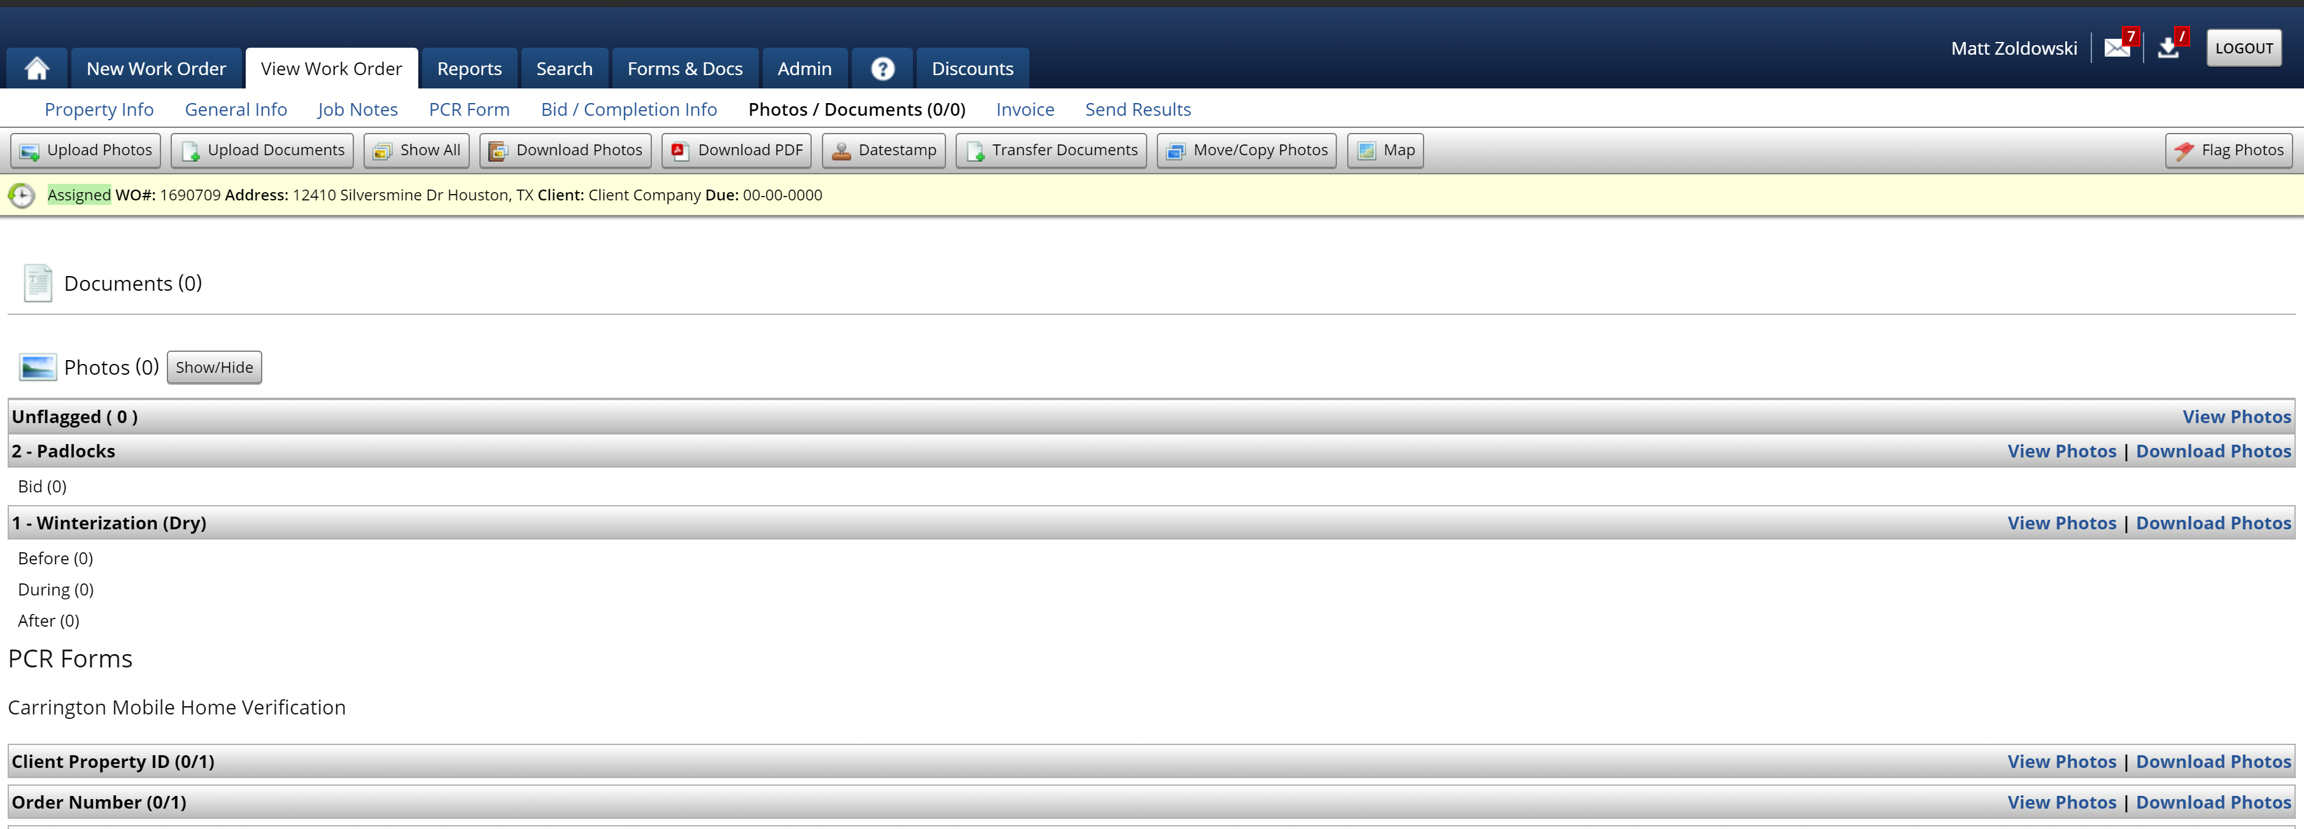
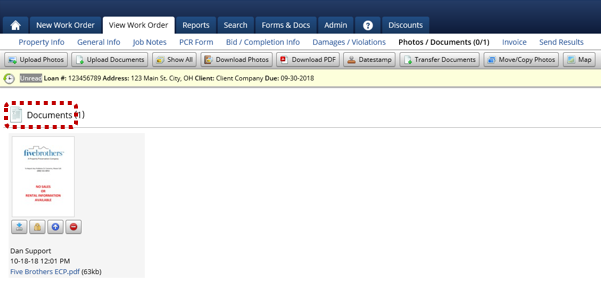
The Photos/Documents tab of PPW is where you can upload/view any photos or documents that were added to this work order.
The buttons in the menu bar are as follows:
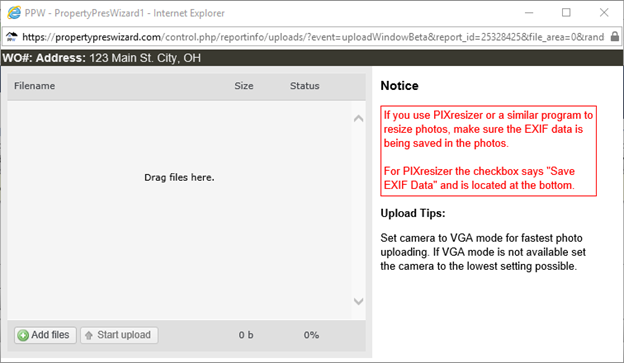
This will allow you to upload photos from your computer, to do so, click on the button and then you can either drag the photos from your PC to where it says ‘Drag Files Here’ or you can click the ‘Add Files’ button and use the file explorer to locate and add the files from here. Once all of the photos are in the screen that says ‘Drag Files Here’ simply click the ‘Start Upload’ button. After the photos are uploaded, simply ‘X’ out of this popup window, the page in PPW will refresh and your photos will now be there.
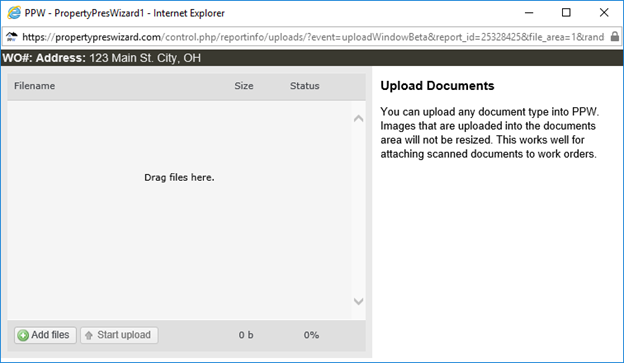
This will allow you to upload Documents from your computer, to do so, click on the button and then you can either drag the Documents from your Computer to where it says ‘Drag Files Here’ or you can click the ‘Add Files’ button and use the file explorer to locate and add the files from here. Once all of the Documents are in the screen that says ‘Drag Files Here’ simply click the ‘Start Upload’ button. After the Documents are uploaded, simply ‘X’ out of this popup window, the page in PPW will refresh and your Documents will now be there.
Clicking this button will display all of the photos on this page.
Clicking this button will allow the user to download the photos to their computer.
When you click this button, you will have 3 options:
1. All - This will download all of the photos to a zip file to your computer
2. All (Queue) - This will prepare a download that will appear in your job queue, when you are ready to download the photos, simply go to the job queue and click download and this will download a zip file of all of the photos to your computer.
3. Selected - This will download only the photos you have selected to a zip file on your computer.
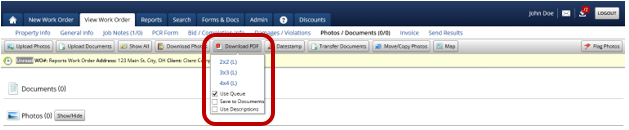
When clicking on this you will have a few options, you can choose for the photos to be in:
a 2x2 pattern on the PDF (4 photos per page)
a 3x3 pattern on the PDF (9 photos per page)
a 4x4 pattern on the PDF (16 photos per page)
Use Queue, if this is checked, the PDF will prepare for download to your job queue.
Save to Documents, if this is a checked the resulting PDF will be added as a document to the work order.
Use Descriptions: When printed the description of the photos will be added.
If the photos do not have a date stamp currently, then you can add a date stamp using this feature. Do note that if the photos already have a date stamp, this feature WILL NOT alter the current date stamp.
To add the date stamp you can manually enter the date to be printed, if you want the time to be printed, you will want to check the box that says ‘Print time’ and you will want to select a time in the Modify time box, set it either to be AM or PM and set a Length of how long it took to take the photos.
Alternatively, if the photos have EXIF data you can check the box that reads ‘Print Date/Time from Exif data’, and the EXIF data will be added as the date and time stamp to the photos.
‘Print Description’ will add the description to the downloaded photo and ‘Don’t Print Date/Time’ will download the photos without a date stamp. After you have set the date/time stamp up how you want it simply download the photos and the downloaded version of the photos will have the selected date/time stamp on them.
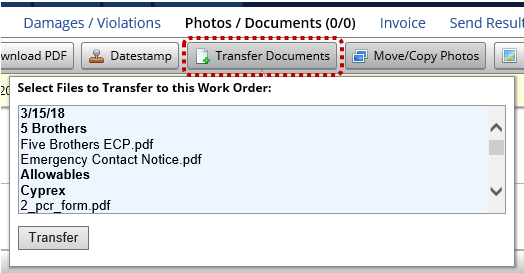
This will allow you to quickly add documents from the 'Forms & Docs' tab of PPW:
To transfer a document, simply select it from the list and click the ‘Transfer’ button and this document will be added to the documents portion of the work order.
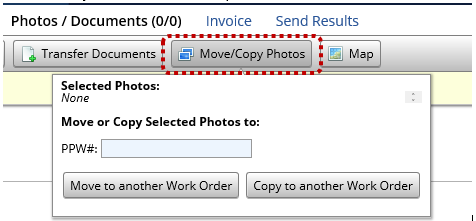
This will allow you to move or copy photos from one work order to another.
To move/copy photos to another work order, go to the order that you want to move the photos to and copy or make a note of the PPW# of that order. Then go to the order that has the photos, select the photos you want to move, click the ‘Move or Copy selected photos to’ button and paste or enter the PPW# of the order you want to move the photos to.
'Move to Another Work Order' Button: This option will remove the photos from this order and add them to another order, this would be used if photos were accidentally taken on the wrong work order and you did not need the photos on this order.
'Copy to Another Work Order' Button: This option will keep the photos on the current order and make a copy of them on the order that you entered the PPW# of.
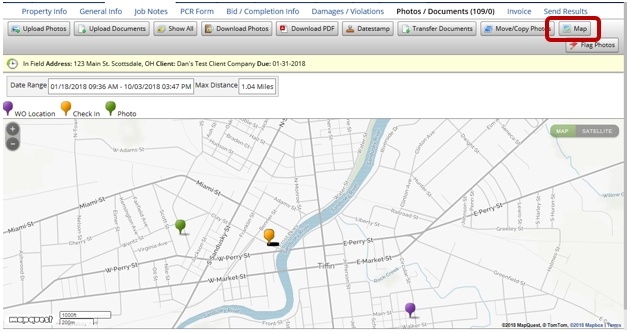
The Map will show you the location of the following:
The Location of the work order (represented by the purple pin)
Where the check-in was performed (represented by the Orange Pin)
Where the photos were taken (represented by a Green Pin)
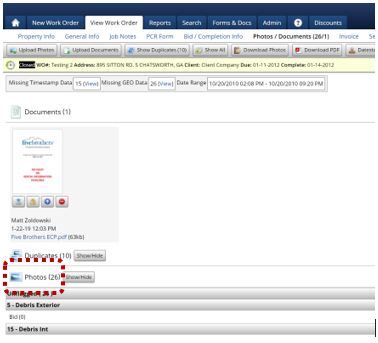
The 'Documents' section of the Photos/Documents tab will display any documents that have been uploaded or added to the work order. On the document that was uploaded you can:
Download it to your computer.
Edit which groups can see the document by clicking on the padlock icon
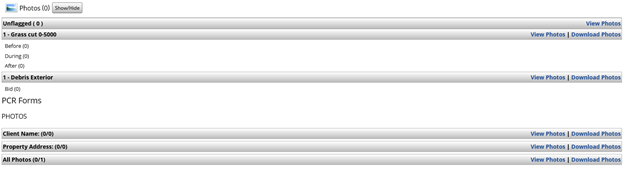
The Photos section of the work order is where you can view the photos that have been added to the work order.
To see all of the photos on the work order, simply click the ‘Show/Hide’ button and it will display all of the photos.
If the photo is outlined in Orange, it means that it is flagged to a flagging option.
To see what it is flagged to simply hover over it and it will display the information about the photo.
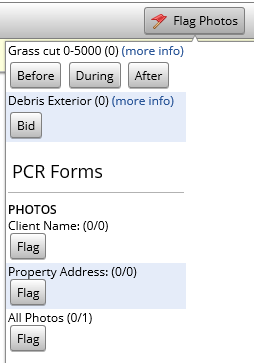
On this page it will display the flagging options. The flagging options will be pulled from:
○ Bid items on the Bid/Completion tab
○ Completion Items on the Bid/Completion tab
○ PCR Form questions that require photos
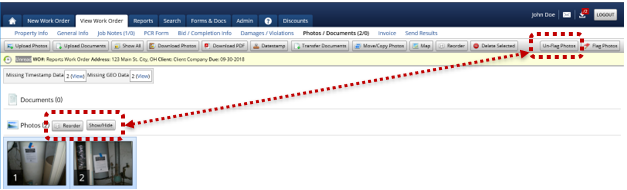
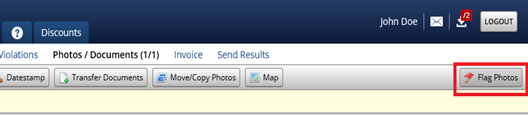
Click on the photo(s) that you want to flag, and click on the ‘Flag Photos’ button in the upper right-hand corner:
After you click 'Flag Photos', you will then be able to choose to what you wish to flag them:
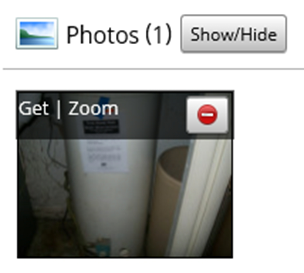
You can hover over a photo ann then you are provided the following options:
'Get' to download that specific photo.
'Zoom' to view a zoomed in version of the photo.
'Delete' to delete that specific photo.
If you have any photos selected, you will see the following additional buttons:
'Reorder' - This will all you to change the order of the photos in PPW.
'Delete Selected' - This will allow you to delete multiple photos at once.
'Un-Flag Photos' - This will allow you to unflag the photos.
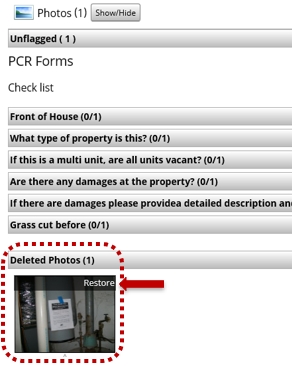
Lastly, if photos have been deleted, you will see them at the bottom of the screen. You can un-delete them by hovering over the photo and clicking on ‘Restore.’
When importing orders via an auto import, depending on the client, you are able to send the results back to them.
To Utilize this feature simply click on the ‘Send Results’ tab.
Below we detail how to send results back if importing from another company that uses PPW. For orders imported from other non-PPW sources, the process may be different. Please consult the Integrations section of the manual.
When Sending the Results, you can:
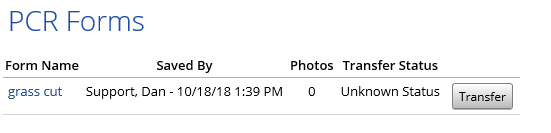
Fill out and transfer the client’s PCR Form back to them by clicking on the ‘Transfer’ button next to PCR form.
Send your ‘Bid/Comp’ items by selecting the client’s version of your bid/comp item in the dropdown box, selecting whether or not you want to send that bid/completion by checking the appropriate box and then clicking ‘Transfer Bid / Completion’.
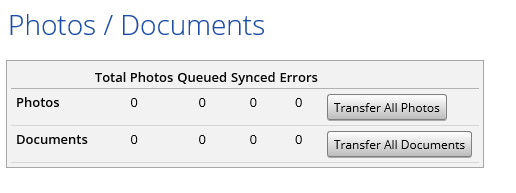
Send all of your Photos/Documents to the client, this will also send your flags as well, but you must send what the photos was flagged to for this to transfer. Ie You flagged a photo to a PCR form question, in order for that photo to be flagged correctly, you must transfer the PCR form as well.
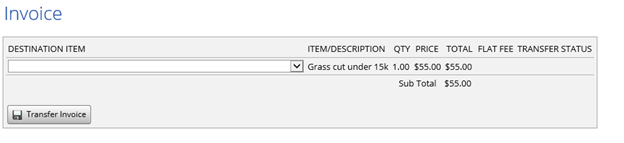
Send the client your Invoice, after you invoice the client on the invoice page of PPW you can select the destination item from the dropdown and transfer your invoice.
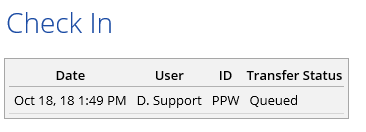
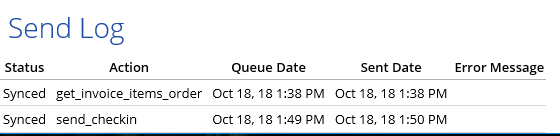
To send your Check-in when a check-in is completed,on an order that was imported from another PPW account, the check-in is automatically sent back to the client. In the following screenshot you can see that the check-in is queued, which means it is in the process of being sent to the client.
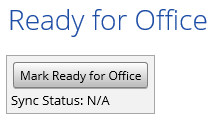
Mark the order as Ready for Office in the client’s system. By clicking this button, you will mark the order as Ready for Office in the client's system.
At the bottom of the Send Results Page is the ‘Send Log’ this will show you the data that has been synced, queued, or if there were any errors. If there is an error message, it will display in the error message column: